|
|
| (13 intermediate revisions by 2 users not shown) |
| Line 40: |
Line 40: |
| | *[[Using#Creating_Reports|Creating Reports]] | | *[[Using#Creating_Reports|Creating Reports]] |
| | | | |
| | + | <div id="Setting_Up_Your_Contact_Center"></div> |
| | ===Creating and Managing Users=== | | ===Creating and Managing Users=== |
| | | | |
| Line 59: |
Line 60: |
| | Creating new Call Center users requires giving new or existing Salesforce users an Administrator or Agent role in VCC for Salesforce. | | Creating new Call Center users requires giving new or existing Salesforce users an Administrator or Agent role in VCC for Salesforce. |
| | | | |
| − | A Salesforce system administrator needs to create the first administrator user in VCC for Salesforce; after that, any VCC for Salesforce user with an Administrator role can create other users. For an explanation of the concepts used here, see the [[CallCenterTerminology|Glossary]] section. | + | A Salesforce system administrator needs to create the first administrator user in VCC for Salesforce; after that, any VCC for Salesforce user with an Administrator role can create other users. |
| | | | |
| − | {{NoteFormat|Setting up your contact center requires creating a '''Genesys Connection''' user who establishes a connection giving the VCC for Salesforce app access to the Salesforce data. For more information about this one-time task, see the [[SFAdministration|Enabling Data Lookup]] topic.}} | + | {{NoteFormat|Setting up your contact center requires creating a '''Genesys Connection''' user who establishes a connection giving the VCC for Salesforce app access to the Salesforce data. |
| | | | |
| | ====Adding Call Center Users==== | | ====Adding Call Center Users==== |
| Line 69: |
Line 70: |
| | #From the Salesforce '''Setup''' tab, click '''Build''' > '''Customize''' > '''Call Center''' > '''Manage Call Centers''' to open up the '''All Users''' screen. | | #From the Salesforce '''Setup''' tab, click '''Build''' > '''Customize''' > '''Call Center''' > '''Manage Call Centers''' to open up the '''All Users''' screen. |
| | #If you see the '''Introducing Salesforce CRM Call Center''' splash screen, instead of the '''All Call Centers''' screen, click '''Continue'''. | | #If you see the '''Introducing Salesforce CRM Call Center''' splash screen, instead of the '''All Call Centers''' screen, click '''Continue'''. |
| − | #Click on '''Genesys Cloud Call Center''' to open the '''Genesys Cloud Call Center''' screen. | + | #Click on '''Genesys Engage cloud Call Center''' to open the '''Genesys Engage cloud Call Center''' screen. |
| | #Click '''Manage Call Center Users''' to open the '''Manage Users''' screen. | | #Click '''Manage Call Center Users''' to open the '''Manage Users''' screen. |
| | #On the '''Manage Users''' screen, click '''Add More Users''' to open the '''Search for New Users''' screen. | | #On the '''Manage Users''' screen, click '''Add More Users''' to open the '''Search for New Users''' screen. |
| Line 154: |
Line 155: |
| | | | |
| | <ol> | | <ol> |
| − | <li>On the '''Users''' page, click the [[CallCenterTerminology#Flagging|flag]] icon next to every user you want to edit. This action creates a '''Flagged''' dialog box below the '''Users''' list. | + | <li>On the '''Users''' page, click the flag icon next to every user you want to edit. This action creates a '''Flagged''' dialog box below the '''Users''' list. |
| | </li> | | </li> |
| | <li>In the '''Flagged''' dialog box, click '''Edit''' and choose one of the following: | | <li>In the '''Flagged''' dialog box, click '''Edit''' and choose one of the following: |
| Line 211: |
Line 212: |
| | ===Routing Calls=== | | ===Routing Calls=== |
| | | | |
| − | On the '''Routing''' page, you can view and create call queues and associate them with routing templates. At first, you have a single queue, which is the entry point for your contact center where all of the calls arrive. You can then create virtual queues for routing purposes that are not associated with a phone number. All queues have a routing template that dictates the routing logic. Each template consists of parameters that define a particular step in the call — for example, two of the parameters are the greeting message and the skill where the call is routed. For instructions on how to configure a routing template and its parameters, see the [[Using#Configuring_your_routing_template|Configuring your routing template]] section. | + | On the '''Routing''' page, you can view and create call queues and associate them with routing templates. At first, you have a single queue, which is the entry point for your contact center where all of the calls arrive. You can then create virtual queues for routing purposes that are not associated with a phone number. All queues have a routing template that dictates the routing logic. Each template consists of parameters that define a particular step in the call — for example, two of the parameters are the greeting message and the skill where the call is routed. |
| − | | |
| | | | |
| | <toggledisplay linkstyle font-size:larger showtext="[+] Click to expand" hidetext="[-] Click to close"> | | <toggledisplay linkstyle font-size:larger showtext="[+] Click to expand" hidetext="[-] Click to close"> |
| Line 230: |
Line 230: |
| | #'''Play Greeting, Segment Caller, and Route to Specified Destination'''<br>The caller hears a greeting and a request to provide information based on the call segmentation parameter that you configure. The call is routed according to the caller's entry. | | #'''Play Greeting, Segment Caller, and Route to Specified Destination'''<br>The caller hears a greeting and a request to provide information based on the call segmentation parameter that you configure. The call is routed according to the caller's entry. |
| | | | |
| − | For information about the audio recordings used in each template, see the [[Media#Managing_Call_Center_Media|Managing Call Center Media]] section. For more information about templates, see the [[Using#Configuring_your_routing_template|Configuring your routing template]] section. | + | For information about the audio recordings used in each template, see the [[Using#Creating_and_Uploading_Recordings|media]] section. For more information about templates, see the [[Using#Configuring_your_routing_template|Configuring your routing template]] section. |
| | | | |
| | ====Configuring your routing template==== | | ====Configuring your routing template==== |
| | | | |
| − | Before getting started, make sure you have [[Skills#Managing_skills|defined the skills]] or [[RoutingCalls#Reviewing_the_routing_templates|virtual queues]] where you will route calls, [[Media#Managing_Call_Center_Media|upload the audio]] that you will use, and [[RoutingCalls#Reviewing_the_routing_templates|reviewed the eight templates]] available. | + | Before getting started, make sure you have [[Using#Creating_and_Managing_Skills|defined the skills]] or [[Using#Reviewing_the_routing_templates|virtual queues]] where you will route calls, [[Using#Creating_and_Uploading_Recordings|upload the audio]] that you will use, and [[Using#Reviewing_the_routing_templates|reviewed the eight templates]] available. |
| | | | |
| | To edit or change your routing template: | | To edit or change your routing template: |
| Line 244: |
Line 244: |
| | #*'''Route Call''' — Select the appropriate recording from the '''Music While Waiting''' drop-down menu and select the skill or queue where you want the call routed. You can also select a timeout interval for unanswered calls and the queue where you want those routed — for example, if you want to route unanswered calls to voice mail, assign the '''Forward Call''' to the '''External Number''' template to a queue and route your timed out calls to that queue. | | #*'''Route Call''' — Select the appropriate recording from the '''Music While Waiting''' drop-down menu and select the skill or queue where you want the call routed. You can also select a timeout interval for unanswered calls and the queue where you want those routed — for example, if you want to route unanswered calls to voice mail, assign the '''Forward Call''' to the '''External Number''' template to a queue and route your timed out calls to that queue. |
| | #*'''Check Operation''' — This parameter defines the working hours for your organization. Your options include setting your time zone, adding holidays and selecting a corresponding '''Holiday Announcement''' recording, selecting the days of the week your business is open and a corresponding '''Closure Announcement''' recording, and selecting the working hours your business is open and a corresponding after-hours message. | | #*'''Check Operation''' — This parameter defines the working hours for your organization. Your options include setting your time zone, adding holidays and selecting a corresponding '''Holiday Announcement''' recording, selecting the days of the week your business is open and a corresponding '''Closure Announcement''' recording, and selecting the working hours your business is open and a corresponding after-hours message. |
| − | #*'''Collect Digits''' — In some templates this parameter is your offer menu. Select the appropriate recordings from the '''Menu Offer''' and '''Music While Waiting''' menus, then select the action that should occur on each digit. For digits <tt>0</tt> (zero) through <tt>9</tt> and the special characters star (<tt>*</tt>) and pound (<tt>#</tt>), you can route the call to a skill or play a specified message.<br/>In Template #3, this parameter requests caller input for call segmentation. For more information on this and similar parameters see [[RoutingCalls#Provisioning_call_segmentation|Provisioning Call Segmentation]]. | + | #*'''Collect Digits''' — In some templates this parameter is your offer menu. Select the appropriate recordings from the '''Menu Offer''' and '''Music While Waiting''' menus, then select the action that should occur on each digit. For digits <tt>0</tt> (zero) through <tt>9</tt> and the special characters star (<tt>*</tt>) and pound (<tt>#</tt>), you can route the call to a skill or play a specified message.<br/>In Template #3, this parameter requests caller input for call segmentation. For more information on this and similar parameters see [[Using#Provisioning_call_segmentation|Provisioning Call Segmentation]]. |
| | #Click '''Save''' to return to the '''Routing''' page. | | #Click '''Save''' to return to the '''Routing''' page. |
| | | | |
| Line 251: |
Line 251: |
| | ====Provisioning call segmentation==== | | ====Provisioning call segmentation==== |
| | | | |
| − | [[CallCenterTerminology#Call_Segmentation|Call segmentation]] in VCC Salesforce allows you to route customer calls based on the Salesforce data — your Customer Service department wants to segment the calls according to the service level agreement (SLA). With a routing template configured to request the caller's account number, VCC Salesforce can locate the correct record in Salesforce and then route the call based on the value it finds in the '''SLA''' field — Platinum accounts can go to one skill or queue and Gold accounts to another. Using this example, the following section explains the call segmentation parameters and then provides implementation tips:
| + | Call segmentation in VCC Salesforce allows you to route customer calls based on the Salesforce data — your Customer Service department wants to segment the calls according to the service level agreement (SLA). With a routing template configured to request the caller's account number, VCC Salesforce can locate the correct record in Salesforce and then route the call based on the value it finds in the '''SLA''' field — Platinum accounts can go to one skill or queue and Gold accounts to another. Using this example, the following section explains the call segmentation parameters and then provides implementation tips: |
| | | | |
| − | {{NoteFormat|Before configuring call segmentation, you must [[SFAdministration#Enabling_Data_Lookup|authorize]] VCC Salesforce to access Salesforce data (also known as ''enabling data lookup'').}} | + | {{NoteFormat|Before configuring call segmentation, you must authorize VCC Salesforce to access Salesforce data (also known as ''enabling data lookup'').}} |
| | | | |
| | =====Call Segmentation Routing Parameters===== | | =====Call Segmentation Routing Parameters===== |
| Line 260: |
Line 260: |
| | | | |
| | <ol> | | <ol> |
| − | <li>Find and open it using the instructions in [[RoutingCalls#Configuring_your_routing_template|Configuring your routing template]].</li> | + | <li>Find and open it using the instructions in [[Using#Configuring_your_routing_template|Configuring your routing template]].</li> |
| | <li>In the '''Play Greeting''' parameter, you can select the recording that callers must hear when the call is answered. </li> | | <li>In the '''Play Greeting''' parameter, you can select the recording that callers must hear when the call is answered. </li> |
| | <li>In the '''Collect Digits''' parameter, select the following two files: | | <li>In the '''Collect Digits''' parameter, select the following two files: |
| Line 295: |
Line 295: |
| | *User input is limited to <tt>31</tt> digits. | | *User input is limited to <tt>31</tt> digits. |
| | *Ensure that agents have permission to view and edit the object and records that are popped — for example, agents need permission to view accounts. If you are using a custom object, agents need permission to view and edit that object. | | *Ensure that agents have permission to view and edit the object and records that are popped — for example, agents need permission to view accounts. If you are using a custom object, agents need permission to view and edit that object. |
| − | *If you are using a custom object, modify the softphone layout to ensure that the records on the custom object can be popped. You can find this layout under the Salesforce '''Setup''' tab, then click '''Customize > Call Center > Softphone Layouts'''. For more information see [[ManagingCalls#Managing_calls|Managing Calls]]. | + | *If you are using a custom object, modify the softphone layout to ensure that the records on the custom object can be popped. You can find this layout under the Salesforce '''Setup''' tab, then click '''Customize > Call Center > Softphone Layouts'''. |
| | *To determine how call segmentation influences your Salesforce API usage limits, consider the following example: <br>For an Enterprise edition with 10 Salesforce licenses, the API request limit is 10,000 requests per day (10 licenses x 1,000). Each instance of call segmentation uses one API request, and on average, each of your agents uses about four requests per day by logging in and out. Therefore, if your 10-agent contact center were to segment 5,000 calls on one day, your API usage is only about half your allotment. (5,000 API requests + 4 requests for each of your 10 agents = 5,040 requests from your 10,000 limit). The calculation of the API request limit, based on user license, is designed to allow sufficient capacity for your organization. <br>For a list of the usage limits for all editions and information on purchasing additional API requests, consult the Salesforce online help. | | *To determine how call segmentation influences your Salesforce API usage limits, consider the following example: <br>For an Enterprise edition with 10 Salesforce licenses, the API request limit is 10,000 requests per day (10 licenses x 1,000). Each instance of call segmentation uses one API request, and on average, each of your agents uses about four requests per day by logging in and out. Therefore, if your 10-agent contact center were to segment 5,000 calls on one day, your API usage is only about half your allotment. (5,000 API requests + 4 requests for each of your 10 agents = 5,040 requests from your 10,000 limit). The calculation of the API request limit, based on user license, is designed to allow sufficient capacity for your organization. <br>For a list of the usage limits for all editions and information on purchasing additional API requests, consult the Salesforce online help. |
| | </toggledisplay> | | </toggledisplay> |
| Line 301: |
Line 301: |
| | ===Creating and Uploading Recordings=== | | ===Creating and Uploading Recordings=== |
| | | | |
| − | On the '''Media''' page in the VCC Salesforce app, you can upload the [[CallCenterTerminology#Media|audio]] recordings used by your routing templates. Simply assign a '''Name''' and '''Description''', then upload the file. Audio files must have an 8000 kHz 8-bit PCM WAV (<tt>.wav</tt>) format. If you receive an error when uploading media, your file might not be in the proper format. You can convert your files using audio editors such as Audacity®, Music Editor Free™, and iTunes®. See the procedure below for instructions on using iTunes®. | + | On the '''Media''' page in the VCC Salesforce app, you can upload the audio recordings used by your routing templates. Simply assign a '''Name''' and '''Description''', then upload the file. Audio files must have an 8000 kHz 8-bit PCM WAV (<tt>.wav</tt>) format. If you receive an error when uploading media, your file might not be in the proper format. You can convert your files using audio editors such as Audacity®, Music Editor Free™, and iTunes®. See the procedure below for instructions on using iTunes®. |
| | | | |
| | | | |
| Line 312: |
Line 312: |
| | ====Using audio recordings in routing templates==== | | ====Using audio recordings in routing templates==== |
| | | | |
| − | To use all the Genesys Cloud Connect routing templates you must create the following audio recordings. For information on which templates use each type of recording, see [[RoutingCalls|Routing Calls with Genesys Cloud Connect]]. | + | To use all the Genesys Engage cloud Connect routing templates you must create the following audio recordings. For information on which templates use each type of recording, see the [[Using#Routing_Calls|Routing calls]] section. |
| | | | |
| | #Greeting message — The message played when the call is initially connected. | | #Greeting message — The message played when the call is initially connected. |
Managing the VCC for Salesforce Application
In brief, you will find the following information in this section:
- how to use VCC for Salesforce
- how to set up your contact center to begin accepting calls
Review the information found in the Prerequisites, and Verifying the Genesys Setup sections and then complete the steps found in the Setting Up Your Contact Center section to configure your contact center and to begin accepting calls.
See the glossary for VCC and Salesforce-specific terminology.
Prerequisites
Before proceeding with the installation, you must do the following:
- install the VCC for Service Cloud app
- install the latest stable version of Google Chrome
Verifying the Genesys Setup
To make getting started easy, Genesys completed the following provisioning tasks for you:
- Installed the VCC for Service Cloud app. You can select it from the Force.com App Menu located in the upper right-hand corner of the Home view.
- Created the Call Center record. You can view the Call Center record by clicking the Salesforce Setup tab and then navigating to: Build > Customize > Call Center > Call Centers.
- Added a Call Center user (the system administrator) to the Call Center record.
- Created a softphone layout for your contact center. You can view the layout by clicking the Salesforce Setup tab and then navigating to: Build > Customize > Call Center > SoftPhone Layouts.
- Assigned your contact center with a phone number. You can view this number in the VCC for Service Cloud app under Setup > Routing.
- Created an ACD queue that routes your contact center’s calls. You can view this queue on the Setup > Routing page. You can also create additional virtual queues.
- Assigned a default routing template to the queue. You will modify this template and authorize the VCC for Service Cloud application to route calls based on the Salesforce data.
Setting Up Your Contact Center
The following procedures outline how to set up your contact center:
Creating and Managing Users
Create users as needed in Salesforce and then make them administrators or agents in VCC for Salesforce.
[+] Click to expand
From the Setup tab, click the Users  tab to access this page. With the Users page, you can perform actions such as:
- Create new Call Center users
- Assign roles, skills, or phone numbers to users
- Change roles, skills, or phone numbers for one or multiple users
- Remove a user from the contact center
Important
Creating new Call Center users is done using the Salesforce
Setup tab located in the upper right-hand corner of the main screen. All other steps are performed using the VCC for Salesforce
Setup tab located on the upper left-hand corner on the main screen.
Creating Call Center users
Creating new Call Center users requires giving new or existing Salesforce users an Administrator or Agent role in VCC for Salesforce.
A Salesforce system administrator needs to create the first administrator user in VCC for Salesforce; after that, any VCC for Salesforce user with an Administrator role can create other users.
{{NoteFormat|Setting up your contact center requires creating a Genesys Connection user who establishes a connection giving the VCC for Salesforce app access to the Salesforce data.
Adding Call Center Users
To add new Call Center users:
- From the Salesforce Setup tab, click Build > Customize > Call Center > Manage Call Centers to open up the All Users screen.
- If you see the Introducing Salesforce CRM Call Center splash screen, instead of the All Call Centers screen, click Continue.
- Click on Genesys Engage cloud Call Center to open the Genesys Engage cloud Call Center screen.
- Click Manage Call Center Users to open the Manage Users screen.
- On the Manage Users screen, click Add More Users to open the Search for New Users screen.
- On the Search for New Users screen, click Find. Or, optionally, add the Filter By Additional Fields criteria.
- In the results area, select the check-box for one or more users and click Add to Call Center.
Creating New Salesforce Users
To create new Salesforce users:
- From the Salesforce Setup tab, click Administer > Manage Users > Users.
- Click New User.
- Enter the required information into the fields.
- Click the Salesforce User check-box to give the user access to the Salesforce console and the softphone.
- Click Save.
Finding existing users
All three of the following searches can be done individually, or all at the same time.
Finding a User by Name
To find Call Center users by name:
- From the Setup tab, click Users to open the Users page.
- You can enter the name of a specific agent into the Name search field.
- Click Search.
Finding a User by Specific Profile
To find Call Center users by profile:
- Click the Profile drop-down menu.
- Click Search.
Finding a User by Specific Role
To find Call Center users by role:
- Click either Agent or Admin under the Role column.
- Click Search.
Managing user attributes
The Users page in the VCC for Salesforce app provides a list of all the Salesforce users in your organization. Users, who also have access to VCC for Salesforce, have a check-mark added to the Role column found on the User Profile page. This page can be accessed by clicking on the Name link for the user for which you want more details.
VCC for Salesforce makes it easy to manage users either one at a time, or in bulk — for example, you can select five people and assign them to an agent role with a single click.
To give a user access to VCC for Salesforce, you must assign them a role. If the user has an agent role, you must assign them a phone number and a skill.
Assigning Roles, Skills, or Phone Numbers
To assign a role, a skill, or a phone number to an user:
- From the Setup tab, click Users.
- Find the user to whom you want to give access under the Name column and click their name to open the User Profile page.
- Configure the following:
- Role — VCC for Salesforce provides two roles: Administrator and Agent. The only difference between the two is that administrators can create and edit other VCC for Salesforce users and agents cannot.
You can assign a user to both roles if, for example, you want the user to process calls, but also be able to manage other users.
Important
If you use the role hierarchy in Salesforce, note that the Salesforce roles are unrelated to the VCC for Salesforce roles. Likewise, the VCC for Salesforce Administrator role is unrelated to the System Administrator profile in Salesforce.
- Skills — Select the skills that are appropriate for this user. Place your cursor in the Skills field to see a drop-down menu.
- Number — Enter the user's desktop phone number or mobile number. This number is the phone number where incoming calls are routed.
- Click Save to return to the Users page.
Managing a Single User
To change a user's role, skills, or phone number, complete the following steps:
- From the Salesforce Setup tab, click Administer > Manage Users > Users.
- Click the name of the user you want to edit. The profile page opens.
- (Optional) Change the user's role. VCC for Salesforce provides two roles: Administrator and Agent. The only technical difference between the roles is that Administrators can create and edit other users in the VCC for Salesforce app and Agents cannot. You can assign both roles to the same user — for example, if the user needs to accept calls and also manage other users.
- (Optional) Add or remove skills. A drop-down menu of skills appears when you put your cursor in the Skills field.
- (Optional) Change the user's phone number.
- Click Save to return to the Users list.
Managing Multiple Users
To manage several users at the same time:
- On the Users page, click the flag icon next to every user you want to edit. This action creates a Flagged dialog box below the Users list.
- In the Flagged dialog box, click Edit and choose one of the following:
- Assign Agent Role — Click this option to assign the agent role to all flagged users.
- Assign Numbers — Click this option to assign each flagged user a unique phone number.
- Assign Skills — Click this option to select a skill for all flagged users.
- Remove from Contact Center — Click this option to remove the role, skills, and phone number from all flagged users.
- When you are finished, click Unflag all users.
Removing users
Removing a user from the contact center removes that user's access to the VCC for Salesforce app, meaning the user's role, skills, and phone number are deleted. Users who formerly had an Administrator role can no longer access the Setup tab in the VCC for Salesforce app and users who formerly had an agent role can no longer access the softphone to manage calls.
Important
When you remove a user from the VCC for Salesforce app, the historical reporting is unaffected.
To remove a user:
- On the Setup > Users page, remove a single user by clicking their name and then choosing the Remove User from Contact Center link.
- Optionally, you can simultaneously remove several users by flagging them on the Users page and choosing Remove from the Edit menu.
Removed users still appear on the Setup > Users page because the Users list is a list of all Salesforce users. You can tell at a glance whom was removed from VCC for Salesforce because these users no longer have any roles.
Creating and Managing Skills
Calls are routed to agents based on skills that identify the agent's areas of expertise.
[+] Click to expand
From the Setup tab, click the Skills  tab to access this page. With the Skills page, you can perform actions such as:
- Create skills
- Edit skills
- Delete skills
Creating or editing skills
To create or edit skills:
- In the VCC for Salesforce app, click Setup > Skills.
- Click Add for a new skill group; to edit an existing skill group, click its name.
- Edit the Name and Description fields.
- Click Save to return to the Skills list.
Deleting skills
To delete skills:
- On Setup > Routing, click Edit to view your current routing template and ensure that the skill you want to delete is not in use. If it is, choose a different skill or queue.
- On Setup > Skills, click Edit for the skill you want to remove and then click Delete Skill. If the skill is being used in your routing template you will receive a warning message.
Routing Calls
On the Routing page, you can view and create call queues and associate them with routing templates. At first, you have a single queue, which is the entry point for your contact center where all of the calls arrive. You can then create virtual queues for routing purposes that are not associated with a phone number. All queues have a routing template that dictates the routing logic. Each template consists of parameters that define a particular step in the call — for example, two of the parameters are the greeting message and the skill where the call is routed.
[+] Click to expand
From the Setup tab, click the Routing  tab to access this page. With the Routing page, you can perform actions such as:
- Review the routing templates
- View call queues
- Associate call queues with routing templates
- Provision call segmentation
Reviewing the routing templates
VCC for Salesforce provides the following routing templates, which are described below. Each template includes either hold music or a hold message. For more information about Template #3, which routes the calls based on Salesforce data, see Provisioning call segmentation.
- Route Call to Specified Destination
The call is automatically routed to the agent or queue selected.
- Play Greeting and Route Call to Specified Destination
The caller hears a greeting and the call is routed either to the agents with the skill that you have configured for this template, or to another queue. Each template can route calls to one skill or to one queue only.
- Play Greeting, Segment Caller, and Route to Specified Destination
The caller hears a greeting and a request to provide information based on the call segmentation parameter that you configure. The call is routed according to the caller's entry.
For information about the audio recordings used in each template, see the media section. For more information about templates, see the Configuring your routing template section.
Configuring your routing template
Before getting started, make sure you have defined the skills or virtual queues where you will route calls, upload the audio that you will use, and reviewed the eight templates available.
To edit or change your routing template:
- Navigate to the Setup > Routing page in the VCC Salesforce app.
- Choose Edit to modify the existing template's parameters or click Delete and Start Over from the Edit drop-down menu to select from the list of templates.
- Depending on the template you select, you will have one or more of the following parameters:
- Play Greeting — Select the appropriate recording from the Greeting Message drop-down menu.
- Route Call — Select the appropriate recording from the Music While Waiting drop-down menu and select the skill or queue where you want the call routed. You can also select a timeout interval for unanswered calls and the queue where you want those routed — for example, if you want to route unanswered calls to voice mail, assign the Forward Call to the External Number template to a queue and route your timed out calls to that queue.
- Check Operation — This parameter defines the working hours for your organization. Your options include setting your time zone, adding holidays and selecting a corresponding Holiday Announcement recording, selecting the days of the week your business is open and a corresponding Closure Announcement recording, and selecting the working hours your business is open and a corresponding after-hours message.
- Collect Digits — In some templates this parameter is your offer menu. Select the appropriate recordings from the Menu Offer and Music While Waiting menus, then select the action that should occur on each digit. For digits 0 (zero) through 9 and the special characters star (*) and pound (#), you can route the call to a skill or play a specified message.
In Template #3, this parameter requests caller input for call segmentation. For more information on this and similar parameters see Provisioning Call Segmentation.
- Click Save to return to the Routing page.
Important
You can modify the queue name and description on this page, but not the routing template's name.
Provisioning call segmentation
Call segmentation in VCC Salesforce allows you to route customer calls based on the Salesforce data — your Customer Service department wants to segment the calls according to the service level agreement (SLA). With a routing template configured to request the caller's account number, VCC Salesforce can locate the correct record in Salesforce and then route the call based on the value it finds in the SLA field — Platinum accounts can go to one skill or queue and Gold accounts to another. Using this example, the following section explains the call segmentation parameters and then provides implementation tips:
Important
Before configuring call segmentation, you must authorize VCC Salesforce to access Salesforce data (also known as
enabling data lookup).
Call Segmentation Routing Parameters
Template 3: Play Greeting, Segment Caller, and Route to Specified Destination is the routing template that provides the call segmentation. To configure this template, do the following:
- Find and open it using the instructions in Configuring your routing template.
- In the Play Greeting parameter, you can select the recording that callers must hear when the call is answered.
- In the Collect Digits parameter, select the following two files:
- Input Request Message: is the message where you ask callers to provide input and press the pound key (#) — for example, this message requests that callers enter their account number. The input request can be a maximum of 31 digits.
- Invalid Entry Message: is the message that tells the customer that an error occurred and asks them to try again. Conditions that trigger this message include partial entries and a time out after 60 seconds.
Important
If the customer enters digits in the correct format, but VCC Salesforce does not find a record associated with that number, the
Unknown Caller message plays instead.
- The Lookup Data from Input parameter has three fields that allow VCC Salesforce to locate and pop the record:
- Select the object associated with the query — for example, this is the Account object.
- Select a Query field to locate the record. — for example, this query is the AccountNumber field.
- Select a Segmentation field to segment and route calls — for example, this is the SLA_c (SLA) field.
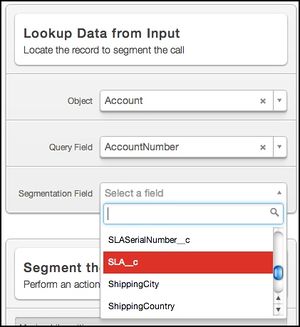
Look Up Data from Input Parameter
- In the Segment the Call parameter, enter Segmentation field values and the skill, queue, or message where you want them routed — for example, the SLA field has three values:
-
Select an Unknown Caller message that tells customers that their record was not located and then choose where these callers must be routed.
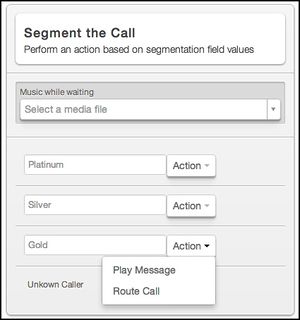
Segment the Call Parameter
Implementation Tips
- User input is limited to 31 digits.
- Ensure that agents have permission to view and edit the object and records that are popped — for example, agents need permission to view accounts. If you are using a custom object, agents need permission to view and edit that object.
- If you are using a custom object, modify the softphone layout to ensure that the records on the custom object can be popped. You can find this layout under the Salesforce Setup tab, then click Customize > Call Center > Softphone Layouts.
- To determine how call segmentation influences your Salesforce API usage limits, consider the following example:
For an Enterprise edition with 10 Salesforce licenses, the API request limit is 10,000 requests per day (10 licenses x 1,000). Each instance of call segmentation uses one API request, and on average, each of your agents uses about four requests per day by logging in and out. Therefore, if your 10-agent contact center were to segment 5,000 calls on one day, your API usage is only about half your allotment. (5,000 API requests + 4 requests for each of your 10 agents = 5,040 requests from your 10,000 limit). The calculation of the API request limit, based on user license, is designed to allow sufficient capacity for your organization.
For a list of the usage limits for all editions and information on purchasing additional API requests, consult the Salesforce online help.
Creating and Uploading Recordings
On the Media page in the VCC Salesforce app, you can upload the audio recordings used by your routing templates. Simply assign a Name and Description, then upload the file. Audio files must have an 8000 kHz 8-bit PCM WAV (.wav) format. If you receive an error when uploading media, your file might not be in the proper format. You can convert your files using audio editors such as Audacity®, Music Editor Free™, and iTunes®. See the procedure below for instructions on using iTunes®.
[+] Click to expand
From the Setup tab, click the Media  tab to access this page. With the Media page, you can perform actions such as:
- Use audio recording in the routing templates
- Convert audio file into the proper formats using iTunes®
Using audio recordings in routing templates
To use all the Genesys Engage cloud Connect routing templates you must create the following audio recordings. For information on which templates use each type of recording, see the Routing calls section.
- Greeting message — The message played when the call is initially connected.
- Holiday announcement — The message played during any 24-hour period designated as a holiday.
- Closure announcement — Excluding holidays, the message played during any 24-hour period designated as closed for business.
- After-hours announcement — Excluding holidays or a business closure, the message played outside designated business hours.
- Hold music (or message) — The music or message played while a call is being connected to an agent or when an agent puts the call on hold.
- Menu offer — The message introducing an offer menu.
- Option messages — The message played when a caller selects a digit from the offer menu; a digit can route a call to an agent or queue, or play a message.
- Input request message — During call segmentation, the message that requests caller input, such as an account ID. Callers must enter the digits requested and press pound (#).
- Invalid entry message — During call segmentation, the message that tells callers their input was not recognized and asks them to try again. Conditions that trigger this message include partial entries and a time out after 60 seconds. Note that if the customer enters digits in the correct format, but VCC Salesforce does not find a record associated with that number, the Unknown Caller message plays instead.
- Unknown caller — During call segmentation, the message played when the value entered by the customer in the Collect Digits parameter is unrecognized and a record cannot be located.
Converting file formats
As mentioned above, the VCC Salesforce routing templates require that all audio files have an 8000 Hz 8-bit PCM WAV (.wav) format. Follow these instructions to convert an audio file into the proper format using iTunes®.
- In iTunes®, open your General Preferences.
- Click Import Settings to open the Import Using menu.
- From the Import Using menu, choose WAV Encoder.
- Using the WAV Encoder dialog box, make the following selections and click OK:
- Sample Rate: 8000 kHz
- Sample Size: 8-bit
- Channels: Mono
- Navigate to the file that you want to convert.
- Right-click and choose Create WAV Version.
You now have a properly formatted .wav file version that you can upload to VCC Salesforce.
*Audacity® is a registered trademark of Dominic Mazzoni. Music Editor Free™ is a copyright of MEFMedia Systems Co., Ltd. iTunes® is a trademark of Apple Inc, registered in the U.S. and other countries. This document is an independent publication and is not authorized, sponsored, or otherwise approved by Apple, Inc.
Creating Reports
View both historical and real-time reporting. A call notation appears as a completed task on the Activity History-related list when an incoming call matches a Salesforce record. You can then run a custom report on activities to view the call logs.
[+] Click to expand
The Reports view displays the real-time statistics of your queues as an instrument panel. The widgets enable you to see a range of pre-defined statistics. You can scroll through all of the queues and skills that you are monitoring.
From the Setup tab, click the Reports  tab to access this page. With the Reports page, you can perform actions such as:
- Create reports on Queues
- Create reports on Skills
Queues
The Queues instrument panel provides you with the following reporting statistics:
- The number of calls waiting
- The current maximum wait time for inbound calls
- The average wait time for inbound calls
- The answered/abandoned calls answer rate summary for a specific time interval
Refresh
Click Refresh  to immediately update the instrument panel. These values are automatically refreshed every 10 seconds.
Contact Center Queue Names
Click the  arrow in the upper right corner to select a different contact center queue.
When a new ACD Page is created in CX Builder, an associated queue is created here.
Summary Tabs
Click either the Past 60 Minutes tab or the Past 24 Hours tab to see the summary information.
The Summary tabs provide you with the following accumulated data over specific time periods:
- The answer rate—the number of calls that were answered and/or abandoned during a specific time interval (the past 60 minutes or the past 24 hours)
- The number of answered calls
- The number of abandoned calls
- The graph of the trendline over a time period of either the past 60 minutes or the past 24 hours. Hover your mouse pointer over the intervals along the bottom of the graph to see the summary statistics for that interval.
Skills
Each individual skill shows the total number of agents available for that skill, along with the total number of calls waiting for that skill. When a skill is added to the contact center, that skill is added to this view and displays the total number of calls waiting for this skill, as well as the number of agents available for that skill.
The Skills panel provides you with the following statistics:
- The number of calls waiting for that particular skill
- The number of agents assigned to the skill who are in one of the following states:
- In call (the state where an agent is engaged in a call)
- Ready (the state where an agent is logged in to an Automatic Call Distributor (ACD) group and is prepared to handle calls that the ACD distributes)
- Not Ready (the state where an agent is logged in to an Automatic Call Distributor (ACD) group, but is not prepared to handle calls that the ACD distributes)
- The Average Handle Time (AHT) for that skill (the average amount of time that it takes for an incoming interaction to be distributed to an agent)
- The longest time that an agent assigned to that skill was in the idle state, Ready, but has not received a call
Refresh
Click Refresh to immediately update the instrument panel. These values are automatically refreshed every 10 seconds.


