(Created target blank page For Version: PSAAS:Public) |
(Modified comment string __NOINDEX__ Category:V:PSAAS:Public with Category:V:PSAAS:Public) |
||
| (4 intermediate revisions by 2 users not shown) | |||
| Line 1: | Line 1: | ||
| − | < | + | = Stage 1: Configuring Outbound routing= |
| + | {{StepNav | ||
| + | |ID=obbs | ||
| + | |node=1 | ||
| + | |display=Configuring | ||
| + | }} | ||
| + | {{BEC_Head | ||
| + | |context= | ||
| + | Given that Harry is new to Genesys Engage cloud products, Alex, a Genesys Administrator, will take care of the first step – routing configuration. }} | ||
| + | Using '''Platform Administrator''' Alex will create and configure the Routing Point DN, the Virtual Queue DN, and the Agent Group, and then assign agents to the group. | ||
| + | |||
| + | Then he’ll build the IVR using '''Designer.''' He’ll drag and drop blocks from the Palette into one of the four Application Flow phases that define the IVR. Then he’ll hand it off to Harry. | ||
| + | |||
| + | '''Scenario:''' A week later, the contact center hired five new agents and asked Harry to add them and assign them to the Outbound campaign. | ||
| + | |||
| + | '''Solution''': Even though Alex assigned the agents to an Agent Group in '''Platform Administrator''', Harry can sign into the application and add or remove agents as needed. | ||
| + | |||
| + | <p><toggledisplay linkstyle font-size:larger showtext="[+] Instructions"> | ||
| + | {{CloudStep_Stack | ||
| + | |title=Add Agents | ||
| + | |media1=GenAdmin_AddAgents.png | ||
| + | |text=From the [[Documentation:PSAAS:Administrator:Agents|Agents]] screen in [[Documentation:PSAAS:Administrator:Accounts|Platform Administration]]: | ||
| + | # Create the Agent account. | ||
| + | # Assign one or more skills to the agent. | ||
| + | # Add the new agent to an Agent Group. | ||
| + | }} | ||
| + | </toggledisplay></p> | ||
| + | |||
| + | == Want to learn more? == | ||
| + | |||
| + | * [[Documentation:PSAAS:Administrator:ConfigOutbound:latest|How to set up Outbound Routing]] | ||
| + | |||
| + | * [[Documentation:DES:Help:RouteCall:latest|How to add the Route Call Block in Designer]] | ||
| + | |||
| + | * [[Documentation:PSAAS:Administrator:Designer:latest|Designer help]] | ||
| + | |||
| + | * [[Documentation:PSAAS:Administrator:Accounts:latest|Platform Administration help]] | ||
| + | |||
| + | *[[DN|How to create a DN]] | ||
| + | |||
| + | [[Category:V:PSAAS:Public]] | ||
Latest revision as of 12:23, October 2, 2020
Stage 1: Configuring Outbound routing
Given that Harry is new to Genesys Engage cloud products, Alex, a Genesys Administrator, will take care of the first step – routing configuration.
Using Platform Administrator Alex will create and configure the Routing Point DN, the Virtual Queue DN, and the Agent Group, and then assign agents to the group.
Then he’ll build the IVR using Designer. He’ll drag and drop blocks from the Palette into one of the four Application Flow phases that define the IVR. Then he’ll hand it off to Harry.
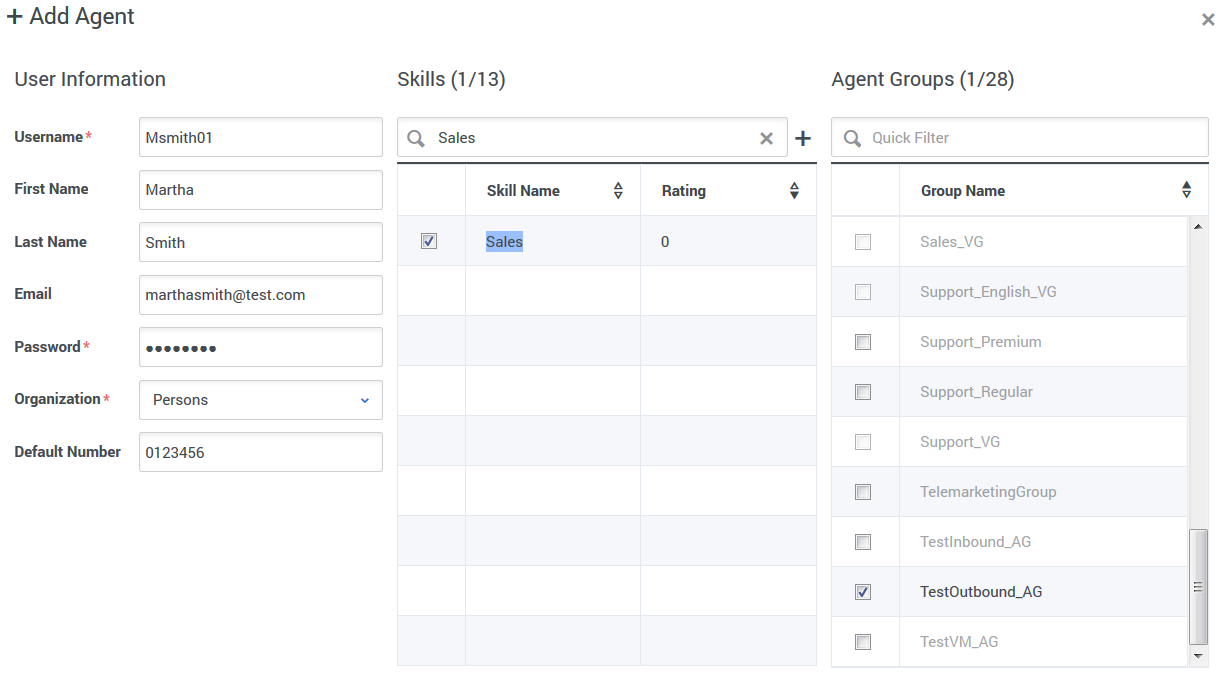
Scenario: A week later, the contact center hired five new agents and asked Harry to add them and assign them to the Outbound campaign.
Solution: Even though Alex assigned the agents to an Agent Group in Platform Administrator, Harry can sign into the application and add or remove agents as needed.

