(Created target blank page For Version: PSAAS:Julie) |
(Automated save: adding PEC_Migrated template.) |
||
| Line 1: | Line 1: | ||
| − | < | + | = Agent Desktop settings= |
| + | |||
| + | {{Template:PEC_Migrated}} | ||
| + | |||
| + | |||
| + | |||
| + | Configuring your Agent Desktop settings involves customizing the available options to meet the specific needs of your contact center. | ||
| + | |||
| + | To access the '''Contact Center Settings''' tab, click '''Contact Center Settings''' on the application menu across the top of Agent Setup. On the '''Contact Center Settings''' tab, you will see a navigation menu on the left hand side. You can see only the objects that permissions enable you to view. If you need to edit an object that you don't see on the interface, contact your administrator. | ||
| + | |||
| + | You can customize the following objects: | ||
| + | {{AnchorDiv|Skills}} | ||
| + | == Skills== | ||
| + | |||
| + | On the '''Skills''' page, you can add and delete skills, as well as organize the skills into folders. | ||
| + | |||
| + | {{CloudStep_Stack | ||
| + | |title= | ||
| + | |text= | ||
| + | ''Skills'' are an agent's knowledge of a particular subject that might be required in an interaction, such as language skills. They can also be used for routing purposes. | ||
| + | |||
| + | To add a skill: | ||
| + | |||
| + | # Click '''Add'''. | ||
| + | # Type a name in the '''Name''' field. | ||
| + | |||
| + | You can also organize skills into folders. If needed, select [[File:Umgr icon addFolder.png|link=]] '''Add Folder''' to create a new folder. | ||
| + | |media1=ASSkills.png | ||
| + | }} | ||
| + | |||
| + | {{AnchorDiv|Dispositions}} | ||
| + | |||
| + | == Dispositions== | ||
| + | On the '''Dispositions''' page, you can create a list of Disposition options to be displayed when an agent makes an outbound call or transfer. ''Dispositions'' are descriptions of the final outcome of a call. These codes are used to flag calls for reporting purposes. | ||
| + | |||
| + | ===Creating a sharable Disposition business attribute=== | ||
| + | |||
| + | Dispositions can be used as sharable business attributes for agents, agent groups, and the global contact center. To view an article about how to create sharable business attributes, see [[Documentation:PSAAS:Administrator:AgentSetupSharedAttributes|Sharing Business Attributes in Agent Setup]]. | ||
| + | |||
| + | {{NoteFormat| | ||
| + | * To view an example of Disposition options in Agent Desktop, see [[Documentation:PSAAS:Agent:Voice#callWrapUp|What do I do at the end of a call?]] in ''Agent Desktop Help''. | ||
| + | * In the table of configured Dispositions, in addition to selecting and adding Dispositions, you can also filter items using the '''Quick Filter''' field and delete a Disposition.|2}} | ||
| + | |||
| + | ===Selecting a disposition=== | ||
| + | {{CloudStep_Stack | ||
| + | |title= | ||
| + | |text=<ol> | ||
| + | <li>Select a business attribute:</li> | ||
| + | <ol type=a> | ||
| + | <li> Select the folder you want to view from the '''Folder''' drop-down list box.</li> | ||
| + | <li> Click the second drop-down list box and select the business attribute for the Disposition. | ||
| + | <p>You can consider a business attribute to be the container that holds a list of Dispositions that have a common theme. </p> | ||
| + | </li> | ||
| + | </ol> | ||
| + | </li> | ||
| + | <li> Select a Disposition from the list. | ||
| + | </li> | ||
| + | </ol> | ||
| + | |media1=ASManageDisposition.png | ||
| + | }} | ||
| + | |||
| + | ===Adding a disposition=== | ||
| + | {{CloudStep_Stack | ||
| + | |title= | ||
| + | |text=# Select the folder you want to view from the '''Folder''' drop-down list box. | ||
| + | # Click the second drop-down list box and select the business attribute into which you want to add the Disposition. | ||
| + | # Click '''Add'''. | ||
| + | #Type the '''Name''' and '''Display Name''' for the new Disposition. | ||
| + | |||
| + | {{NoteFormat|To add a new folder to the list, you can do one of the following: | ||
| + | * Click '''Add Folder'''; or | ||
| + | * To add a subfolder, click the '''Folder''' drop-down list box, select a folder, and then click the '''Add folder''' icon.|2}} | ||
| + | |media1=ASAddDisposition.png | ||
| + | }} | ||
| + | |||
| + | {{AnchorDiv|Custom_agent_states}} | ||
| + | == Custom agent states== | ||
| + | |||
| + | {{CloudStep_Stack | ||
| + | |title= | ||
| + | |text=On the '''Custom Agent States''' tab, you can add custom agent states that an agent can select for After Call Work and Not Ready reasons. | ||
| + | |||
| + | You can organize custom agent states into folders. When you select the '''Folder''' option, a drop-down list box is displayed where you can select a folder or click the add folder icon [[File:Umgr icon addFolder.png|link=]] to create a new folder. | ||
| + | |||
| + | Once you have selected the folder, enter an appropriate '''Display Name''' (example: ''Lunch Break'') and a relevant '''Code''' that is unique. | ||
| + | |media1=ASCustomAgentStates2.png | ||
| + | }} | ||
| + | |||
| + | {{AnchorDiv|Global_Favorites}} | ||
| + | |||
| + | == Global Favorites== | ||
| + | |||
| + | {{CloudStep_Stack | ||
| + | |title= | ||
| + | |text=As a contact center administrator, you can create and maintain a list of Favorites, which are contacts and internal targets that your agents can access quickly in the Team Communicator. To see how agents use Global Favorites in Agent Desktop, see [[Documentation:PSAAS:Agent:contacts#favorites|How do I set up my favorites?]] in the ''Agent Dektop Help'' guide. | ||
| + | |||
| + | In addition to managing favorites from the '''Desktop Settings''' page, you can also manage favorites on the '''Agent Groups''' page and the '''Add/Manage User''' window. No matter from what screen you add a favorite, you can include the favorite in the list of shareable favorites to be reused in all places where Global Favorites (or Personal Favorites for user accounts) are available for configuration in Agent Setup. | ||
| + | |media1=ASGlobalFav.png | ||
| + | }} | ||
| + | |||
| + | To learn more about how to work with Global Favorites, including a scenario-based demonstration, see [[AgentSetupArticalFavorites|Working with Global Favorites]]. | ||
| + | |||
| + | {{AnchorDiv|External_URLs}} | ||
| + | |||
| + | ==External URLs== | ||
| + | |||
| + | You can integrate internal and external websites into your agent's main view. At the Agent Desktop level, the external website is displayed in dedicated tabs. These tabs allow you to access the website without leaving Agent Desktop. | ||
| + | |||
| + | {{CloudStep_Stack | ||
| + | |title= | ||
| + | |text= | ||
| + | |||
| + | At the interaction level, there are two ways to display websites depending on the main interaction type. | ||
| + | |||
| + | * For voice, the external website is displayed in the background when an interaction is selected. When the interaction is unselected or closed, the external website is replaced with the previous panel displayed in the background. | ||
| + | * For multimedia, the external website is displayed in a dedicated view in the case data. | ||
| + | |||
| + | To add a URL to the list, select '''Workspace''' or '''Interaction''' from the '''Level''' menu, type a label for the URL, type or paste the URL in the URL field, and click '''Add'''. | ||
| + | |media1=ASExternalURLs3.png | ||
| + | }} | ||
| + | |||
| + | Additionally, you can add the following field codes, which are supported for both the <tt>label</tt> and <tt>url</tt> options in the '''Templates''' drop-down menus: | ||
| + | <ul> | ||
| + | <li><tt>Agent.FullName</tt></li> | ||
| + | <li><tt>Agent.UserName</tt></li> | ||
| + | <li><tt>Agent.LastName</tt></li> | ||
| + | <li><tt>Agent.FirstName</tt></li> | ||
| + | <li><tt>Agent.EmployeeId</tt></li> | ||
| + | </ul> | ||
| + | |||
| + | An external web site URL can be defined using the <tt>$AttachedData.Y$</tt> parameter to have flexible text in the URL where <tt>Y</tt> represents an attached data name. | ||
| + | {{NoteFormat| | ||
| + | <ul> | ||
| + | <li>If the <tt>$AttachedData.Y$</tt> parameter is specified for the external website URL, and <tt>Y</tt> is not part of the attached data associated with an interaction, the external website is not displayed.</li> | ||
| + | <li>If an agent manually adds the attached data to the interaction (or if it's added by any other means), then the external website tab is displayed with the content of the external website.</li> | ||
| + | </ul> | ||
| + | |3}} | ||
| + | <br> | ||
| + | For example, the external website specified as follows: | ||
| + | <source lang="text"> | ||
| + | label = Customer Location | ||
| + | url = https://www.bing.com/search?q=$AttachedData.CustomerLocation$ | ||
| + | </source> | ||
| + | With this URL, if an interaction is received with a <tt>CustomerLocation</tt> attached data with the value of <tt>Paris</tt>, then the external website will be displayed in a dedicated tab called '''Customer Location''', and the external web site will be <tt><nowiki>https://www.bing.com/search?q=Paris</nowiki></tt> | ||
| + | </li> | ||
| + | <li><tt>mode</tt>: Specifies the mode Agent Desktop uses to display the web application. The default value is <tt>INTERNAL</tt>. The possible values are: | ||
| + | <ul> | ||
| + | <li><tt>INTERNAL</tt>: The web application is displayed in a dedicated tab in Agent Desktop. It can be viewed and used when the agent clicks the tab to display it. This is the default behavior.</li> | ||
| + | <li><tt>EXTERNAL</tt>: The web application is displayed in a popup window.</li> | ||
| + | <li><tt>BACKGROUND</tt>: The web application is displayed in the background when the interaction is selected. When the interaction is deselected or closed, the third-party website is replaced with the previous panel that was displayed in the background. This mode is only applicable at the interaction level.</li> | ||
| + | <li><tt>HIDDEN</tt>:The web application is loaded but not displayed in Agent Desktop. You can use this mode to integrate Agent Desktop with a non-web application.</li> | ||
| + | </ul> | ||
| + | |||
| + | {{AnchorDiv|Case_and_Toast_Data}} | ||
| + | |||
| + | ==Case Data== | ||
| + | On the '''Case Data''' page, you can specify the information to be displayed to agents when a call, chat, or other interaction is transferred to them. | ||
| + | |||
| + | ===Creating a sharable Case Data business attribute=== | ||
| + | |||
| + | Case data can be used as sharable business attributes for agents, agent groups, and the global contact center. To view an article about how to create sharable business attributes, see [[Documentation:PSAAS:Administrator:AgentSetupSharedAttributes|Sharing Business Attributes in Agent Setup]]. | ||
| + | |||
| + | {{NoteFormat| | ||
| + | * To view an example of Case Data in Agent Desktop, see [[Documentation:PSAAS:Agent:hist|Contact and interaction history]] in ''Agent Desktop Help''. | ||
| + | * In the table of configured Case Data, in addition to selecting and adding Case Data, you can also filter items using the '''Quick Filter''' field and delete a Case Data.|2}} | ||
| + | |||
| + | ===Selecting Case Data=== | ||
| + | {{CloudStep_Stack | ||
| + | |title= | ||
| + | |text=<ol> | ||
| + | <li>Select a business attribute: | ||
| + | <ol type=a> | ||
| + | <li> Select the folder you want to view from the '''Folder''' drop-down list box.</li> | ||
| + | <li> Click the second drop-down list box and select the business attribute for the Disposition. | ||
| + | <p>You can consider a business attribute to be the container that holds a list of Dispositions that have a common theme. </p> | ||
| + | </li> | ||
| + | </ol> | ||
| + | </li> | ||
| + | <li> Select a Case Data from the list. | ||
| + | </li> | ||
| + | </ol> | ||
| + | |media1=ASSelectCaseData.png | ||
| + | }} | ||
| + | |||
| + | ===Adding Case Data=== | ||
| + | {{CloudStep_Stack | ||
| + | |title= | ||
| + | |text= | ||
| + | Select the folder you want to view from the '''Folder''' drop-down list box. | ||
| + | # Click the second drop-down list box and select the business attribute into which you want to add the Case Data. | ||
| + | # Click '''Add'''. | ||
| + | #Specify a name and display name. | ||
| + | #Select '''Mandatory''' to specify that the case data is mandatory. | ||
| + | #Enable the '''Read Only''' option if you do not want the agent to be able to update the data. Or, select a data validation type, such as '''Boolean''', '''String''', '''Integer''', or '''Enum''' which allows the agent to edit the data. If the case data is mandatory, the '''Read Only''' option is disabled. | ||
| + | |media1=ASAddCaseData.png | ||
| + | }} | ||
| + | |||
| + | {{NoteFormat|To add a new folder to the list, you can do one of the following: | ||
| + | * Click '''Add Folder'''; or | ||
| + | * To add a subfolder, click the '''Folder''' drop-down list box, select a folder, and then click the '''Add folder''' icon.|2}} | ||
| + | |||
| + | To configure the order in which the case is displayed in the UI, click '''Sort Case Data''' and follow the instructions in the dialog box. | ||
| + | |||
| + | {{AnchorDiv|ToastData}} | ||
| + | |||
| + | ==Toast Data== | ||
| + | On the '''Toast Data''' page, you can specify the information to be displayed to the agent when they receive a call, chat, or other interaction. | ||
| + | |||
| + | ===Creating a sharable Toast business attribute=== | ||
| + | |||
| + | Toast Data can be used as sharable business attributes for agents, agents groups, and the global contact center. To view an article about how to create sharable business attributes, see [[Documentation:PSAAS:Administrator:AgentSetupSharedAttributes|Sharing Business Attributes in Agent Setup]]. | ||
| + | |||
| + | {{NoteFormat| | ||
| + | * To view an example of Toast Data in Agent Desktop, see [[Documentation:PSAAS:Agent:hist|Contact and interaction history]] in ''Agent Desktop Help''. | ||
| + | * In the table of configured Toast Data, in addition to selecting and adding Toast Data, you can also filter items using the '''Quick Filter''' field and delete a Toast Data.|2}} | ||
| + | |||
| + | ===Selecting Toast Data=== | ||
| + | {{CloudStep_Stack | ||
| + | |title= | ||
| + | |text=<ol> | ||
| + | <li>Select a business attribute: | ||
| + | <ol type=a> | ||
| + | <li> Select the folder you want to view from the '''Folder''' drop-down list box.</li> | ||
| + | <li> Click the second drop-down list box and select the business attribute for the Disposition. | ||
| + | <p>You can consider a business attribute to be the container that holds a list of Dispositions that have a common theme. </p> | ||
| + | </li> | ||
| + | </ol> | ||
| + | </li> | ||
| + | <li> Select a Toast Data from the list. | ||
| + | </li> | ||
| + | </ol> | ||
| + | |media1=ASSelectToastData.png | ||
| + | }} | ||
| + | |||
| + | ===Adding Toast Data=== | ||
| + | {{CloudStep_Stack | ||
| + | |title= | ||
| + | |text= | ||
| + | Select the folder you want to view from the '''Folder''' drop-down list box. | ||
| + | # Click the second drop-down list box and select the business attribute into which you want to add the Toast Data. | ||
| + | # Click '''Add'''. | ||
| + | #Specify a name and display name. | ||
| + | |media1=ASAddToastData.png | ||
| + | }} | ||
| + | |||
| + | {{NoteFormat|To add a new folder to the list, you can do one of the following: | ||
| + | * Click '''Add Folder'''; or | ||
| + | * To add a subfolder, click the '''Folder''' drop-down list box, select a folder, and then click the '''Add folder''' icon.|2}} | ||
| + | |||
| + | {{AnchorDiv|Caller_ID}} | ||
| + | == Caller ID== | ||
| + | On the '''Caller ID''' page, you can create a list of Caller Identification (ID) options to be displayed when an agent makes an outbound call or transfer. A Caller ID is typically the phone number that you want displayed on the phone of the person who receives the call when the agent consults, conferences, or transfers a call. | ||
| + | |||
| + | You can also specify a display name, such as your company name, to be included with the Caller ID. For example, SalesForMore 1-555-555-5555. In this case, Agent Desktop shows '''SalesForMore''' on the list of Caller IDs that an agent can select. | ||
| + | |||
| + | ===Creating a sharable Caller ID business attribute=== | ||
| + | |||
| + | Caller IDs can be used as sharable business attributes for agents, agents groups, and the global contact center. To view an article about how to create sharable business attributes, see [[Documentation:PSAAS:Administrator:AgentSetupSharedAttributes|Sharing Business Attributes in Agent Setup]]. | ||
| + | |||
| + | {{NoteFormat| | ||
| + | * To view an example of Caller ID options in Agent Desktop, see [[Documentation:PSAAS:Agent:Voice#callid|How do I manually select a Caller Identification?]] in ''Agent Desktop Help''. | ||
| + | * In the table of configured Caller IDs, in addition to selecting and adding Caller IDs, you can also filter items using the '''Quick Filter''' field and delete a Caller ID.|2}} | ||
| + | |||
| + | ===Selecting a Caller ID=== | ||
| + | {{CloudStep_Stack | ||
| + | |title= | ||
| + | |text= | ||
| + | <ol> | ||
| + | <li>Select a business attribute: | ||
| + | <ol type=a> | ||
| + | <li> Select the folder you want to view from the '''Folder''' drop-down list box.</li> | ||
| + | <li> Click the second drop-down list box and select the business attribute for the Caller ID. | ||
| + | <p>You can consider a business attribute to be the container that holds a list of Caller IDs that have a common theme. </p> | ||
| + | </li> | ||
| + | </ol> | ||
| + | </li> | ||
| + | <li> Select a Caller ID from the list. | ||
| + | </li> | ||
| + | </ol> | ||
| + | |media1=ASSelectCallerID.png | ||
| + | }} | ||
| + | |||
| + | ===Adding a new Caller ID=== | ||
| + | {{CloudStep_Stack | ||
| + | |title= | ||
| + | |text= | ||
| + | # Select the folder you want to view from the '''Folder''' drop-down list box. | ||
| + | # Click the second drop-down list box and select the business attribute into which you want to add the Caller ID. | ||
| + | # Click '''Add'''. | ||
| + | #Type the '''Name''' and '''Display Name''' for the new Caller ID. | ||
| + | |media1=ASAddCallerID.png | ||
| + | }} | ||
| + | |||
| + | {{NoteFormat|To add a new folder to the list, you can do one of the following: | ||
| + | * Click '''Add Folder'''; or | ||
| + | * To add a subfolder, click the '''Folder''' drop-down list box, select a folder, and then click the '''Add folder''' icon.|2}} | ||
| + | |||
| + | ==Next Steps== | ||
| + | |||
| + | Now that you have configured your Agent Desktop settings, you can proceed to configure Desktop Options for your contact center. See [[umgrDesktopOptions|Desktop Options]]. | ||
| + | |||
| + | |||
| + | [[Category:V:PSAAS:Julie]] | ||
Latest revision as of 22:45, June 21, 2020
Contents
Agent Desktop settings
Configuring your Agent Desktop settings involves customizing the available options to meet the specific needs of your contact center.
To access the Contact Center Settings tab, click Contact Center Settings on the application menu across the top of Agent Setup. On the Contact Center Settings tab, you will see a navigation menu on the left hand side. You can see only the objects that permissions enable you to view. If you need to edit an object that you don't see on the interface, contact your administrator.
You can customize the following objects:
Skills
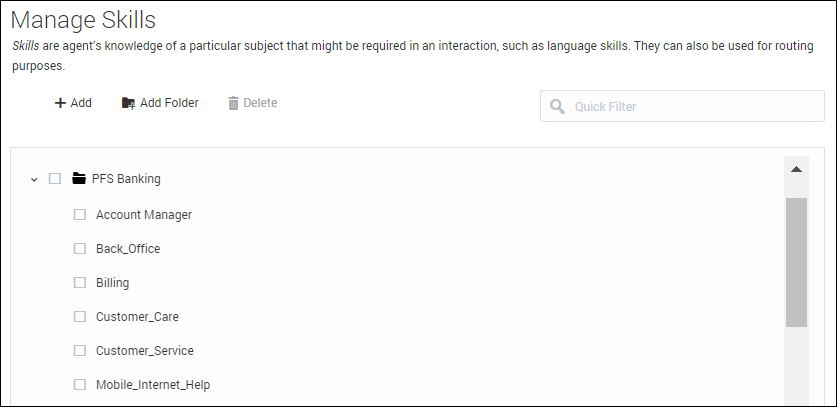
On the Skills page, you can add and delete skills, as well as organize the skills into folders.
Skills are an agent's knowledge of a particular subject that might be required in an interaction, such as language skills. They can also be used for routing purposes.
To add a skill:
- Click Add.
- Type a name in the Name field.
You can also organize skills into folders. If needed, select ![]() Add Folder to create a new folder.
Add Folder to create a new folder.
Dispositions
On the Dispositions page, you can create a list of Disposition options to be displayed when an agent makes an outbound call or transfer. Dispositions are descriptions of the final outcome of a call. These codes are used to flag calls for reporting purposes.
Creating a sharable Disposition business attribute
Dispositions can be used as sharable business attributes for agents, agent groups, and the global contact center. To view an article about how to create sharable business attributes, see Sharing Business Attributes in Agent Setup.
- To view an example of Disposition options in Agent Desktop, see What do I do at the end of a call? in Agent Desktop Help.
- In the table of configured Dispositions, in addition to selecting and adding Dispositions, you can also filter items using the Quick Filter field and delete a Disposition.
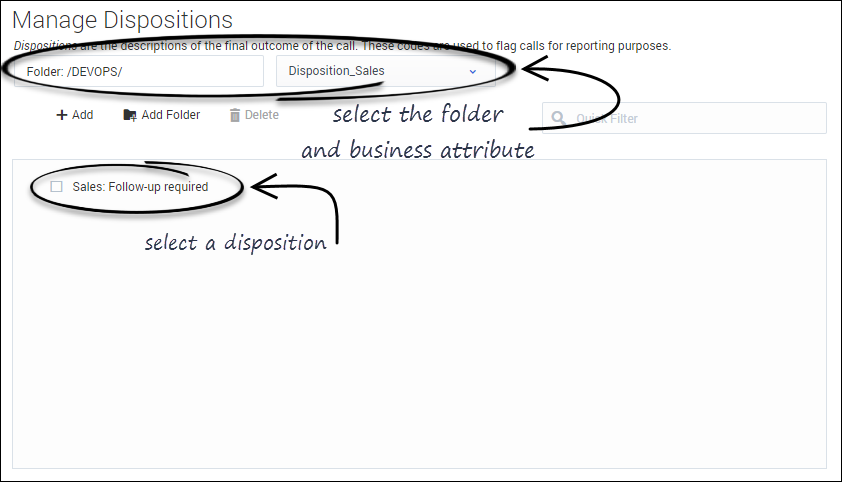
Selecting a disposition
- Select a business attribute:
- Select the folder you want to view from the Folder drop-down list box.
- Click the second drop-down list box and select the business attribute for the Disposition.
You can consider a business attribute to be the container that holds a list of Dispositions that have a common theme.
- Select a Disposition from the list.
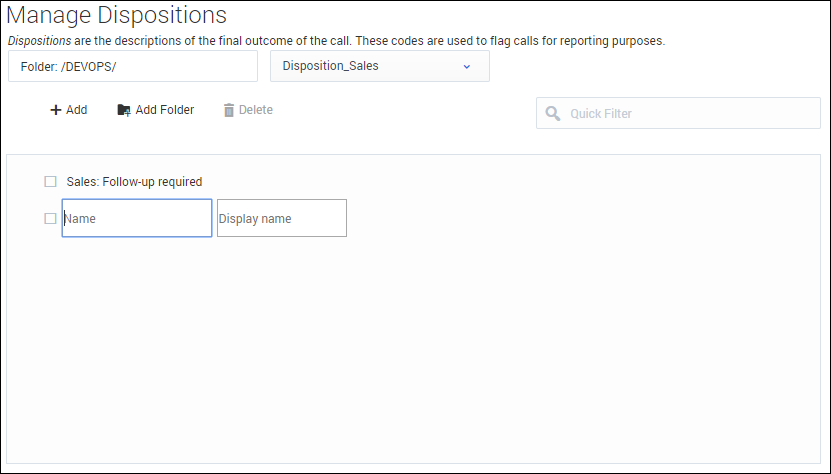
Adding a disposition
- Select the folder you want to view from the Folder drop-down list box.
- Click the second drop-down list box and select the business attribute into which you want to add the Disposition.
- Click Add.
- Type the Name and Display Name for the new Disposition.
- Click Add Folder; or
- To add a subfolder, click the Folder drop-down list box, select a folder, and then click the Add folder icon.
Custom agent states
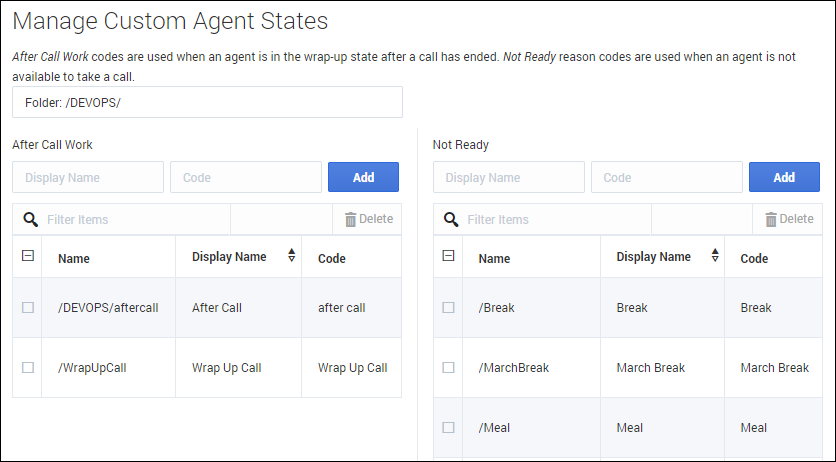
On the Custom Agent States tab, you can add custom agent states that an agent can select for After Call Work and Not Ready reasons.
You can organize custom agent states into folders. When you select the Folder option, a drop-down list box is displayed where you can select a folder or click the add folder icon ![]() to create a new folder.
to create a new folder.
Once you have selected the folder, enter an appropriate Display Name (example: Lunch Break) and a relevant Code that is unique.
Global Favorites
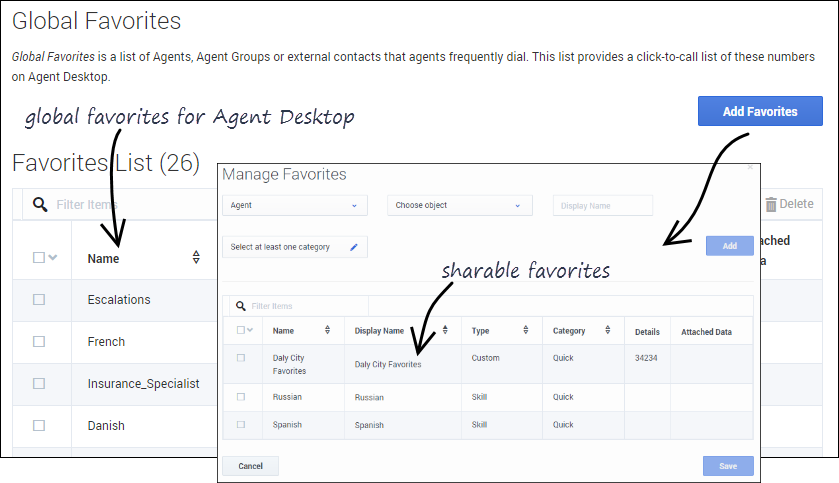
As a contact center administrator, you can create and maintain a list of Favorites, which are contacts and internal targets that your agents can access quickly in the Team Communicator. To see how agents use Global Favorites in Agent Desktop, see How do I set up my favorites? in the Agent Dektop Help guide.
In addition to managing favorites from the Desktop Settings page, you can also manage favorites on the Agent Groups page and the Add/Manage User window. No matter from what screen you add a favorite, you can include the favorite in the list of shareable favorites to be reused in all places where Global Favorites (or Personal Favorites for user accounts) are available for configuration in Agent Setup.
To learn more about how to work with Global Favorites, including a scenario-based demonstration, see Working with Global Favorites.
External URLs
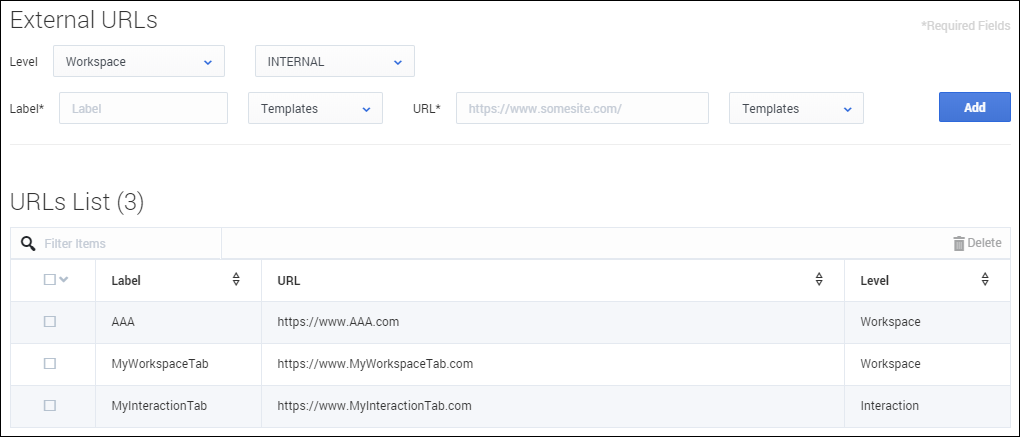
You can integrate internal and external websites into your agent's main view. At the Agent Desktop level, the external website is displayed in dedicated tabs. These tabs allow you to access the website without leaving Agent Desktop.
At the interaction level, there are two ways to display websites depending on the main interaction type.
- For voice, the external website is displayed in the background when an interaction is selected. When the interaction is unselected or closed, the external website is replaced with the previous panel displayed in the background.
- For multimedia, the external website is displayed in a dedicated view in the case data.
To add a URL to the list, select Workspace or Interaction from the Level menu, type a label for the URL, type or paste the URL in the URL field, and click Add.
Additionally, you can add the following field codes, which are supported for both the label and url options in the Templates drop-down menus:
- Agent.FullName
- Agent.UserName
- Agent.LastName
- Agent.FirstName
- Agent.EmployeeId
An external web site URL can be defined using the $AttachedData.Y$ parameter to have flexible text in the URL where Y represents an attached data name.
- If the $AttachedData.Y$ parameter is specified for the external website URL, and Y is not part of the attached data associated with an interaction, the external website is not displayed.
- If an agent manually adds the attached data to the interaction (or if it's added by any other means), then the external website tab is displayed with the content of the external website.
For example, the external website specified as follows:
label = Customer Location
url = https://www.bing.com/search?q=$AttachedData.CustomerLocation$
With this URL, if an interaction is received with a CustomerLocation attached data with the value of Paris, then the external website will be displayed in a dedicated tab called Customer Location, and the external web site will be https://www.bing.com/search?q=Paris
- INTERNAL: The web application is displayed in a dedicated tab in Agent Desktop. It can be viewed and used when the agent clicks the tab to display it. This is the default behavior.
- EXTERNAL: The web application is displayed in a popup window.
- BACKGROUND: The web application is displayed in the background when the interaction is selected. When the interaction is deselected or closed, the third-party website is replaced with the previous panel that was displayed in the background. This mode is only applicable at the interaction level.
- HIDDEN:The web application is loaded but not displayed in Agent Desktop. You can use this mode to integrate Agent Desktop with a non-web application.
Case Data
On the Case Data page, you can specify the information to be displayed to agents when a call, chat, or other interaction is transferred to them.
Creating a sharable Case Data business attribute
Case data can be used as sharable business attributes for agents, agent groups, and the global contact center. To view an article about how to create sharable business attributes, see Sharing Business Attributes in Agent Setup.
- To view an example of Case Data in Agent Desktop, see Contact and interaction history in Agent Desktop Help.
- In the table of configured Case Data, in addition to selecting and adding Case Data, you can also filter items using the Quick Filter field and delete a Case Data.
Selecting Case Data
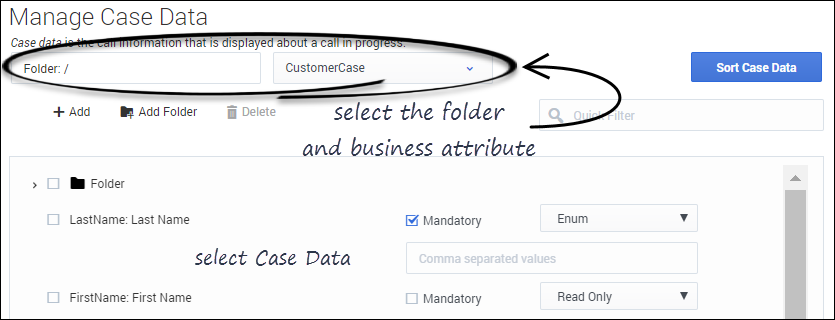
- Select a business attribute:
- Select the folder you want to view from the Folder drop-down list box.
- Click the second drop-down list box and select the business attribute for the Disposition.
You can consider a business attribute to be the container that holds a list of Dispositions that have a common theme.
- Select a Case Data from the list.
Adding Case Data
Select the folder you want to view from the Folder drop-down list box.
- Click the second drop-down list box and select the business attribute into which you want to add the Case Data.
- Click Add.
- Specify a name and display name.
- Select Mandatory to specify that the case data is mandatory.
- Enable the Read Only option if you do not want the agent to be able to update the data. Or, select a data validation type, such as Boolean, String, Integer, or Enum which allows the agent to edit the data. If the case data is mandatory, the Read Only option is disabled.
- Click Add Folder; or
- To add a subfolder, click the Folder drop-down list box, select a folder, and then click the Add folder icon.
To configure the order in which the case is displayed in the UI, click Sort Case Data and follow the instructions in the dialog box.
Toast Data
On the Toast Data page, you can specify the information to be displayed to the agent when they receive a call, chat, or other interaction.
Creating a sharable Toast business attribute
Toast Data can be used as sharable business attributes for agents, agents groups, and the global contact center. To view an article about how to create sharable business attributes, see Sharing Business Attributes in Agent Setup.
- To view an example of Toast Data in Agent Desktop, see Contact and interaction history in Agent Desktop Help.
- In the table of configured Toast Data, in addition to selecting and adding Toast Data, you can also filter items using the Quick Filter field and delete a Toast Data.
Selecting Toast Data
- Select a business attribute:
- Select the folder you want to view from the Folder drop-down list box.
- Click the second drop-down list box and select the business attribute for the Disposition.
You can consider a business attribute to be the container that holds a list of Dispositions that have a common theme.
- Select a Toast Data from the list.
Adding Toast Data
Select the folder you want to view from the Folder drop-down list box.
- Click the second drop-down list box and select the business attribute into which you want to add the Toast Data.
- Click Add.
- Specify a name and display name.
- Click Add Folder; or
- To add a subfolder, click the Folder drop-down list box, select a folder, and then click the Add folder icon.
Caller ID
On the Caller ID page, you can create a list of Caller Identification (ID) options to be displayed when an agent makes an outbound call or transfer. A Caller ID is typically the phone number that you want displayed on the phone of the person who receives the call when the agent consults, conferences, or transfers a call.
You can also specify a display name, such as your company name, to be included with the Caller ID. For example, SalesForMore 1-555-555-5555. In this case, Agent Desktop shows SalesForMore on the list of Caller IDs that an agent can select.
Creating a sharable Caller ID business attribute
Caller IDs can be used as sharable business attributes for agents, agents groups, and the global contact center. To view an article about how to create sharable business attributes, see Sharing Business Attributes in Agent Setup.
- To view an example of Caller ID options in Agent Desktop, see How do I manually select a Caller Identification? in Agent Desktop Help.
- In the table of configured Caller IDs, in addition to selecting and adding Caller IDs, you can also filter items using the Quick Filter field and delete a Caller ID.
Selecting a Caller ID
- Select a business attribute:
- Select the folder you want to view from the Folder drop-down list box.
- Click the second drop-down list box and select the business attribute for the Caller ID.
You can consider a business attribute to be the container that holds a list of Caller IDs that have a common theme.
- Select a Caller ID from the list.
Adding a new Caller ID
- Select the folder you want to view from the Folder drop-down list box.
- Click the second drop-down list box and select the business attribute into which you want to add the Caller ID.
- Click Add.
- Type the Name and Display Name for the new Caller ID.
- Click Add Folder; or
- To add a subfolder, click the Folder drop-down list box, select a folder, and then click the Add folder icon.
Next Steps
Now that you have configured your Agent Desktop settings, you can proceed to configure Desktop Options for your contact center. See Desktop Options.

