
(Update with the copy of version: 9.0.0DRAFT) |
(Modified comment string Agent Desktop with Agent Workspace) |
||
| (5 intermediate revisions by 2 users not shown) | |||
| Line 1: | Line 1: | ||
| − | = Integrating Gplus Adapter = | + | = Integrating Gplus Adapter in Lightning= |
{{NoteFormat| | {{NoteFormat| | ||
| − | + | <ol> | |
| − | + | <li><p>Ensure that [[Documentation:HTCC:Dep:Welcome|Agent Workspace]] release 9 has been deployed in your environment.</p></li> | |
| − | + | <li><p>Copy the Agent Workspace domain name from the Agent Workspace URL to build Gplus Adapter URL. The domain in the Agent Workspace URL should be used in Gplus Adapter URL.</p> | |
| + | </li> | ||
| + | <li><p>The Adapter URL will look like this:<br /><br /><tt><nowiki>https://<your Agent Workspace domain>/ui/crm-workspace/index.html</nowiki></tt></li> | ||
| + | </ol> | ||
|1}} | |1}} | ||
| + | |||
| + | {{NoteFormat|If you are migrating from Adapter 8.5, you must first follow the migration procedure in [[Documentation:HTCC:MIG:UpgradeGplus:9.0.0|this article]].|1}} | ||
| + | |||
| + | {{NoteFormat|For information about integrating Gplus Adapter in Classic, [[GPlusSalesforceClassic|go here]].|1}} | ||
Here’s a summary of the steps you need to take to setup and access Gplus Adapter in Salesforce. | Here’s a summary of the steps you need to take to setup and access Gplus Adapter in Salesforce. | ||
| Line 11: | Line 18: | ||
# [[GPlusSalesforceLightning#setupAddUsers|Add users]] to your Call Center. | # [[GPlusSalesforceLightning#setupAddUsers|Add users]] to your Call Center. | ||
# [[GPlusSalesforceLightning#setupAddUtility|Configure the Utility bar]] for Gplus Adapter for the agents to easily access the application. | # [[GPlusSalesforceLightning#setupAddUtility|Configure the Utility bar]] for Gplus Adapter for the agents to easily access the application. | ||
| − | <!--# [[ | + | <!--# [[GPSSO#SSO|Configure Gplus Adapter SSO]].--> |
{{AnchorDiv|setupAD}} | {{AnchorDiv|setupAD}} | ||
| Line 49: | Line 56: | ||
|text= | |text= | ||
# In the setup page, using the '''Quick Find''' field, search for and access the '''App Manager''' settings page. <br/> | # In the setup page, using the '''Quick Find''' field, search for and access the '''App Manager''' settings page. <br/> | ||
| − | # Create a new application by clicking '''New Lightning App'''. Follow the steps in {{#Widget:ExtLink|link=https://trailhead.salesforce.com/en/content/learn/modules/ | + | # Create a new application by clicking '''New Lightning App'''. Follow the steps in {{#Widget:ExtLink|link=https://trailhead.salesforce.com/en/content/learn/modules/lightning_app_builder|displaytext=New Lightning App creation procedure}} in Salesforce documentation. |
# When creating a new Lightning app, follow the additional steps below to configure the utility items for your Gplus Adapter. | # When creating a new Lightning app, follow the additional steps below to configure the utility items for your Gplus Adapter. | ||
#* In the '''App Options''' step, ensure that you select '''Console Navigation'''. Gplus Adapter does not support '''Standard Navigation'''. | #* In the '''App Options''' step, ensure that you select '''Console Navigation'''. Gplus Adapter does not support '''Standard Navigation'''. | ||
#* In the '''Utility Items''' step, add <tt>Open CTI Softphone</tt> by clicking '''Add Utility Item'''. | #* In the '''Utility Items''' step, add <tt>Open CTI Softphone</tt> by clicking '''Add Utility Item'''. | ||
#* For the soft phone, you can modify the display properties such as '''Label, Panel Width''' and '''Panel Height'''. | #* For the soft phone, you can modify the display properties such as '''Label, Panel Width''' and '''Panel Height'''. | ||
| + | #*Select '''Start automatically''' to start loading the data when the Gplus Adapter first opens to ensure that it initializes immediately; otherwise, Gplus Adapter does not load until an agent first opens it from the '''Utility Bar'''. If Gplus Adapter is not initialized immediately, then agents do not receive voice calls until they first open the application. | ||
# Specify '''Navigation Items''' and '''User Profiles''' for the new Lightning app by referring to Salesforce documentation. | # Specify '''Navigation Items''' and '''User Profiles''' for the new Lightning app by referring to Salesforce documentation. | ||
# Save the application. | # Save the application. | ||
|media1=GplusLightUtility.png | |media1=GplusLightUtility.png | ||
| + | }} | ||
| + | {{AnchorDiv|MultiRegion}} | ||
| + | {{CloudStep_Stack | ||
| + | |title=Multi-region and multiple Salesforce Call Centers configuration | ||
| + | |text= | ||
| + | |textwide= | ||
| + | Your Genesys Engage deployment may have multiple regions. For multiple regions you must create a unique Salesforce Call Center for each region and use the CTI Adapter URL specific to each region. Agents may only be assigned to a single Salesforce Call Center. Agents assigned to one region may not access other regions unless their Salesforce account is moved from one Salesforce Call Center to another Call Center. Follow these steps to create a Salesforce Call Center for a second region: | ||
| + | |||
| + | #[https://help.salesforce.com/articleView?id=cti_admin_createcc.htm&type=5 Clone your existing Salesforce Call Center]. | ||
| + | #In the new Salesforce Call Center replace the '''CTI Adapter URL''' with the second region URL. For example <nowiki> https://gwa-<region2>.genesyscloud.com/ui/crm-workspace/index.html</nowiki>. | ||
| + | #Add agents for the second region to the created Call Center. '''Note:''' Agents must be assigned to one Salesforce Call Center only. | ||
| + | |||
| + | {{NoteFormat|The same Genesys Contact Center field mapping configuration is shared by the two Salesforce Call Centers.|1}} | ||
| + | |media1= | ||
| + | |video= | ||
}} | }} | ||
| Line 66: | Line 89: | ||
# Click the phone icon from the bar at the bottom-left corner to open the Gplus Adapter application. | # Click the phone icon from the bar at the bottom-left corner to open the Gplus Adapter application. | ||
# Log in to the application to start using the Genesys contact center functionalities. | # Log in to the application to start using the Genesys contact center functionalities. | ||
| − | |||
| − | |||
| − | |||
| − | |||
| − | |||
| − | |||
| − | |||
| − | |||
| − | |||
[[Category:V:HTCC:9.0.0]] | [[Category:V:HTCC:9.0.0]] | ||
Latest revision as of 15:31, July 29, 2022
Contents
Integrating Gplus Adapter in Lightning
Important
Ensure that Agent Workspace release 9 has been deployed in your environment.
Copy the Agent Workspace domain name from the Agent Workspace URL to build Gplus Adapter URL. The domain in the Agent Workspace URL should be used in Gplus Adapter URL.
The Adapter URL will look like this:
https://<your Agent Workspace domain>/ui/crm-workspace/index.html
Important
If you are migrating from Adapter 8.5, you must first follow the migration procedure in this article.Important
For information about integrating Gplus Adapter in Classic, go here.Here’s a summary of the steps you need to take to setup and access Gplus Adapter in Salesforce.
- Enable Lightning in your Salesforce environment.
- Integrate Gplus Adapter in Salesforce Lightning.
- Add users to your Call Center.
- Configure the Utility bar for Gplus Adapter for the agents to easily access the application.
Integrating Gplus Adapter in Salesforce Lightning
Follow these steps:
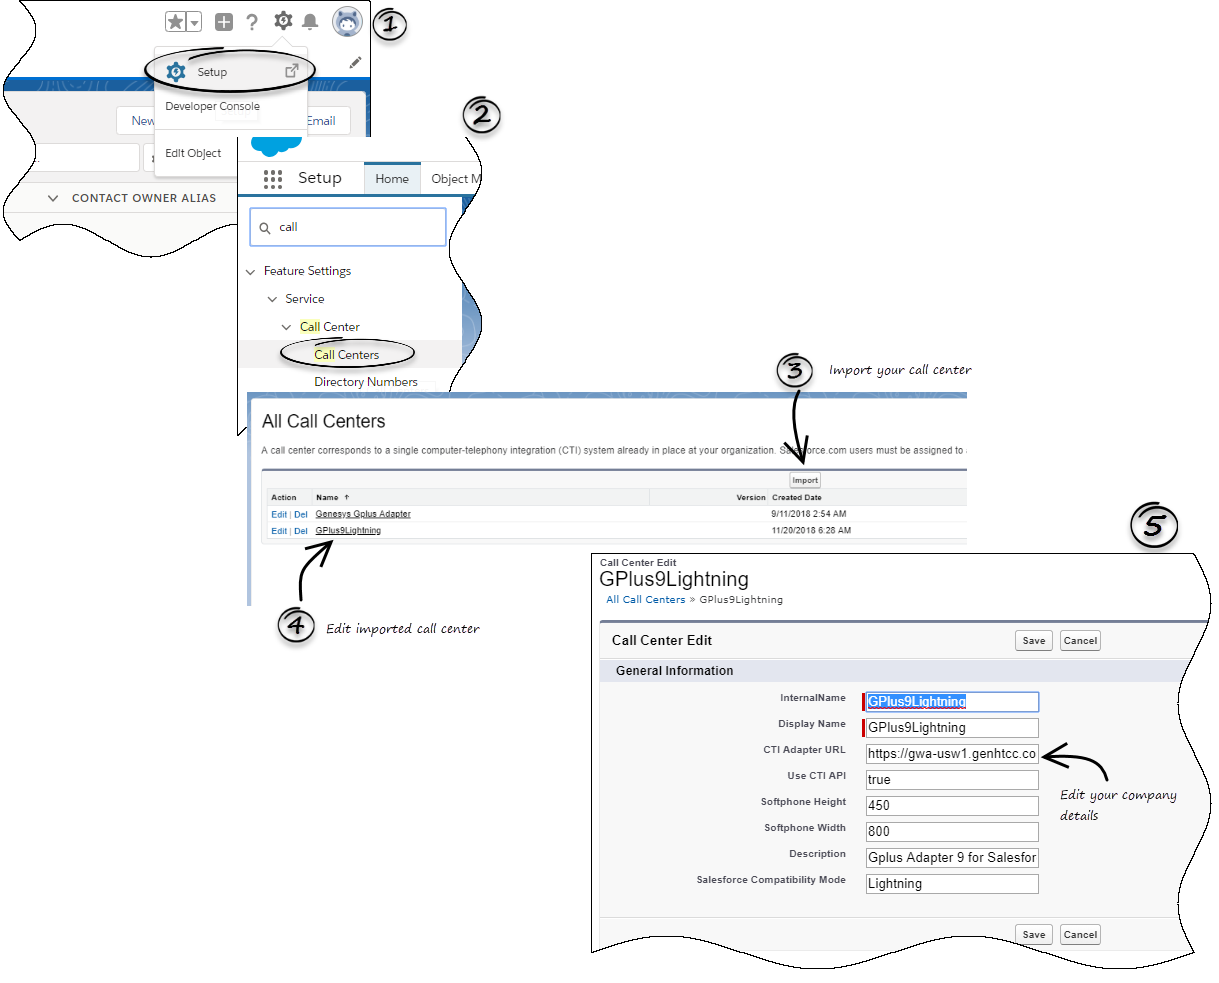

- Click the gear icon in the top right corner and then click Setup.
- Using the Quick Find field, search for and access the Call Centers setup page.
- Using the Import functionality, import the lightning-callcenter.xml file from your computer. If you have not already downloaded the file, download it from here.
- From the All Call Centers list, click the Call Center you just imported. For example, GPlus9Lightning.
- Take the Adapter URL that you built at the beginning of this article and enter it in the CTI Adapter URL field. The domain name can be in one of two formats. If you do not have a unique tenant, the domain name includes a region:
https://gwa-<region>.genesyscloud.com/ui/crm-workspace/index.html.
If you have a unique tenant, your URL will include your company name:
https://<your company name>.genesyscloud.com/ui/crm-workspace/index.html. - Save the changes.
Adding users to Call Center

The next step after you setup your Adapter is to add users to your call center. You must add at least one user to your call center.
- In the Call Centers setup page, click Manage Call Center Users.
- Click Add More Users.
- Search the interface to find the users you want to add to Gplus Adapter.
- Select the users you want to add and click Add to Call Center.
Tip
From the Manage Users page, select the users you want to remove from a call center and click Remove Users.Configuring the Utility bar

- In the setup page, using the Quick Find field, search for and access the App Manager settings page.
- Create a new application by clicking New Lightning App. Follow the steps in New Lightning App creation procedure in Salesforce documentation.
- When creating a new Lightning app, follow the additional steps below to configure the utility items for your Gplus Adapter.
- In the App Options step, ensure that you select Console Navigation. Gplus Adapter does not support Standard Navigation.
- In the Utility Items step, add Open CTI Softphone by clicking Add Utility Item.
- For the soft phone, you can modify the display properties such as Label, Panel Width and Panel Height.
- Select Start automatically to start loading the data when the Gplus Adapter first opens to ensure that it initializes immediately; otherwise, Gplus Adapter does not load until an agent first opens it from the Utility Bar. If Gplus Adapter is not initialized immediately, then agents do not receive voice calls until they first open the application.
- Specify Navigation Items and User Profiles for the new Lightning app by referring to Salesforce documentation.
- Save the application.
Multi-region and multiple Salesforce Call Centers configuration
Your Genesys Engage deployment may have multiple regions. For multiple regions you must create a unique Salesforce Call Center for each region and use the CTI Adapter URL specific to each region. Agents may only be assigned to a single Salesforce Call Center. Agents assigned to one region may not access other regions unless their Salesforce account is moved from one Salesforce Call Center to another Call Center. Follow these steps to create a Salesforce Call Center for a second region:
- Clone your existing Salesforce Call Center.
- In the new Salesforce Call Center replace the CTI Adapter URL with the second region URL. For example https://gwa-<region2>.genesyscloud.com/ui/crm-workspace/index.html.
- Add agents for the second region to the created Call Center. Note: Agents must be assigned to one Salesforce Call Center only.
Important
The same Genesys Contact Center field mapping configuration is shared by the two Salesforce Call Centers.Accessing Gplus Adapter
You can access the Gplus Adapter application by following the procedure below.
- In the top-left corner, click the App Launcher icon
 .
. - Select the app that you created when setting up the Gplus Adapter application.
- Click the phone icon from the bar at the bottom-left corner to open the Gplus Adapter application.
- Log in to the application to start using the Genesys contact center functionalities.
This page was last edited on July 29, 2022, at 15:31.
Comments or questions about this documentation? Contact us for support!