
screenpop.object-type-new-record
Section: crm-adapter
Default Value: No default value
Valid Values: A string that contains the name of the custom section that you have defined to contain the new object type record name.
Changes Take Effect: After the next platform configuration refresh interval.
Introduced: 9.0.0
Related Options: screenpop.object-type
Specifies the section name where the 'entityName' option is configured. This option must contain a valid object name like 'Account', 'Case', 'Contact', 'Lead' or a user data key in the following format: '$key_name$'.
- Example 1:
- Section name: custom.section.newrecord
- Key: entityName
- Value: "Contact"
- Example 2:
- Section name: custom.section.newrecord
- Key: entityName
- Value: '$attach_data_entityname$'
- where attach_data_entityname is the name of the user data attribute containing the valid object name.
screenpop.object-type-search
Section: crm-adapter
Default Value: No default value
Valid Values: A string that contains the name of the custom section that you have defined to contain the default search string. The search string must be at least 3 characters.
Changes Take Effect: After the next platform configuration refresh interval.
Introduced: 9.0.0
Related Options: screenpop.object-type
Specifies the section name where the 'searchString' option is configured. This option must contain a valid string at least 3 characters in length or a user data key in the following format: '$key_name$'.
- Example 1:
- Section name: custom.section.search
- Key: searchString
- Value: "abc"
- Example 2:
- Section name: custom.section.search
- Key: searchString
- Value: '$attach_data_search$'
- where attach_data_search is the name of the user data attribute containing a valid string of at least 3 characters.
screenpop.object-type-list
Section: crm-adapter
Default Value: No default value
Valid Values: A string that contains the name of the custom section that you have defined to contain the object list.
Changes Take Effect: After the next platform configuration refresh interval.
Introduced: 9.0.0
Related Options: screenpop.object-type
Specifies the section name where the 'scope' and 'listViewId' options are configured. These options must contain a valid object name like 'Contact' and a List ID like '00B3m000008e3AwEAI', or user data keys in the following format: '$key_name$'.
- Example 1:
- Section name: custom.section.list
- key: listViewId
- value: 00B3m000008e3AwEAI
- key: scope
- value: "Contact"
- Example 2:
- Section name: custom.section.list
- key: listViewId
- value: '$attach_data_list_id$'
- where attach_data_key is the name of the user data attribute containing the valid ID of a list.
- key: scope
- value: '$attach_data_list_scope$'
- where attach_data_list_scope is the name of the user data attribute containing the valid object name of a list item.
screenpop.object-type-object-home
Section: crm-adapter
Default Value: No default value
Valid Values: A string that contains the name of the custom section you have defined to contain the Object Home.
Changes Take Effect: After the next platform configuration refresh interval.
Introduced: 9.0.0
Related Options: screenpop.object-type
Specifies section name where the 'scope' option is configured. The 'scope' option must contain a valid object name like 'Contact' or user data key in the following format: '$key_name$'.
- Example 1:
- Section name: custom.section.objecthome
- key: scope
- value: "Contact"
- Example 2:
- Section name: custom.section.objecthome
- key: scope
- value: '$attach_data_key$'
- where attach_data_key is the name of the user data attribute containing the valid object name.
screenpop.object-type-url
Section: crm-adapter
Default Value: No default value
Valid Values: A string that contains the name of the custom section you have defined to contain the URL.
Changes Take Effect: After the next platform configuration refresh interval.
Specifies the URL section name for the screen pop object type. The custom section must contain the key "url". This key must contain a valid URL or an '$attach_data_key$' name.
- Example 1:
- Section name: custom.section.url
- key: url
- value: "https://www.genesys.com"
- Example 2:
- Section name: custom.section.url
- key: url
- value: '$attach_data_key$'
- where attach_data_key is the name of the user data attribute containing the URL address of the website to pop.
screenpop.object-type-flow
Section: crm-adapter
Default Value: No default value
Valid Values: A string that contains the name of the custom section that you have defined to contain the Flow to be executed during the ringing or established phase.
Changes Take Effect: After the next platform configuration refresh interval.
Introduced: 9.0.0
Related Options: screenpop.object-type
Specifies the section name where the flowDevName and flowArgs options are configured. Options must contain a valid flow name and flow arguments in JSON format. Values may also be user data keys in the following format: '$key_name$'.
- Example 1:
- Section name: custom.section.flow
- Key: flowDevName
- Value: 'Test_flow'
- Key: flowArgs
- Value: '[{"name": "text", "type": "String", "value": "Test"}, {"name": "number", "type": "Number","value": 5}]'
- Example 2:
- Section name: custom.section.flow
- Key: flowDevName
- Value: '$attach_data_flow_name$'
- where attach_data_flow_name is the name of the user data attribute containing the name of the Flow.
- Key: flowArgs
- Value: '$attach_data_flow_param$'
- where attach_data_flow_param is the name of the user data attribute containing the Flow parameters.
screenpop.object-type
Section: crm-adapter
Default Value: SOBJECT
Valid Values: SOBJECT, FLOW, URL, OBJECTHOME, LIST, SEARCH, NEW_RECORD_MODAL
Changes Take Effect: Immediately
Introduced: 9.0.0
Related Options: screenpop.object-type-flow, screenpop.object-type-url, screenpop.object-type-object-home, screenpop.object-type-list, screenpop.object-type-search, screenpop.object-type-new-record
Specifies object type to screen pop in Salesforce. The following options enable you to configure the supported object types:
- screenpop.object-type-flow
- screenpop.object-type-url
- screenpop.object-type-object-home
- screenpop.object-type-list
- screenpop.object-type-search
- screenpop.object-type-new-record
interaction.case-data.is-read-only-on-idle
Section: interaction-workspace
Default Value: true
Valid Values: true, false
Changes Take Effect: When the session is started or restarted.
If the value of this option is true, changes to the case data after a voice interaction has been released are prevented. When some values are modified or added after the voice call is released, the update is pushed to back-end as a User Event when agent clicks Mark Done. This option can be overridden by a routing strategy as described in this Deployment Guide.
salesforce.user-data.object-type-key
Section: crm-adapter
Default Value: No default value
Valid Values: A valid user key name to store the Salesforce object type name. For example: sf_object_type
Changes Take Effect: When the session is started or restarted.
Introduced: 9.0.0
Specifies the key Adapter uses when saving the type of the focused Salesforce object to attached data.
salesforce.user-data.object-name-key
Section: crm-adapter
Default Value: No default value
Valid Values: A valid user key name to store the Salesforce object name. For example: sf_object_name
Changes Take Effect: When the session is started or restarted.
Introduced: 9.0.0
Specifies the key Adapter uses when saving the name of the focused Salesforce object to attached data.
salesforce.user-data.object-id-key
Section: crm-adapter
Default Value: No default value
Valid Values: A valid user key name to store the Salesforce object id. For example: sf_object_key
Changes Take Effect: When the session is started or restarted.
Introduced: 9.0.0
Specifies the key Adapter uses when saving the ID of the focused Salesforce object to attached data.
salesforce.new-record.field-mapping
Section: crm-adapter
Default Value:
Valid Values: The name of a configuration section that contains the mapping of a new record custom field mapping.
Changes Take Effect: When the session is started or restarted.
Introduced: 9.0.000.57
Related Options: screenpop.save-new-record-criterion, screenpop.object-api-name
Specifies the name of the configuration section where the mapping is defined. In the section, each key must correspond to an interaction UserData key and each value must correspond to the name of the Salesforce standard or custom object field.
screenpop.object-api-name
Section: crm-adapter
Default Value:
Valid Values: The name of a Salesforce custom object API
Changes Take Effect: When the session is started or restarted.
Introduced: 9.0.000.57
Related Options: screenpop.save-new-record-criterion, salesforce.new-record.field-mapping
Specifies the Salesforce custom object API name. To find the API name, go to Salesforce Setup - Object Manager - Custom Object - Details - API Name.
screenpop.save-new-record-criterion
Section: crm-adapter
Default Value:
Valid Values: no_matching_record, always
Changes Take Effect: When the session is started or restarted.
Dependencies: screenpop.object-api-name, salesforce.new-record.field-mapping
Introduced: 9.0.000.57
Specifies whether Gplus Adapter creates new Salesforce record on screen pop.
- If left blank, no new Salesforce record is created.
- no_matching_record: A new Salesforce record is created if Salesforce search returns no matching record.
- always: A new Salesforce record is created for every screen pop.
screenpop.transfer-object-key
Section: crm-adapter
Default Value: id_transfer_object
Valid Values: A valid key
Changes Take Effect: When the session is started or restarted.
Introduced: 9.0.0
Specifies the custom UserData key Adapter should use for the object ID of the focused page in Salesforce.
salesforce.enable-in-focus-page-transfer
Section: crm-adapter
Default Value: false
Valid Values: true, false
Changes Take Effect: When the session is started or restarted.
Introduced: 9.0.0
Specifies whether to update the call data with the ID of the object the agent is looking at in Salesforce when performing a voice or chat conference or transfer. If set to true, the agent receiving the voice or chat conference or transfer gets a screen pop for the most relevant object.
screenpop.openmedia.on-invite
Section: crm-adapter
Default Value: false
Valid Values: true, false
Changes Take Effect: When the session is started or restarted.
Introduced: 9.0.0
Specifies whether Adapter initiates a screen pop in Salesforce immediately after displaying the open media invite notification. If the option is not set or false, Adapter initiates a screen pop only when the agent accepts the open media invite. This option supports the open media items configured in the openmedia.workitem-channels option.
screenpop.email.on-create
Section: crm-adapter
Default Value: false
Valid Values: true, false
Changes Take Effect:
Introduced: 9.0.000.54
Specifies whether Adapter initiates a screen pop in Salesforce immediately after creating an email. If the option value is not set or is set to false, Adapter does not initiate a screen pop when a new outgoing or reply email is created.
screenpop.email.on-invite
Section: crm-adapter
Default Value: false
Valid Values: true, false
Changes Take Effect: When the session is started or restarted.
Introduced: 9.0.0
Specifies whether Adapter initiates a screen pop in Salesforce immediately after displaying the email invite notification. If the option is not set or false, Adapter initiates a screen pop only when the agent accepts the email invite.
screenpop.chat.on-invite
Section: crm-adapter
Default Value: false
Valid Values: true, false
Changes Take Effect: When the session is started or restarted.
Introduced: 9.0.0
Specifies whether Adapter initiates a screen pop in Salesforce immediately after displaying the chat or SMS invite notification. If the option is not set or false, Adapter initiates a screen pop only when the agent accepts the chat or SMS invite. For SMS, the screen pop appears only for an unassigned contact, and if the contact is already assigned to the agent in the Workspace Agent Desktop Communication tab, no screen-pop is displayed.
screenpop.search-key-regex
Section: crm-adapter
Default Value: cti_
Valid Values: A regular expression that matches one or more UserData keys.
Changes Take Effect: When the session is started or restarted.
Introduced: 9.0.0
Specifies a regular expression pattern used to match one or more UserData keys. The values for these keys are used to build the search and screen pop expression in Salesforce. If this option is not defined, Adapter uses the existing "cti_" prefix logic.
screenpop.include-ani-in-search
Section: crm-adapter
Default Value: true
Valid Values: true, false
Changes Take Effect: When the session is started or restarted.
Introduced: 9.0.0
Specifies whether the ANI is used in the screen pop search.
screenpop.include-dnis-in-search
Section: crm-adapter
Default Value: false
Valid Values: true, false
Changes Take Effect: When the session is started or restarted.
Introduced: 9.0.0
Specifies whether the pre-processed DNIS is used in the screen pop search.
screenpop.for-outbound
Section: crm-adapter
Default Value:
Valid Values: established, dialing
Changes Take Effect: When the session is started or restarted.
Introduced: 9.0.000.xx
Related Options: screenpop.id-key-regex, screenpop.include-ani-in-search, screenpop.search-key-regex, screenpop.save-new-record-criterion
Specifies whether Gplus Adapter initiates screen pops in Salesforce for outbound calls.
- If no value is specified, Gplus Adapter does not screen pop for outbound calls.
- Established: Gplus Adapter initiates a screen pop when the call is established.
- Dialing: Gplus Adapter initiates a screen pop on dialing.
screenpop.enable-for-consult
Section: crm-adapter
Default Value: false
Valid Values: true, false
Changes Take Effect: When the session is started or restarted.
Introduced: 9.0.0
Specifies whether Adapter initiates screen pops for consultation calls regardless of screenpop.enable-for-internal-calls option configuration.
screenpop.enable-for-internal-calls
Section: crm-adapter
Default Value: true
Valid Values: true, false
Changes Take Effect: When the session is started or restarted.
Introduced: 9.0.0
Specifies whether Adapter initiates screen pops for internal calls.
screenpop.on-ringing
Section: crm-adapter
Default Value: false
Valid Values: true, false
Changes Take Effect: When the session is started or restarted.
Introduced: 9.0.0
Specifies whether Adapter initiates a screen pop in Salesforce when the call is ringing. If not set or if set to false, Adapter initiates a screen pop when the call is established.
screenpop.transfer-object-key
Section: crm-adapter
Default Value: id_transfer_object
Valid Values: A valid key
Changes Take Effect: When the session is started or restarted.
Introduced: 9.0.0
Specifies the custom UserData key Adapter should use for the object ID of the focused page in Salesforce.
screenpop.search-key-regex
Section: crm-adapter
Default Value: cti_
Valid Values: A regular expression that matches one or more UserData keys.
Changes Take Effect: When the session is started or restarted.
Introduced: 9.0.0
Specifies a regular expression pattern used to match one or more UserData keys. The values for these keys are used to build the search and screen pop expression in Salesforce. If this option is not defined, Adapter uses the existing "cti_" prefix logic.
screenpop.id-key-regex
Section: crm-adapter
Default Value: No default value
Valid Values: A regular expression that matches a UserData key.
Changes Take Effect: When the session is started or restarted.
Introduced: 9.0.0
Specifies a regular expression pattern used to match a UserData key. This key's value should contain the ID of an object to screen pop in Salesforce. As with the existing screen pop behavior using the "id_" prefix, if multiple matching keys are present, Adapter only uses the first one. If this option isn't defined, Adapter uses the existing "id_" prefix logic.
screenpop.preprocessing-rule
Section: crm-adapter
Default Value: default
Valid Values: default, none, or a pre-processing rule section name.
Changes Take Effect: When the session is started or restarted.
Introduced: 9.0.0
Specifies the pre-processing rule to apply to the Automatic Number Identification (ANI) before showing the screen pop. If the option is not defined, the default rule is applied. The possible values are:
- default — applies the default rule, which removes +1 from the beginning of the ANI.
- none — turns off pre-processing.
- <pre-processing-rule-section-name> — name of the pre-processing rule section. Within this rule section, you must set the following key/value pairs:
- expression — A regex that defines the condition to be matched.
- replacement — The string to replace the matched substring. If you set this value to empty, this removes the matched section.
- description — A short description of the rule.
Here's how the default rule would be configured:
[crm-adapter]
screenpop.preprocessing-rule: preprocessing-rule-remove-prefix

[preprocessing-rule-remove-prefix]
expression: ^\\+1
replacement:
description: "Remove +1 from the beginning of the number"
screenpop.include-dnis-in-search
Section: crm-adapter
Default Value: false
Valid Values: true, false
Changes Take Effect: When the session is started or restarted.
Introduced: 9.0.0
Specifies whether the pre-processed DNIS is used in the screen pop search.
screenpop.include-ani-in-search
Section: crm-adapter
Default Value: true
Valid Values: true, false
Changes Take Effect: When the session is started or restarted.
Introduced: 9.0.0
Specifies whether the ANI is used in the screen pop search.
screenpop.id-key-regex
Section: crm-adapter
Default Value: No default value
Valid Values: A regular expression that matches a UserData key.
Changes Take Effect: When the session is started or restarted.
Introduced: 9.0.0
Specifies a regular expression pattern used to match a UserData key. This key's value should contain the ID of an object to screen pop in Salesforce. As with the existing screen pop behavior using the "id_" prefix, if multiple matching keys are present, Adapter only uses the first one. If this option isn't defined, Adapter uses the existing "id_" prefix logic.
(Created target blank page For Version: HTCC:9.0.0) |
(Update with the copy of version: 9.0.0DRAFT) |
||
| (12 intermediate revisions by 2 users not shown) | |||
| Line 1: | Line 1: | ||
| − | < | + | =Screen Pop= |
| + | Screen pop displays a relevant record or a search results list from Salesforce to support agents when they are handling interactions. | ||
| + | |||
| + | You can setup how you want Adapter to select the screen pop record from Salesforce for different type of interactions. | ||
| + | |||
| + | This process involves: | ||
| + | * [[ScreenPop#ConfiguringscreenpopsinSalesforce|Set up screen pops in Salesforce]] and | ||
| + | * [[ScreenPop#screenpoplogic|Gplus Adapter screen pops]] | ||
| + | |||
| + | {{AnchorDiv|ConfiguringscreenpopsinSalesforce}} | ||
| + | ==Set up screen pops in Salesforce== | ||
| + | To set up this functionality in Salesforce, login and go to '''Setup > Customize > Call Center > SoftPhone Layouts''' to create a SoftPhone Layout. Check out the {{#Widget:ExtLink|link=https://help.salesforce.com/HTViewHelpDoc?id=cti_admin_phonelayoutscreate.htm&language=en_US|displaytext=Salesforce documentation}} for details about configuration. | ||
| + | |||
| + | When you set up a SoftPhone Layout for Adapter, the Gplus Adapter for Salesforce ignores the SoftPhone Layout settings that control call-related fields. Instead, Adapter gets this information from [[Documentation:HTCC:IWWDep:SettingUpAgents|toast and case data]] you configure in the Genesys environment. | ||
| + | |||
| + | {{NoteFormat|Make sure you configure the '''Screen Pop Settings''' in the "CTI 2.0 or Higher Settings" section. These settings control whether the screen pop opens in a new window, tab, or Visualforce page.|1}} | ||
| + | |||
| + | {{AnchorDiv|screenpoplogic}} | ||
| + | ==Gplus Adapter screen pops== | ||
| + | Gplus Adapter can retrieve and screen pop Salesforce records for calls, chats, SMS, emails, and open media interactions. You can configure how Adapter displays a screen pop when a call or chat (including SMS) is transferred or merged in a conference. | ||
| + | |||
| + | Before you proceed with selecting the screen pop settings, get familiar with how screen pop records are selected and displayed to an agent. This section helps you understand how Adapter finds the matching Salesforce record to screen pop. Review the diagram and accompanying video for a summary of the screen pop search process. | ||
| + | |||
| + | [[File:GAPI_900_Gplus_Screen_Pop_logic_Based_On_User_Data.png|Screen pop logic to search for a record based on userData.|alt=A flowchart of Gplus Adapter Screen pop logic to search for a Salesforce record based on userData.]] | ||
| + | |||
| + | {{Video|id=665316532|Description=An overview of how Gplus Adapter for Salesforce builds a search query.|width=572|height=392}} | ||
| + | |||
| + | Here's the logic Gplus Adapter uses to determine what to send to Salesforce to request Salesforce to display a screen pop of an SOBJECT [[ScreenPop#ScreenPopType|object type]] based on the '''userData''' keys for an interaction: | ||
| + | |||
| + | <ol> | ||
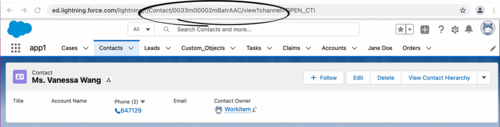
| + | <li>Find the first '''userData''' keyname with the '''id_''' prefix and request a screen pop based on the key-value. The Salesforce record ID is included in the record URL.<br> | ||
| + | [[File:GAPI_900_Salesforce_Record_ID_In_URL.png|The Salesforce Record ID is displayed in the Contact Record URL|alt=The Salesforce Record ID displayed in the Contact Record URL.|500px]]</li> | ||
| + | <li>Otherwise, combine values based on the following conditions: | ||
| + | <ul> | ||
| + | <li>Find the keys with the '''cti_''' prefix, such as "cti_FirstName" or "cti_PhoneNumber", and request a screen pop based on the key-values. | ||
| + | </li> | ||
| + | <li>If the {{Optionslink|link=Options:Genesys_Web_Services:crm-adapter:screenpop-id-key-regex|screenpop.id-key-regex}} option is configured, Adapter applies a regular expression (RegEx) to match userData key-names. Refer to [[ScreenPop#RegEx|Search for records using a Regular Expression]]. | ||
| + | </li> | ||
| + | <li>For voice calls: | ||
| + | <ul> | ||
| + | <li>If the {{Optionslink|link=Options:Genesys_Web_Services:crm-adapter:screenpop-include-ani-in-search|screenpop.include-ani-in-search}} option is specified (<tt>true</tt> by default), Adapter finds the originating phone number by the Automatic Number Identification (ANI) value and requests a screen pop based on the '''ANI'''.</li> | ||
| + | <li>If the {{Optionslink|link=Options:Genesys_Web_Services:crm-adapter:screenpop-include-dnis-in-search|screenpop.include-dnis-in-search}} option is specified (<tt>false</tt> by default), Adapter finds the dialed number from the Dialed Number Identification Service (DNIS) value and request a screen pop based on the '''DNIS'''.</li> | ||
| + | </ul> | ||
| + | <p>These two options depend on the {{Optionslink|link=Options:Genesys_Web_Services:crm-adapter:screenpop-preprocessing-rule|screenpop.preprocessing-rule}} option. Use this option to adjust the format of phone numbers (DNIS) and Automatic Number Identification (ANI) to search for on screen pop. Choose one of these settings: | ||
| + | <ul> | ||
| + | <li>'''None''': By default, no phone number preprocessing rule is applied.</li> | ||
| + | <li>'''Default''': The default preprocessing rule removes "+1" from the beginning of the ANI or DNIS.</li> | ||
| + | <li>'''Add...''': Name and define your own preprocessing rule. These four parameters define each preprocessing rule: | ||
| + | <ul>'''Display Name''': The name of the pre-processing rule.</li> | ||
| + | <li>'''RegEx''': A RegEx defining the condition to be matched.</li> | ||
| + | <li>'''Replacement''': The string to replace the matched string.</li> | ||
| + | <li>'''Description''': A short description of the rule</li> | ||
| + | </ul> | ||
| + | </li> | ||
| + | </ul> | ||
| + | </p> | ||
| + | <p>Here are some examples of preprocessing rules that you can define: | ||
| + | <ul> | ||
| + | <li>'''Remove the prefix and use only 9 digits from the phone number''' | ||
| + | <ul> | ||
| + | <li>'''Display Name''': Use only last 9 digits</li> | ||
| + | <li>'''RegEx''': ^.*([0-9]{9})$</li> | ||
| + | <li>'''Replacement''': $1</li> | ||
| + | <li>'''Description''': Remove the prefix and use only 9 digits from the phone number.</li> | ||
| + | </ul> | ||
| + | </li> | ||
| + | <li>'''Remove the country code prefix''' | ||
| + | <ul> | ||
| + | <li>'''Display Name''': Remove country code</li> | ||
| + | <li>'''RegEx''': (\+1|\+33|\+91)(.*)$</li> | ||
| + | <li>'''Replacement''': $2</li> | ||
| + | <li>'''Description''': Remove the country code prefix.</li> | ||
| + | </ul> | ||
| + | </li> | ||
| + | </ul> | ||
| + | </p> | ||
| + | </li> | ||
| + | </ul> | ||
| + | </li> | ||
| + | </ol> | ||
| + | {{AnchorDiv|RegEx}} | ||
| + | ====Search for records using a Regular Expression==== | ||
| + | You can use regular expressions (RegEx) to specify how Gplus Adapter finds key names in the userData and returns the key value. The RegEx is applied to the ID and search fields that Adapter uses to match screen pop userData keys. | ||
| + | |||
| + | Configure the {{Optionslink|link=Options:Genesys_Web_Services:crm-adapter:screenpop-id-key-regex|screenpop.id-key-regex}} and {{Optionslink|link=Options:Genesys_Web_Services:crm-adapter:screenpop-search-key-regex|screenpop.search-key-regex}} options. These options only change the criteria by which userData keys are matched. The existing logic and order between ID-based screen pop and search are the same (see the bullet points above). | ||
| + | |||
| + | You can specify RegEx search strings to search through the userData key names for specific patterns or letters and numbers such as in this example of userData input: | ||
| + | |||
| + | <source lang="text"> | ||
| + | userData:{ | ||
| + | userDataKeyname1:"keyvalue1", | ||
| + | userDataKeyname2:"keyvalue2", | ||
| + | userDataKeyname3:"keyvalue3", | ||
| + | userDataKeyname4:"keyvalue4", | ||
| + | userDataKeyname5:"keyvalue5", | ||
| + | userDataKeyname6:"keyvalue6" | ||
| + | } | ||
| + | </source> | ||
| + | |||
| + | You can use RegEx to search through the userData to return the key value from the userData for "userDataKeyname5 '''or''' userDataKeyname6". The RegEx you enter in Agent Setup for this example would be: '''UserDataKeyname5|UserDataKeyname6'''. | ||
| + | |||
| + | With the example userData input above, Adapter would return the key values '''keyvalue5''' and '''keyvalue6''': | ||
| + | |||
| + | Regular expressions (RegEx) are sequences of characters (strings) that define a search pattern. There are many RegEx cheat sheets available on the internet to help you understand how to construct a search pattern using the special RegEx control characters such as: [, ], +, :, \, /, <, >, =, -, _, *, ?, {, }, and so on. | ||
| + | |||
| + | The '''RegEx to Match UserData''' option does not support RegEx flags, such as: i, g, s, m, y, and u. For example, use <tt>"Hello"</tt> to search for this string rather than <tt>/Hello/ig</tt>. | ||
| + | |||
| + | If you use the regular expression options to match your own ID key, then you should also ensure you set the {{Optionslink|link=Options:Genesys_Web_Services:crm-adapter:screenpop-transfer-object-key|screenpop.transfer-object-key}} option to '''id_transfer_object''' so that screen pop works with in-focus page transfers. | ||
| + | |||
| + | For information about troubleshooting Gplus Adapter for Salesforce, refer to [[GplusTroubleshoot90|Troubleshooting Gplus Adapter Integration with Salesforce]]. | ||
| + | |||
| + | {{AnchorDiv|VoiceCalls}} | ||
| + | ==Screen pop for Voice== | ||
| + | |||
| + | When an agent receives an external call, Adapter initiates a screen pop that causes Salesforce to show an appropriate record for the caller. By default, Adapter initiates the screen pop when the call is established, but you can set the {{Optionslink|link=Options:Genesys_Web_Services:crm-adapter:screenpop-on-ringing|screenpop.on-ringing}} option to initiate a screen pop when the call is ringing instead. Note that Adapter also initiates screen pop for calls established through Genesys Softphone in Connector mode. | ||
| + | |||
| + | {{NoteFormat|You can also set up screen pops for internal calls with the {{Optionslink|link=Options:Genesys_Web_Services:crm-adapter:screenpop-enable-for-internal-calls|screenpop.enable-for-internal-calls}} option and consult calls with the {{Optionslink|link=Options:Genesys_Web_Services:crm-adapter:screenpop-enable-for-consult|screenpop.enable-for-consult}} option.}} | ||
| + | |||
| + | For Outbound campaign calls, the screen pop appears immediately after the agent clicks '''Get Record''' on the notification. Agent can then choose to make or decline the Outbound campaign call. For Push Preview campaigns, the screen pop appears after the agent clicks '''Accept'''. For more information on configuring outbound campaigns, case and toast data, see [[Documentation:HTCC:IWWDep:IntOutboundCampaigns|Outbound campaigns]] in the Web Services and Applications Configuration Guide. | ||
| + | |||
| + | {{AnchorDiv|DialedCalls}} | ||
| + | |||
| + | ===Screen pop for Outbound calls on Dialing and Established=== | ||
| + | You can configure Adapter to screen pop a new or existing Salesforce record when an agent dials an outgoing call to an external or internal number and choose whether to screen pop when the agent dials the call or when the call is established. | ||
| + | |||
| + | To enable this feature, configure the {{Optionslink|link=Options:Genesys_Web_Services:crm-adapter:screenpop-for-outbound}} option. | ||
| + | |||
| + | To specify how to search for an existing Salesforce record, configure the following options: | ||
| + | * {{Optionslink|link=Options:Genesys_Web_Services:crm-adapter:screenpop-include-dnis-in-search}} | ||
| + | * {{Optionslink|link=Options:Genesys_Web_Services:crm-adapter:screenpop-include-ani-in-search}}: To remove the call number from the search, set the value of this option to <tt>false</tt>. | ||
| + | * {{Optionslink|link=Options:Genesys_Web_Services:crm-adapter:screenpop-search-key-regex}} | ||
| + | |||
| + | {{AnchorDiv|Chat}} | ||
| + | == Screen pop for Chat and SMS == | ||
| + | You can enable Adapter to initiate a screen pop when an agent receives a chat or SMS invite from a contact by configuring the {{Optionslink|link=Options:Genesys_Web_Services:crm-adapter:screenpop-chat-on-invite|screenpop.chat.on-invite}} option. | ||
| + | * When the option's value is set to <tt>true</tt>, Adapter displays the screen pop on chat or SMS invite. | ||
| + | * When the option's value is set to <tt>false</tt> or the option is not available, Adapter displays the screen pop only when you accept the invitation for chat or SMS interaction. | ||
| + | |||
| + | For SMS, the screen pop appears only for an unassigned contact, and if the contact is already assigned to the agent in the Agent Workspace '''[https://all.docs.genesys.com/PEC-AD/Current/Agent/ADSMS#CommunicationTab Communication]''' tab, no screen-pop is displayed. | ||
| + | |||
| + | {{AnchorDiv|Email}} | ||
| + | == Screen pop for Email == | ||
| + | You can enable Adapter to initiate a screen pop when an agent receives an email invite from a contact by configuring the {{Optionslink|link=Options:Genesys_Web_Services:crm-adapter:screenpop-email-on-invite|screenpop.email.on-invite}} option. | ||
| + | * When the option's value is set to <tt>true</tt>, Adapter displays the screen pop on email invite. | ||
| + | * When the option's value is set to <tt>false</tt> or the option is not available, Adapter displays the screen pop only when you accept the invitation for email interaction. | ||
| + | |||
| + | You can enable Adapter to initiate a screen pop when an agent replies to an inbound email or creates an outgoing email by configuring the {{Optionslink|link=Options:Genesys_Web_Services:crm-adapter:screenpop-email-on-create}} option. | ||
| + | * When the option's value is set to <tt>true</tt>, Adapter displays the screen pop on email create and email reply create. | ||
| + | * When the option's value is set to <tt>false</tt> or the option is not available, Adapter does not display a screen pop on email create and email reply create. | ||
| + | {{AnchorDiv|OpenMediaWorkitems}} | ||
| + | ==Screen pop for Open Media items == | ||
| + | You can configure Adapter to initiate a screen pop when an agent receives an Open Media invite from a contact by configuring the {{Optionslink|link=Options:Genesys_Web_Services:crm-adapter:screenpop-openmedia-on-invite|screenpop.openmedia.on-invite}} option. | ||
| + | * When the option's value is set to <tt>true</tt>, Adapter displays the screen pop on open media invite. | ||
| + | * When the option's value is set to <tt>false</tt> or the option is not available, Adapter displays the screen pop only when you accept the invitation for an open media interaction. | ||
| + | {{AnchorDiv|Configuringscreenpopsforconferenceortransferinteractions}} | ||
| + | ==Screen pops for conference or transfer interactions== | ||
| + | When an agent performs a chat (including SMS) conference or transfer, Adapter can update the UserData with the ID of the object the agent is looking at in Salesforce. This makes sure that the agent who receives the conference or transfer gets a screen pop for the most relevant object. | ||
| + | |||
| + | This can be helpful when: | ||
| + | * There are multiple matches for a screen pop search initially and the agent has to select between them. | ||
| + | * There are no matches for the initial screen pop search and the agent creates a new record. | ||
| + | |||
| + | You can enable this feature by setting the {{Optionslink|link=Options:Genesys_Web_Services:crm-adapter:salesforce-enable-in-focus-page-transfer|salesforce.enable-in-focus-page-transfer}} option to <tt>true</tt>. | ||
| + | |||
| + | When Adapter updates the UserData, any existing UserData keys that begin with "id_" or "cti_" are removed and a new key, called "id_transfer_object", is added with the object ID of the focused page. If the focused page doesn't correspond to a Salesforce object, Adapter does not make an update and the existing UserData is sent with the conference or transfer request. | ||
| + | |||
| + | If you configured your environment to use a key other than "id_" or "cti_" (basically if you need to set the '''screenpop.id-key-regex''' option as described in [[ScreenPop#screenpoplogic|How screen pop records are retrieved from Salesforce?]], then you must also set the {{Optionslink|link=Options:Genesys_Web_Services:crm-adapter:screenpop-transfer-object-key|screenpop.transfer-object-key}} to your custom key in order for screen pop to work. Adapter will add the key you specify in this option instead of "id_transfer_object". | ||
| + | |||
| + | {{AnchorDiv|NewRecord}} | ||
| + | ==Create a new Salesforce record on screen pop== | ||
| + | Gplus Adapter can create new Salesforce records based on a specified Salesforce Object API name (for example '''Custom_Object__c'''. Refer to the screenshot.) and interaction data field mapping then screen pop the created record. | ||
| + | |||
| + | [[File:Gplus_900_Salesforce_Custom_API_Object.png|500px]] | ||
| + | |||
| + | Use this feature to create a new Salesforce record in the following scenarios: | ||
| + | |||
| + | * When the search for an existing Salesforce record for screen pop returns no matching record. | ||
| + | * To create a new Salesforce record for ''every'' interaction. | ||
| + | |||
| + | To have Gplus Adapter screen pop a new record you must create a Salesforce custom object API to be used as a template for a new Salesforce record and you must define the record field mapping where each key must correspond to an interaction '''userData''' key and each value must correspond to the name of the Salesforce standard or custom object field. | ||
| + | |||
| + | To enable this feature, configure the {{Optionslink|link=Options:Genesys_Web_Services:crm-adapter:screenpop-save-new-record-criterion}} option. This option depends on the following options: | ||
| + | * {{Optionslink|link=Options:Genesys_Web_Services:crm-adapter:screenpop-object-api-name}} | ||
| + | * {{Optionslink|link=Options:Genesys_Web_Services:crm-adapter:salesforce-new-record-field-mapping}} | ||
| + | |||
| + | This screenshot shows you the relationship between the UserData associated with an interaction and Salesforce record fields for a New Salesforce Record Field Mapping. In this example, "custom-field-mappings" is the name of the new configuration section that is specified in the {{Optionslink|link=Options:Genesys_Web_Services:crm-adapter:salesforce-new-record-field-mapping}} option. "Firstname" and "Firstname__c" represent the key-value pairs that are specified for the "custom-field-mappings" section. In your environment you will specify values that are relevant to your organization. | ||
| + | |||
| + | [[File:Gplus_900_New_Salesforce_Record_Mapping_PREM.png|600px]] | ||
| + | |||
| + | You can configure Gplus Adapter to display confirmation messages to agents when a new record is successfully created. Select the [[GPAConfig#Notifications|Notifications options]] to enable this feature. | ||
| + | |||
| + | {{AnchorDiv|Attacheddata}} | ||
| + | ==Attached data== | ||
| + | You can configure Adapter to save the ID, name, and type of the focused Salesforce object to attached data when an agent clicks '''Mark Done'''. To do this, set {{Optionslink|link=Options:Genesys_Web_Services:crm-adapter:salesforce-user-data-object-id-key|salesforce.user-data.object-id-key}}, {{Optionslink|link=Options:Genesys_Web_Services:crm-adapter:salesforce-user-data-object-name-key|salesforce.user-data.object-name-key}}, and {{Optionslink|link=Options:Genesys_Web_Services:crm-adapter:salesforce-user-data-object-type-key|salesforce.user-data.object-type-key}} to the keys you want Adapter to use when saving the ID, name, and type. Also, make sure the Workspace Web Edition option {{Optionslink|link=Options:Web_Services_and_Applications:interaction-workspace:interaction-case-data-is-read-only-on-idle}} is set to <tt>false</tt>. | ||
| + | |||
| + | You should consider setting these options if you want to make sure the ID, name, or type is added to attached data when agents create a new object during a call. | ||
| + | |||
| + | {{AnchorDiv|ScreenPopType}} | ||
| + | ==Screen pop by Salesforce object type== | ||
| + | |||
| + | {{NoteFormat|This feature is not supported for Salesforce Classic.|1}} | ||
| + | |||
| + | You can use the {{Optionslink|link=Options:Genesys_Web_Services:crm-adapter:screenpop-object-type|screenpop.object-type}} option to specify what [[GPAConfig#ObjectType|type of object]] you want Salesforce to screen-pop. This feature supports voice and digital channels interactions. SOBJECT is the default value, other available object types are: | ||
| + | |||
| + | * FLOW: Pops to the [https://developer.salesforce.com/developer-centers/lightning-flow/ target flow]. The flow is specified by the {{Optionslink|link=Options:Genesys_Web_Services:crm-adapter:screenpop-object-type-flow|screenpop.object-type-flow}} option. Additional arguments can be passed to the flow, for example, the caller’s phone number or a list of matching records. Specify the flow name and "flowArgs", valid flow arguments in JSON format, or the <tt>$attach_data_flow_name$</tt> and <tt>$attach_data_flowArgs_name$</tt> parameters to take the flow name and arguments from the attached data. | ||
| + | * URL: Opens [https://developer.salesforce.com/docs/component-library/bundle/force:navigateToURL/documentation the URL] in a new browser or tab. The URL is specified by the {{Optionslink|link=Options:Genesys_Web_Services:crm-adapter:screenpop-object-type-url|screenpop.object-type-url}} option. Specify the URL or use the <tt>$attach_data_key$</tt> parameter to take the URL from the interaction attached data. | ||
| + | * OBJECTHOME: Pops to the [https://developer.salesforce.com/docs/component-library/bundle/force:navigateToObjectHome/documentation home of an object or entity], such as a Case or an Account. The object home is specified by the {{Optionslink|link=Options:Genesys_Web_Services:crm-adapter:screenpop-object-type-object-home|screenpop.object-type-object-home}} option. Specify the object or the <tt>$attach_data_key$</tt> parameter to take the object name from the interaction attached data. | ||
| + | * LIST: Pops to the [https://developer.salesforce.com/docs/atlas.en-us.object_reference.meta/object_reference/sforce_api_objects_listview.htm specified list] of Salesforce objects, such as Contacts or Accounts. The list is specified by the {{Optionslink|link=Options:Genesys_Web_Services:crm-adapter:screenpop-object-type-list|screenpop.object-type-list}} option. Specify the user data keys or the <tt>$attach_data_list_id$</tt> and <tt>$attach_data_list_scope$</tt> parameters to take the List from the interaction attached data. | ||
| + | * SEARCH: Pops to the Top Results section of the [https://help.salesforce.com/articleView?id=search_unified_results.htm&type=5 search page]. The search string is specified by the {{Optionslink|link=Options:Genesys_Web_Services:crm-adapter:screenpop-object-type-search|screenpop.object-type-search}} option. Specify the search string or the <tt>$attach_data_search$</tt> parameter to take the string from the interaction attached data. | ||
| + | * NEW_RECORD_MODAL: Pops a [https://developer.salesforce.com/docs/component-library/bundle/force:createRecord/documentation modal form] for creation of a new object, such as Account, Case, Contact, or Lead. The new record modal is specified by the {{Optionslink|link=Options:Genesys_Web_Services:crm-adapter:screenpop-object-type-new-record|screenpop.object-type-new-record}} option. Specify the object name or the <tt>$attach_data_entityname$</tt> parameter to take the new record type from the interaction attached data. | ||
| + | |||
| + | [[Category:V:HTCC:9.0.0]] | ||
Latest revision as of 10:48, August 23, 2022
Screen Pop
Screen pop displays a relevant record or a search results list from Salesforce to support agents when they are handling interactions.
You can setup how you want Adapter to select the screen pop record from Salesforce for different type of interactions.
This process involves:
Set up screen pops in Salesforce
To set up this functionality in Salesforce, login and go to Setup > Customize > Call Center > SoftPhone Layouts to create a SoftPhone Layout. Check out the Salesforce documentation for details about configuration.
When you set up a SoftPhone Layout for Adapter, the Gplus Adapter for Salesforce ignores the SoftPhone Layout settings that control call-related fields. Instead, Adapter gets this information from toast and case data you configure in the Genesys environment.
Gplus Adapter screen pops
Gplus Adapter can retrieve and screen pop Salesforce records for calls, chats, SMS, emails, and open media interactions. You can configure how Adapter displays a screen pop when a call or chat (including SMS) is transferred or merged in a conference.
Before you proceed with selecting the screen pop settings, get familiar with how screen pop records are selected and displayed to an agent. This section helps you understand how Adapter finds the matching Salesforce record to screen pop. Review the diagram and accompanying video for a summary of the screen pop search process.

Here's the logic Gplus Adapter uses to determine what to send to Salesforce to request Salesforce to display a screen pop of an SOBJECT object type based on the userData keys for an interaction:
- Find the first userData keyname with the id_ prefix and request a screen pop based on the key-value. The Salesforce record ID is included in the record URL.
- Otherwise, combine values based on the following conditions:
- Find the keys with the cti_ prefix, such as "cti_FirstName" or "cti_PhoneNumber", and request a screen pop based on the key-values.
- If the screenpop.id-key-regex option is configured, Adapter applies a regular expression (RegEx) to match userData key-names. Refer to Search for records using a Regular Expression.
- For voice calls:
- If the screenpop.include-ani-in-search option is specified (true by default), Adapter finds the originating phone number by the Automatic Number Identification (ANI) value and requests a screen pop based on the ANI.
- If the screenpop.include-dnis-in-search option is specified (false by default), Adapter finds the dialed number from the Dialed Number Identification Service (DNIS) value and request a screen pop based on the DNIS.
These two options depend on the screenpop.preprocessing-rule option. Use this option to adjust the format of phone numbers (DNIS) and Automatic Number Identification (ANI) to search for on screen pop. Choose one of these settings:
- None: By default, no phone number preprocessing rule is applied.
- Default: The default preprocessing rule removes "+1" from the beginning of the ANI or DNIS.
- Add...: Name and define your own preprocessing rule. These four parameters define each preprocessing rule:
- Display Name: The name of the pre-processing rule.
- RegEx: A RegEx defining the condition to be matched.
- Replacement: The string to replace the matched string.
- Description: A short description of the rule
Here are some examples of preprocessing rules that you can define:
- Remove the prefix and use only 9 digits from the phone number
- Display Name: Use only last 9 digits
- RegEx: ^.*([0-9]{9})$
- Replacement: $1
- Description: Remove the prefix and use only 9 digits from the phone number.
- Remove the country code prefix
- Display Name: Remove country code
- RegEx: (\+1|\+33|\+91)(.*)$
- Replacement: $2
- Description: Remove the country code prefix.

Search for records using a Regular Expression
You can use regular expressions (RegEx) to specify how Gplus Adapter finds key names in the userData and returns the key value. The RegEx is applied to the ID and search fields that Adapter uses to match screen pop userData keys.
Configure the screenpop.id-key-regex and screenpop.search-key-regex options. These options only change the criteria by which userData keys are matched. The existing logic and order between ID-based screen pop and search are the same (see the bullet points above).
You can specify RegEx search strings to search through the userData key names for specific patterns or letters and numbers such as in this example of userData input:
userData:{
  userDataKeyname1:"keyvalue1",
  userDataKeyname2:"keyvalue2",
  userDataKeyname3:"keyvalue3",
  userDataKeyname4:"keyvalue4",
  userDataKeyname5:"keyvalue5",
  userDataKeyname6:"keyvalue6"
}
You can use RegEx to search through the userData to return the key value from the userData for "userDataKeyname5 or userDataKeyname6". The RegEx you enter in Agent Setup for this example would be: UserDataKeyname5|UserDataKeyname6.
With the example userData input above, Adapter would return the key values keyvalue5 and keyvalue6:
Regular expressions (RegEx) are sequences of characters (strings) that define a search pattern. There are many RegEx cheat sheets available on the internet to help you understand how to construct a search pattern using the special RegEx control characters such as: [, ], +, :, \, /, <, >, =, -, _, *, ?, {, }, and so on.
The RegEx to Match UserData option does not support RegEx flags, such as: i, g, s, m, y, and u. For example, use "Hello" to search for this string rather than /Hello/ig.
If you use the regular expression options to match your own ID key, then you should also ensure you set the screenpop.transfer-object-key option to id_transfer_object so that screen pop works with in-focus page transfers.
For information about troubleshooting Gplus Adapter for Salesforce, refer to Troubleshooting Gplus Adapter Integration with Salesforce.
Screen pop for Voice
When an agent receives an external call, Adapter initiates a screen pop that causes Salesforce to show an appropriate record for the caller. By default, Adapter initiates the screen pop when the call is established, but you can set the screenpop.on-ringing option to initiate a screen pop when the call is ringing instead. Note that Adapter also initiates screen pop for calls established through Genesys Softphone in Connector mode.
For Outbound campaign calls, the screen pop appears immediately after the agent clicks Get Record on the notification. Agent can then choose to make or decline the Outbound campaign call. For Push Preview campaigns, the screen pop appears after the agent clicks Accept. For more information on configuring outbound campaigns, case and toast data, see Outbound campaigns in the Web Services and Applications Configuration Guide.
Screen pop for Outbound calls on Dialing and Established
You can configure Adapter to screen pop a new or existing Salesforce record when an agent dials an outgoing call to an external or internal number and choose whether to screen pop when the agent dials the call or when the call is established.
To enable this feature, configure the screenpop.for-outbound option.
To specify how to search for an existing Salesforce record, configure the following options:
- screenpop.include-dnis-in-search
- screenpop.include-ani-in-search: To remove the call number from the search, set the value of this option to false.
- screenpop.search-key-regex
Screen pop for Chat and SMS
You can enable Adapter to initiate a screen pop when an agent receives a chat or SMS invite from a contact by configuring the screenpop.chat.on-invite option.
- When the option's value is set to true, Adapter displays the screen pop on chat or SMS invite.
- When the option's value is set to false or the option is not available, Adapter displays the screen pop only when you accept the invitation for chat or SMS interaction.
For SMS, the screen pop appears only for an unassigned contact, and if the contact is already assigned to the agent in the Agent Workspace Communication tab, no screen-pop is displayed.
Screen pop for Email
You can enable Adapter to initiate a screen pop when an agent receives an email invite from a contact by configuring the screenpop.email.on-invite option.
- When the option's value is set to true, Adapter displays the screen pop on email invite.
- When the option's value is set to false or the option is not available, Adapter displays the screen pop only when you accept the invitation for email interaction.
You can enable Adapter to initiate a screen pop when an agent replies to an inbound email or creates an outgoing email by configuring the screenpop.email.on-create option.
- When the option's value is set to true, Adapter displays the screen pop on email create and email reply create.
- When the option's value is set to false or the option is not available, Adapter does not display a screen pop on email create and email reply create.
Screen pop for Open Media items
You can configure Adapter to initiate a screen pop when an agent receives an Open Media invite from a contact by configuring the screenpop.openmedia.on-invite option.
- When the option's value is set to true, Adapter displays the screen pop on open media invite.
- When the option's value is set to false or the option is not available, Adapter displays the screen pop only when you accept the invitation for an open media interaction.
Screen pops for conference or transfer interactions
When an agent performs a chat (including SMS) conference or transfer, Adapter can update the UserData with the ID of the object the agent is looking at in Salesforce. This makes sure that the agent who receives the conference or transfer gets a screen pop for the most relevant object.
This can be helpful when:
- There are multiple matches for a screen pop search initially and the agent has to select between them.
- There are no matches for the initial screen pop search and the agent creates a new record.
You can enable this feature by setting the salesforce.enable-in-focus-page-transfer option to true.
When Adapter updates the UserData, any existing UserData keys that begin with "id_" or "cti_" are removed and a new key, called "id_transfer_object", is added with the object ID of the focused page. If the focused page doesn't correspond to a Salesforce object, Adapter does not make an update and the existing UserData is sent with the conference or transfer request.
If you configured your environment to use a key other than "id_" or "cti_" (basically if you need to set the screenpop.id-key-regex option as described in How screen pop records are retrieved from Salesforce?, then you must also set the screenpop.transfer-object-key to your custom key in order for screen pop to work. Adapter will add the key you specify in this option instead of "id_transfer_object".
Create a new Salesforce record on screen pop
Gplus Adapter can create new Salesforce records based on a specified Salesforce Object API name (for example Custom_Object__c. Refer to the screenshot.) and interaction data field mapping then screen pop the created record.

Use this feature to create a new Salesforce record in the following scenarios:
- When the search for an existing Salesforce record for screen pop returns no matching record.
- To create a new Salesforce record for every interaction.
To have Gplus Adapter screen pop a new record you must create a Salesforce custom object API to be used as a template for a new Salesforce record and you must define the record field mapping where each key must correspond to an interaction userData key and each value must correspond to the name of the Salesforce standard or custom object field.
To enable this feature, configure the screenpop.save-new-record-criterion option. This option depends on the following options:
This screenshot shows you the relationship between the UserData associated with an interaction and Salesforce record fields for a New Salesforce Record Field Mapping. In this example, "custom-field-mappings" is the name of the new configuration section that is specified in the salesforce.new-record.field-mapping option. "Firstname" and "Firstname__c" represent the key-value pairs that are specified for the "custom-field-mappings" section. In your environment you will specify values that are relevant to your organization.

You can configure Gplus Adapter to display confirmation messages to agents when a new record is successfully created. Select the Notifications options to enable this feature.
Attached data
You can configure Adapter to save the ID, name, and type of the focused Salesforce object to attached data when an agent clicks Mark Done. To do this, set salesforce.user-data.object-id-key, salesforce.user-data.object-name-key, and salesforce.user-data.object-type-key to the keys you want Adapter to use when saving the ID, name, and type. Also, make sure the Workspace Web Edition option interaction.case-data.is-read-only-on-idle is set to false.
You should consider setting these options if you want to make sure the ID, name, or type is added to attached data when agents create a new object during a call.
Screen pop by Salesforce object type
You can use the screenpop.object-type option to specify what type of object you want Salesforce to screen-pop. This feature supports voice and digital channels interactions. SOBJECT is the default value, other available object types are:
- FLOW: Pops to the target flow. The flow is specified by the screenpop.object-type-flow option. Additional arguments can be passed to the flow, for example, the caller’s phone number or a list of matching records. Specify the flow name and "flowArgs", valid flow arguments in JSON format, or the $attach_data_flow_name$ and $attach_data_flowArgs_name$ parameters to take the flow name and arguments from the attached data.
- URL: Opens the URL in a new browser or tab. The URL is specified by the screenpop.object-type-url option. Specify the URL or use the $attach_data_key$ parameter to take the URL from the interaction attached data.
- OBJECTHOME: Pops to the home of an object or entity, such as a Case or an Account. The object home is specified by the screenpop.object-type-object-home option. Specify the object or the $attach_data_key$ parameter to take the object name from the interaction attached data.
- LIST: Pops to the specified list of Salesforce objects, such as Contacts or Accounts. The list is specified by the screenpop.object-type-list option. Specify the user data keys or the $attach_data_list_id$ and $attach_data_list_scope$ parameters to take the List from the interaction attached data.
- SEARCH: Pops to the Top Results section of the search page. The search string is specified by the screenpop.object-type-search option. Specify the search string or the $attach_data_search$ parameter to take the string from the interaction attached data.
- NEW_RECORD_MODAL: Pops a modal form for creation of a new object, such as Account, Case, Contact, or Lead. The new record modal is specified by the screenpop.object-type-new-record option. Specify the object name or the $attach_data_entityname$ parameter to take the new record type from the interaction attached data.