(Created target blank page For Version: PSAAS:Public) |
(Update with the copy of version: 8.5.0) |
||
| Line 1: | Line 1: | ||
| − | < | + | = Stage 2: Setting up a campaign and sub-campaign= |
| + | {{StepNav | ||
| + | |ID=obbs | ||
| + | |node=2 | ||
| + | |display=Setting Up | ||
| + | }} | ||
| + | {{BEC_Head | ||
| + | |context=Now Harry will configure his campaign in '''Engage.''' To make it easy for him, we’ll break his work down into four tasks with sub-tasks: | ||
| + | *[[Stage2#ContactLists|Contacts and contact lists]] | ||
| + | *[[Stage2#Compliance|Compliance]] | ||
| + | *[[Stage2#CampaignConfig|Campaigns]] | ||
| + | *[[Stage2#Subcampaign|Sub-campaigns]] | ||
| + | }} | ||
| + | |||
| + | {{AnchorDiv|ContactLists}} | ||
| + | ==Contacts and contact lists== | ||
| + | ===Import contacts=== | ||
| + | '''Scenario''': Harry has a spreadsheet containing the names of 1,500 customers that will be contacted. He’s busy and doesn’t have the time to add each customer manually into '''Engage'''. | ||
| + | |||
| + | '''Solution''': Rather than enter each contact’s information directly into '''Engage''', Harry can import the spreadsheet that contains the contact information of each customer. He'll do this in two steps: | ||
| + | |||
| + | <p><toggledisplay linkstyle font-size:larger showtext="[+] Step 1 Instructions: Prepare data for import"> | ||
| + | First, he'll need to prepare the data for import so that it maps correctly in to the appropriate list fields in '''Engage.''' | ||
| + | # Remove all unnecessary fields. Harry keeps only '''FirstName''', '''LastName''', '''ClientID''', and Device1''' and removes all other fields. | ||
| + | # Include a header with the field names that match those in the messaging system contact list so that the imported data is mapped directly into the appropriate contact list field. | ||
| + | # Save the spreadsheet as a CSV file. | ||
| + | </toggledisplay></p> | ||
| + | |||
| + | <p><toggledisplay linkstyle font-size:larger showtext="[+] Step 2 Instructions: Import the contact list"> | ||
| + | |||
| + | {{CloudStep_Stack | ||
| + | |title=Import contacts | ||
| + | |media1=OB ImportList.png | ||
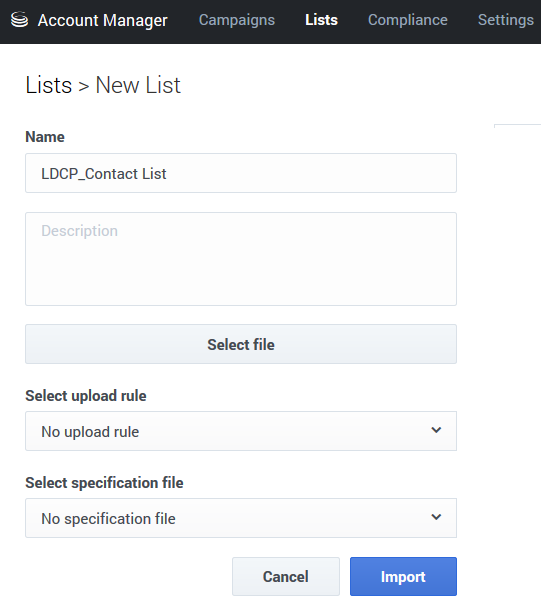
| + | |text=Now, in '''Account Manager''', Harry will import his contact list. | ||
| + | # From the menu bar on the '''Lists''' tabbed page, click '''Lists.''' | ||
| + | #From the '''Lists''' screen, select '''New-->List.''' | ||
| + | # Type the name of the contact list ('''LDCP_ContactList''' in Harry's case) in the '''Name''' field. | ||
| + | # Select '''Browse''' and select the file to be imported. | ||
| + | # Harry doesn't want to split his list into smaller lists, so he'll select '''No upload rule.''' | ||
| + | # Because Harry set up the header row in his spreadsheet, he’ll select '''No specification file'''. | ||
| + | # Click ''' Import.''' | ||
| + | }} | ||
| + | </toggledisplay></p> | ||
| + | |||
| + | Once Harry imports his list in '''Account Manager''', he can retrieve the list for this campaign and for future campaigns. | ||
| + | |||
| + | ===Add contacts to an existing list=== | ||
| + | '''Scenario''': After Harry imported his spreadsheet, his account representative from G-Tel called with the contact information of seven customers they wanted added to the campaign. Harry confirmed that these customers were not listed on the spreadsheet he just finished importing. | ||
| + | |||
| + | '''Solution''': Harry can manually add each of the seven customers to the imported contact list. | ||
| + | |||
| + | <p><toggledisplay linkstyle font-size:larger showtext="[+] Instructions"> | ||
| + | |||
| + | {{CloudStep_Stack | ||
| + | |title=Add new contacts | ||
| + | |media1=OBBS newcontact.png | ||
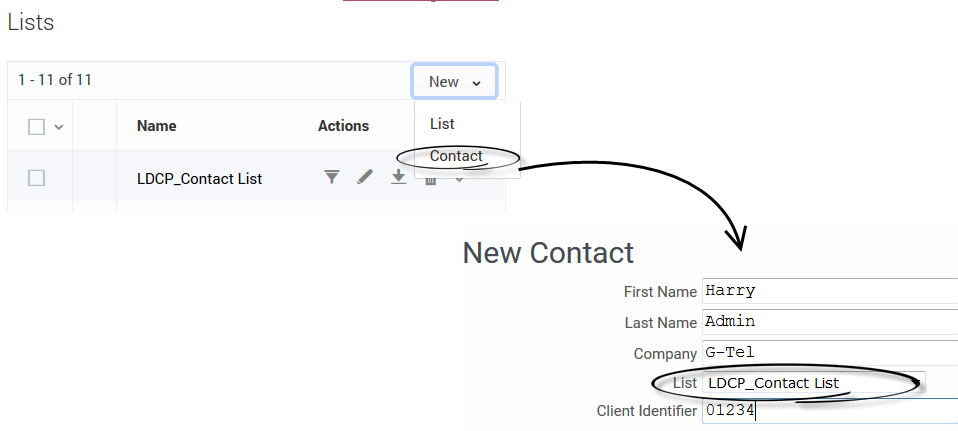
| + | |text=# On the '''Lists''' tabbed page, click '''New''' and then '''Contact.''' The New Contact page appears | ||
| + | # Enter the contact information as required. | ||
| + | # Select the list ('''LDCP_ContactList''' in Harry's case) to specify where the new contact will go. | ||
| + | # Click '''Save and Add New''' to add the contact to the list and to continue adding the remaining six contacts. | ||
| + | }} | ||
| + | </toggledisplay></p> | ||
| + | |||
| + | Now that Harry has imported the contact list and added his additional seven contacts, he can edit, delete, export, filter, download, or generate a report of the list or edit or delete individual contacts. He can also split his list into smaller lists using the Apply list rules function, and he can import specification files and perform a contact search. He’s happy with the list and moves on. | ||
| + | |||
| + | {{AnchorDiv|Compliance}} | ||
| + | ==Compliance== | ||
| + | Now it’s time for Harry to select the people he’ll exclude from the campaign. When he clicks on the '''Compliance''' tab on the '''Campaigns''' page, he'll have two options: Compliance Tools and Contact Suppression Lists. | ||
| + | |||
| + | ===Compliance Tools=== | ||
| + | |||
| + | '''Scenario''': Harry has also been told that Ohio is under a state of emergency as a result of widespread damage from a tornado. He wants to remove all Ohio customers from the calling list. | ||
| + | |||
| + | '''Solution''': Harry can use the '''Do Not Contact Location''' rule to stop the system from calling Ohio. | ||
| + | |||
| + | <p><toggledisplay linkstyle font-size:larger showtext="[+] Instructions"> | ||
| + | |||
| + | {{CloudStep_Stack | ||
| + | |title=Do Not Contact Location Rule | ||
| + | |media1=OBBS locationrule.png | ||
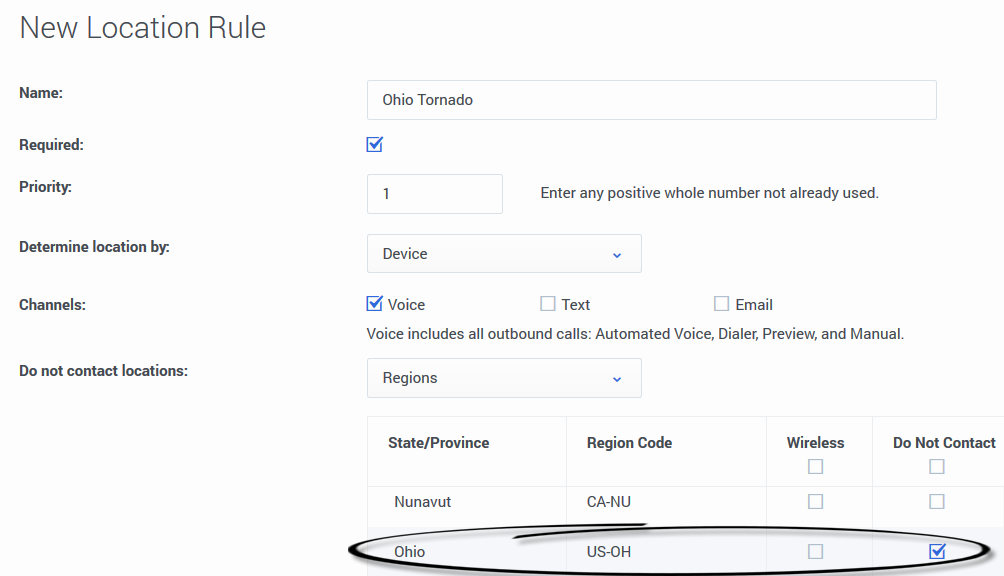
| + | |text=# On the '''Campaigns''' tabbed page, click '''Compliance''' and select '''Compliance Tools'''. | ||
| + | #Click '''Location Rule.''' The '''Do Not Contact Location Rules''' screen appears. | ||
| + | # Click '''New.''' | ||
| + | #Name the rule '''Ohio Tornado''' | ||
| + | # Check the '''Required''' box. | ||
| + | # Indicate the Priority of the rule by entering '''1'''. | ||
| + | # From the '''Determine Location By''' drop-down list, select '''Device''' because the location will be determined by the area code of the device. | ||
| + | # In the '''Using Channel(s):''' section, select '''Voice.''' | ||
| + | # From the '''Do not contact location:''' drop-down, select '''Regions''' find '''Ohio''' and check the check the associated '''Do Not Contact''' box. | ||
| + | }} | ||
| + | </toggledisplay></p> | ||
| + | |||
| + | {{AnchorDiv|suppression}} | ||
| + | ===Contact Suppression Lists=== | ||
| + | |||
| + | '''Scenario''': Harry has a spreadsheet containing the names of 50 people who have requested to be removed from all future calling campaigns. | ||
| + | |||
| + | '''Solution''': Harry will use the '''Contact Suppression Lists''' function to exclude those 50 people from the campaign. He'll do this in two steps: | ||
| + | |||
| + | <p><toggledisplay linkstyle font-size:larger showtext="[+] Step 1 Instructions: Prepare data for import"> | ||
| + | # Remove all unnecessary fields. Harry keeps only '''FirstName''', '''LastName''', '''ClientID''', and Device1''' and removes all other fields. | ||
| + | # Include a header with the field names that match those in the messaging system contact list so that the imported data is mapped directly into the appropriate contact list field. | ||
| + | # Save the spreadsheet as a CSV file. | ||
| + | </toggledisplay></p> | ||
| + | |||
| + | <p><toggledisplay linkstyle font-size:larger showtext="[+] Step 2 Instructions: Import the suppression list"> | ||
| + | {{CloudStep_Stack | ||
| + | |title=Import Suppression List | ||
| + | |media1=OBBS importsuppressionlist.png | ||
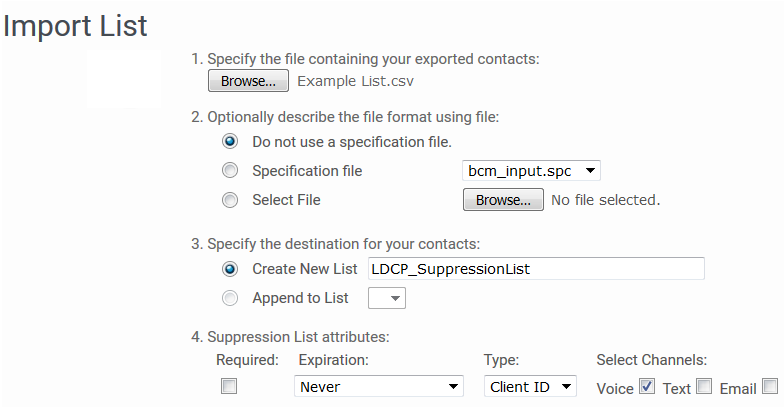
| + | |text=#Select '''Compliance''' -->'''Contact Suppression List.''' | ||
| + | # Click '''Add -> Import file.''' The Import List page appears | ||
| + | # Select '''Browse''' and select the file to be imported. | ||
| + | # Select '''Do not use specification file''' because the header row in the spreadsheet was defined and matches the structure in the messaging system. | ||
| + | # Select '''Create New List''' and type '''LDCP_SuppressionList''' in the '''Name''' field. | ||
| + | # Select '''Required:''', meaning that the suppression list is required for all campaigns in the account. | ||
| + | # From the Expires: list, select '''Never,''' meaning the device or Client ID is never removed from the suppression list. | ||
| + | # From the Type: list, select '''Client ID.''' | ||
| + | # In the Select Channels field, select '''Voice'''. | ||
| + | #Click '''Next''' to see a mapping page that shows all the fields found in the file. Confirm that the data is mapped appropriately and click '''Next''' again. A confirmation page will show the number of records available to be imported. | ||
| + | # Click '''Complete Import'''. | ||
| + | }} | ||
| + | </toggledisplay></p> | ||
| + | |||
| + | If he wants to, Harry can now select from the following suppression list options: edit, delete, export a list, or add, edit or delete individual contacts. He’ll leave it alone for now. | ||
| + | |||
| + | {{AnchorDiv|CampaignConfig}} | ||
| + | ==Campaigns== | ||
| + | |||
| + | Harry can now configure his campaign using '''Engage.''' | ||
| + | |||
| + | '''Scenario''': Because this is a sales campaign, Harry must abide by the FCC rule that says the contact center must connect a call to an agent within 2 seconds of detecting a voice. | ||
| + | |||
| + | '''Solution''': In order to meet the 2-second connect standard, Harry will run his campaign in '''ASM''' mode, often referred to as '''Fast Bridging'''. And because Harry has only two weeks to reach 1,500 customers, with 25 agents assigned to the campaign, he chooses the fastest dialing mode, '''Predictive'''. | ||
| + | |||
| + | <p><toggledisplay linkstyle font-size:larger showtext="[+] Campaign details"> | ||
| + | The starting point is the '''Campaigns''' page in '''Account Manager'''. He’ll set up a new campaign and create and run a new sub-campaign. | ||
| + | |||
| + | Select '''New-->Campaign''' from the top of the '''Campaigns''' page, he’ll provide basic details about his campaign. | ||
| + | *Campaign Name: '''Long Distance Calling Plan''' <br> | ||
| + | *Campaign Description: '''Outbound campaign to sell more long distance calling plans to existing customers.''' <br> | ||
| + | *Start Date and End Date: '''July 1 to July 15''' <br> | ||
| + | </toggledisplay></p> | ||
| + | |||
| + | <p><toggledisplay linkstyle font-size:larger showtext="[+] Outbound options"> | ||
| + | Now, in the '''Outbound''' tab, he’ll specify '''Default Single Pass''' as his strategy name and he'll use the following settings for his '''Predictive''' dialing campaign: | ||
| + | * Script: '''dialer_script''' | ||
| + | * Agent Group: Select '''TelemarketingGroup''. Alex set this up in '''Platform Administrator'''. | ||
| + | * Timezone source: '''Device''' | ||
| + | * Constrain Pass Time: Since Harry’s campaign will run seven days a week for the campaign period from 9AM-9PM, he will select 9:00 in '''Never start passes before:''' field and he’ll select 21:00 in '''Always end passes by:''' field. He’ll select his timezone America/New York. | ||
| + | </toggledisplay></p> | ||
| + | |||
| + | {{AnchorDiv|Filteringoptions}} | ||
| + | <p><toggledisplay linkstyle font-size:larger showtext="[+] Filtering options"> | ||
| + | In this section Harry will only need to add the contact suppression list he uploaded earlier. The compliance rules he defined in '''Enterprise Manager''' should appear in this section. | ||
| + | </toggledisplay></p> | ||
| + | |||
| + | {{AnchorDiv|Patternoptions}} | ||
| + | <p><toggledisplay linkstyle font-size:larger showtext="[+] Pattern options"> | ||
| + | Escalation Type: Select '''None''' because escalation is not required in this campaign. | ||
| + | Execution Order: '''Sequential''', meaning that supplemental passes to a contact will not be executed until at least one attempt on every contact in a list has been made in a previous pass. | ||
| + | </toggledisplay></p> | ||
| + | |||
| + | {{AnchorDiv|Definepass}} | ||
| + | <p><toggledisplay linkstyle font-size:larger showtext="[+] Define a pass"> | ||
| + | In the '''Pattern Options''' section, Harry will select '''Dialer Pass''' and then ensure the settings are as follows: | ||
| + | |||
| + | '''General options:''' | ||
| + | * Pass Name: '''Pass 1''' | ||
| + | * Accept Phone Numbers: '''Landline''' and '''Wireless''' | ||
| + | <br> | ||
| + | If Harry later added a second dialer pass, he would configure the added options as follows: | ||
| + | * Accept Contacts From: '''All Passes''' | ||
| + | * Last Voice Messaging result was: Select the following: '''Not Attempted, Hang up on Machine, Not Connected, Busy, Undelivered Machine, Bad Device, No Answer''' | ||
| + | * Last Text Messaging result was: '''Not Attempted''' | ||
| + | * Last Email Messaging result was: '''Not Attempted''' | ||
| + | * Last Script result was: Leave blank | ||
| + | |||
| + | '''Timeframe options''' | ||
| + | * Days to Wait: '''0''' | ||
| + | * Allow Attempts on These Days: Select all | ||
| + | * Start time: '''9:00 Local''' | ||
| + | * End Time: '''21:00''' | ||
| + | |||
| + | '''Delivery options''' | ||
| + | * Bridge Calls to Agent when: '''Live Party Detected''' | ||
| + | * Caller ID Number: '''Account Default''' | ||
| + | * Deliver to answering machines: leave unchecked | ||
| + | |||
| + | '''Retry options''' | ||
| + | * Retry Busy Calls: '''0 times with 5 minutes between attempts''' | ||
| + | * Retry Attempts: '''0 times with 30 minutes between attempts''' | ||
| + | * When Call Result is: leave options unchecked | ||
| + | |||
| + | '''Pacing options''' | ||
| + | * Enable Predictive Pacing: Check | ||
| + | * Target Abandon Rate: '''5%''' | ||
| + | * Enable Fast Bridging: Check | ||
| + | * Priority: '''Background''' | ||
| + | |||
| + | Remember, enabling '''Predictive Pacing''' and '''Fast Bridging''' is the only way to meet the 2-second connect rule set by FCC regulations. | ||
| + | </toggledisplay></p> | ||
| + | |||
| + | ===Add a default Caller ID Number=== | ||
| + | |||
| + | '''Scenario:''' The Caller ID number that will display on a contact's phone is currently defaulted to the phone number associated with Harry's account, but Harry wants to specify a different phone number. | ||
| + | |||
| + | '''Solution:''' Harry can change the default Caller ID number to any specified phone number. | ||
| + | |||
| + | {{AnchorDiv|CallerID}} | ||
| + | <p><toggledisplay linkstyle font-size:larger showtext="[+] Instructions"> | ||
| + | On the '''Campaigns''' tab, click '''Caller ID Numbers.''' | ||
| + | # Click '''New''' to add a new number. The New Caller ID Number page appears. | ||
| + | # Enter the Caller ID number '''1 800 555 3232''' | ||
| + | # Enter '''LDCP_July2016''' | ||
| + | # Enter description '''Caller ID for LDCP_July2016''' | ||
| + | # Select '''Set as default''' | ||
| + | # Click '''Save Caller ID''' | ||
| + | |||
| + | Once Harry creates the '''Caller ID Number''', he can change it (by using the '''Reassign''' function), edit the name of description fields, or delete the number. | ||
| + | |||
| + | </toggledisplay></p> | ||
| + | |||
| + | {{AnchorDiv|Subcampaign}} | ||
| + | ==Sub-campaigns== | ||
| + | |||
| + | '''Scenario:''' Harry is now ready to create and send his sub-campaign. He doesn't have time to go through and specify the same options he specified when he configured the campaign. | ||
| + | |||
| + | '''Solution:''' Harry can apply his campaign settings to his sub-campaign. | ||
| + | |||
| + | <p><toggledisplay linkstyle font-size:larger showtext="[+] Instructions"> | ||
| + | |||
| + | |||
| + | |||
| + | {{CloudStep_Stack | ||
| + | |title=Create sub-campaign from campaign | ||
| + | |media1=Obbs newsubcampaign.png | ||
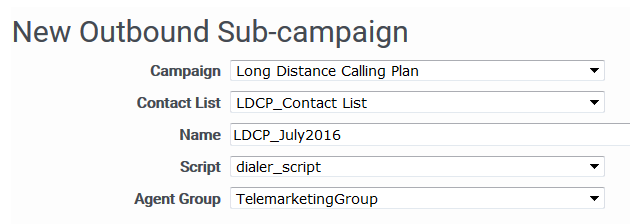
| + | |text=On the '''Campaigns''' page, under '''Actions''', he’ll select '''New Outbound''' from the Sub-campaign section of the drop-down menu. Then he’ll specify the sub-campaign information as follows: | ||
| + | # Select the campaign he labelled '''Long Distance Calling Plan''' from the '''Campaign''' menu. | ||
| + | # Select the contact list he named '''LDCP_ContactList''' from the '''Contact List''' menu. | ||
| + | # In the '''Name''' field, enter '''LDCP_July2016'''. This description will appear on the '''Campaigns''' list, under the sub-campaign name. | ||
| + | # In the '''Script''' field, select '''dialer_script.''' | ||
| + | # In '''Agent Group''', select '''TelemarketingGroup.''' | ||
| + | }} | ||
| + | </toggledisplay></p> | ||
| + | |||
| + | == Want to learn more? == | ||
| + | * [[Documentation:OCS:OCShelp:EntMgr:Current|Enterprise Manager help]] | ||
| + | * [[Documentation:PSAAS:Administrator:AcctMgr:latest|Account Manager help]]<br> | ||
| + | * [[Documentation:OCS:OCShelp:Comp:Current|Compliance (Account Manager)]]<br> | ||
| + | * [[Documentation:OCS:OCShelp:Suppression:Current|Contact Suppression Lists (Account Manager)]]<br> | ||
| + | * [[Documentation:OCS:OCShelp:Lists:Current|Contacts and contact lists]] | ||
| + | * [[Documentation:OCS:OCShelp:Campaigns:Current|Campaigns]]<br> | ||
| + | *[[DialingModes|Outbound dialing modes]] | ||
| + | |||
| + | [[Category:V:PSAAS:Public]] | ||
Revision as of 13:47, August 10, 2017
Contents
Stage 2: Setting up a campaign and sub-campaign
Now Harry will configure his campaign in Engage. To make it easy for him, we’ll break his work down into four tasks with sub-tasks:
Contacts and contact lists
Import contacts
Scenario: Harry has a spreadsheet containing the names of 1,500 customers that will be contacted. He’s busy and doesn’t have the time to add each customer manually into Engage.
Solution: Rather than enter each contact’s information directly into Engage, Harry can import the spreadsheet that contains the contact information of each customer. He'll do this in two steps:
[+] Step 1 Instructions: Prepare data for import
[+] Step 2 Instructions: Import the contact list
Once Harry imports his list in Account Manager, he can retrieve the list for this campaign and for future campaigns.
Add contacts to an existing list
Scenario: After Harry imported his spreadsheet, his account representative from G-Tel called with the contact information of seven customers they wanted added to the campaign. Harry confirmed that these customers were not listed on the spreadsheet he just finished importing.
Solution: Harry can manually add each of the seven customers to the imported contact list.
Now that Harry has imported the contact list and added his additional seven contacts, he can edit, delete, export, filter, download, or generate a report of the list or edit or delete individual contacts. He can also split his list into smaller lists using the Apply list rules function, and he can import specification files and perform a contact search. He’s happy with the list and moves on.
Compliance
Now it’s time for Harry to select the people he’ll exclude from the campaign. When he clicks on the Compliance tab on the Campaigns page, he'll have two options: Compliance Tools and Contact Suppression Lists.
Compliance Tools
Scenario: Harry has also been told that Ohio is under a state of emergency as a result of widespread damage from a tornado. He wants to remove all Ohio customers from the calling list.
Solution: Harry can use the Do Not Contact Location rule to stop the system from calling Ohio.
Contact Suppression Lists
Scenario: Harry has a spreadsheet containing the names of 50 people who have requested to be removed from all future calling campaigns.
Solution: Harry will use the Contact Suppression Lists function to exclude those 50 people from the campaign. He'll do this in two steps:
[+] Step 1 Instructions: Prepare data for import
[+] Step 2 Instructions: Import the suppression list
If he wants to, Harry can now select from the following suppression list options: edit, delete, export a list, or add, edit or delete individual contacts. He’ll leave it alone for now.
Campaigns
Harry can now configure his campaign using Engage.
Scenario: Because this is a sales campaign, Harry must abide by the FCC rule that says the contact center must connect a call to an agent within 2 seconds of detecting a voice.
Solution: In order to meet the 2-second connect standard, Harry will run his campaign in ASM mode, often referred to as Fast Bridging. And because Harry has only two weeks to reach 1,500 customers, with 25 agents assigned to the campaign, he chooses the fastest dialing mode, Predictive.
Add a default Caller ID Number
Scenario: The Caller ID number that will display on a contact's phone is currently defaulted to the phone number associated with Harry's account, but Harry wants to specify a different phone number.
Solution: Harry can change the default Caller ID number to any specified phone number.
Sub-campaigns
Scenario: Harry is now ready to create and send his sub-campaign. He doesn't have time to go through and specify the same options he specified when he configured the campaign.
Solution: Harry can apply his campaign settings to his sub-campaign.

