
(Created target blank page For Version: PSAAS:Public) |
(Update with the copy of version: draft) |
||
| Line 1: | Line 1: | ||
| − | + | = Chat= | |
| + | {{BEC_Head | ||
| + | |context=Chat is a Genesys Digital channel. The chat channel lets you handle customer chats. To chat with your team members start a chat consultation. | ||
| + | |||
| + | This page describes the typical options for handling a chat interaction. During a chat session, you and your contact send messages back and forth in real-time. When your contact is typing, you will see a notice that they are writing a response, but you won't see what they have written until they send it. The Interaction View keeps track of the conversation and allows you to review what has been said. | ||
| + | }} | ||
| + | |||
| + | __TOC__ | ||
| + | {{AnchorDiv|chat_interaction}} | ||
| + | ==How do I handle a chat interaction?== | ||
| + | When you accept a chat request, the name of the contact is displayed at the top of the screen and the timer for the pending response indicator starts. The color of the indicator begins as green, then changes to yellow if you have not responded within the specified time limit. If you still do not respond, the indicator changes to red and begins to flash. | ||
| + | |||
| + | Some of the things you can do while handling a chat include: | ||
| + | |||
| + | * Transfer ([[File:GAPI_Instant_Voice_Transfer_Icon_900.png|link=]]) the chat to someone else in your company. | ||
| + | * Start a chat conference ([[File:GAPI_Instant_Voice_Conference_Icon_900.png|link=]]) with yourself, the customer, and someone else in your company. | ||
| + | * Start a Voice (internal targets and contacts) or Chat (an internal target only) [[ADintinter#consult|consultation]]. If you want to perform a warm transfer or a two-step transfer, click Consult to talk to the consultation target and then click Transfer to transfer the call. | ||
| + | * [[ADVoice|Call]] or [[ADemail|email]] the contact, if there is a phone number or email address in the contact database. (You can also launch a call or email from the '''[[ADNav#PartyActionMenu|Party Action]]''' menu by clicking an email address or phone number.) If your account is set up for it, you can also click a phone number or email address that your contact sends you as a chat message to call or email the contact. | ||
| + | * Add a [[ADcustinter#dispcode|disposition code]] or [[ADcustinter#note|note]]. | ||
| + | * End the chat ([[Image:GAPI_900_End_Chat_Icon.png|link=]]) and mark it as done ([[Image:GAPI_Mark_Done_Button_900.png|link=]]). | ||
| + | |||
| + | If you place your mouse pointer over the interaction in the [[ADNav#ibar|Interaction Bar]], you can see the elapsed time of the interaction and the last lines of the chat transcript. Connection-status information is displayed next to the'''[[ADNav#PartyActionMenu|Party Action]]''' menu. | ||
| + | |||
| + | '''Note:''' If you have a pending response and the Chat Interaction window is not the active window, it will start flashing in the Windows taskbar, regardless of the pending-response indicator status (green, yellow, or red). | ||
| + | |||
| + | Watch the video to see what happens when a chat request arrives at a workstation. | ||
| + | {{#widget:Vimeo|id=286615890|width=572|height=392}} | ||
| + | {{AnchorDiv|PushURL}} | ||
| + | ==Pushing weblinks (URLs) to your contacts== | ||
| + | Some agents might be set up to push website links (URLs) to contacts. If you are, you will see the '''Add URL''' button ([[File:GAPI_900_Add_URL_Button.png|link=]]) beneath the chat text editing area. | ||
| + | |||
| + | Click the button to open the URL Editor below the chat text editing area. Type or paste the website address (URL) that you want to send to your contact and click '''Send''' ([[File:GAPI_900_Chat_Send_Button.png|14px|link=]]). | ||
| + | |||
| + | [[File:GAPI_900_Push_URL_Field.png|center|thumb|link=]] | ||
| + | |||
| + | To check the URL before you sent it, click the link symbol ([[File:GAPI_900_Check_Link_Button.png|link=]]) to open the URL in your browser. This way you can be sure that you are sending your contact to the correct website. | ||
| + | |||
| + | If you have sent previous URLs, a down arrow is displayed next to the link symbol in the URL Editor area. Click the arrow to open a menu that contains a list of URLs that you have sent to your contacts. Select one of the URLs to push it to your contact. You can use arrow keys to navigate through the list of URLs: up and down highlights the next URL, left or right selects it and inserts it into the Push URL field. | ||
| + | |||
| + | Your contact will receive a message in their chat window telling them to click the link that you sent them. | ||
| + | {{#widget:Vimeo|id=287504292|width=572|height=392}} | ||
| + | |||
| + | {{AnchorDiv|Emojis}} | ||
| + | ==Send Emojis to Contacts== | ||
| + | Your account might be set up to let you send emojis (''emoticons'' or ''smileys'') to your contact as part of the chat interaction text. Emojis are little faces and other symbols that you can use to let your contact know how you are feeling or to help them to know when something is good, funny, bad, or sad. Ask your supervisor or administrator about when to use emojis. | ||
| + | |||
| + | There are different ways to add emojis to your chats. Some contact centers allow you to copy and paste emojis into the text editing area. Other contact centers might have the '''Emoji Picker''' enabled (see below) — use this tool to choose an emoji to send. | ||
| + | |||
| + | Your administrator might have enabled the licensed emojis that come with Workspace Agent Desktop. These are pictures that enhance the appearance of standard operating system and browser supported emojis. If this feature is not enabled for you, you will see the standard color or black and white emojis that are supported by your operating system and browser instead. | ||
| + | |||
| + | Use the '''Emoji Picker''' to add an emoji to your chat interaction: | ||
| + | <ol> | ||
| + | <li>Click the '''Choose an emoji''' button ([[File:GAPI_900_Choose_A_Smiley_Button.png|link=]]) that appears below the text editing area to display the menu of emojis that you can choose from. | ||
| + | <br> | ||
| + | [[File:GAPI_900_Choosing_An_Emoticon.png|Center|250px]] | ||
| + | </li> | ||
| + | <li>Click an emoji.</li> | ||
| + | <li>Click '''Send''' ([[File:GAPI_900_Chat_Send_Button.png|14px|link=]]).</li> | ||
| + | </ol> | ||
| + | |||
| + | == What next? == | ||
| + | * [[ADChatAsync|Asynchronous Chat]] | ||
| + | * [[ADcontacts|Contacts]] | ||
| + | * [[ADNav#tcbar|Team Communicator]] | ||
| + | * [[ADAltocloud|Altocloud customer journey]] | ||
| + | * [[ADintinter|Internal interactions]] | ||
| + | |||
| + | == Top 5 topics == | ||
| + | # [[ADQuickStart|Getting Started]] | ||
| + | # [[ADNav|Navigating Agent Desktop]] | ||
| + | # [[ADVoice|Calls]] | ||
| + | # [[ADcontacts|Contacts]] | ||
| + | # [[ADhist|Contact and interaction history]] | ||
| + | |||
| + | [[Category:V:PSAAS:Public]] | ||
| + | [[Category:Workspace_Web_Edition_9.0.0_Help]] | ||
Revision as of 12:09, April 18, 2019
Chat
Chat is a Genesys Digital channel. The chat channel lets you handle customer chats. To chat with your team members start a chat consultation.
This page describes the typical options for handling a chat interaction. During a chat session, you and your contact send messages back and forth in real-time. When your contact is typing, you will see a notice that they are writing a response, but you won't see what they have written until they send it. The Interaction View keeps track of the conversation and allows you to review what has been said.
Contents
How do I handle a chat interaction?
When you accept a chat request, the name of the contact is displayed at the top of the screen and the timer for the pending response indicator starts. The color of the indicator begins as green, then changes to yellow if you have not responded within the specified time limit. If you still do not respond, the indicator changes to red and begins to flash.
Some of the things you can do while handling a chat include:
- Transfer (
 ) the chat to someone else in your company.
 - Start a chat conference (
 ) with yourself, the customer, and someone else in your company.
 - Start a Voice (internal targets and contacts) or Chat (an internal target only) consultation. If you want to perform a warm transfer or a two-step transfer, click Consult to talk to the consultation target and then click Transfer to transfer the call.
- Call or email the contact, if there is a phone number or email address in the contact database. (You can also launch a call or email from the Party Action menu by clicking an email address or phone number.) If your account is set up for it, you can also click a phone number or email address that your contact sends you as a chat message to call or email the contact.
- Add a disposition code or note.
- End the chat (
 ) and mark it as done (
 ).
).
If you place your mouse pointer over the interaction in the Interaction Bar, you can see the elapsed time of the interaction and the last lines of the chat transcript. Connection-status information is displayed next to theParty Action menu.
Note: If you have a pending response and the Chat Interaction window is not the active window, it will start flashing in the Windows taskbar, regardless of the pending-response indicator status (green, yellow, or red).
Watch the video to see what happens when a chat request arrives at a workstation.
Pushing weblinks (URLs) to your contacts
Some agents might be set up to push website links (URLs) to contacts. If you are, you will see the Add URL button (![]() ) beneath the chat text editing area.
) beneath the chat text editing area.
Click the button to open the URL Editor below the chat text editing area. Type or paste the website address (URL) that you want to send to your contact and click Send (![]() ).
).
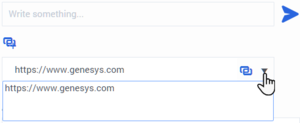
To check the URL before you sent it, click the link symbol (![]() ) to open the URL in your browser. This way you can be sure that you are sending your contact to the correct website.
) to open the URL in your browser. This way you can be sure that you are sending your contact to the correct website.
If you have sent previous URLs, a down arrow is displayed next to the link symbol in the URL Editor area. Click the arrow to open a menu that contains a list of URLs that you have sent to your contacts. Select one of the URLs to push it to your contact. You can use arrow keys to navigate through the list of URLs: up and down highlights the next URL, left or right selects it and inserts it into the Push URL field.
Your contact will receive a message in their chat window telling them to click the link that you sent them.
Send Emojis to Contacts
Your account might be set up to let you send emojis (emoticons or smileys) to your contact as part of the chat interaction text. Emojis are little faces and other symbols that you can use to let your contact know how you are feeling or to help them to know when something is good, funny, bad, or sad. Ask your supervisor or administrator about when to use emojis.
There are different ways to add emojis to your chats. Some contact centers allow you to copy and paste emojis into the text editing area. Other contact centers might have the Emoji Picker enabled (see below) — use this tool to choose an emoji to send.
Your administrator might have enabled the licensed emojis that come with Workspace Agent Desktop. These are pictures that enhance the appearance of standard operating system and browser supported emojis. If this feature is not enabled for you, you will see the standard color or black and white emojis that are supported by your operating system and browser instead.
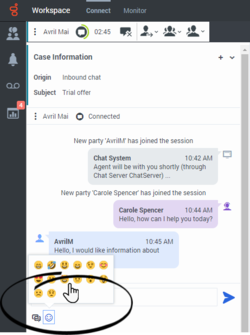
Use the Emoji Picker to add an emoji to your chat interaction:
- Click the Choose an emoji button (
 ) that appears below the text editing area to display the menu of emojis that you can choose from.
- Click an emoji.
- Click Send (
 ).
).
