(Created target blank page For Version: PSAAS:Public) |
(Update with the copy of version: draft) |
||
| Line 1: | Line 1: | ||
| − | <!-- | + | = Getting started = |
| + | __NOTOC__ | ||
| + | {{BEC_Head | ||
| + | |context= | ||
| + | Now that you know what Gplus Adapter for Salesforce Lightning is, you’re probably wondering how to use it. Let’s get started. | ||
| + | |dimension= | ||
| + | }} | ||
| + | |||
| + | {{CloudStep_Stack | ||
| + | |title=How do I log in? | ||
| + | |textwide=You can log into Gplus Adapter from within Salesforce Lightning doing the following: | ||
| + | # Click the soft phone icon at the bottom-left corner of the '''Utility Bar'''. | ||
| + | # Follow the log in procedure. For more information about logging in, see [[Documentation:PSAAS:Agent:ADQuickStart|Getting Started]] in the Genesys Agent Desktop help. | ||
| + | # After you successfully log in, you can start working in the [[GPASFLGettingStarted#ADPMainview|Adapter main view]]. | ||
| + | <!-- | ||
| + | {{CloudStep_Stack | ||
| + | |title=Log in with Salesforce single sign-on (SSO) | ||
| + | |text=Your Genesys Contact Center and Salesforce account might be set up to let you log in to Gplus Adapter using Salesforce as SSO and identity provider. | ||
| + | |||
| + | Log in to Salesforce Lightning as usual, click the Gplus Adapter button at the bottom-left corner of the Salesforce Lightning Utility Bar, enter your Genesys Username and click '''Next'''. If your contact center uses tenants, click '''Tenant''' to reveal the Tenant field. You will be told by your administrator what to enter in the Tenant field. Leave this field blank unless instructed otherwise by your administrator. | ||
| + | |||
| + | Since you are already logged in to Salesforce Lightning, your identity is confirmed without you having to enter your password. You can start using Gplus Adapter. | ||
| + | |textwide= | ||
| + | |media1=GAPI_900_WWE_Login_Salesforce.png | ||
| + | |video= | ||
| + | }} | ||
| + | --> | ||
| + | <!-- | ||
| + | {{CloudStep_Stack | ||
| + | |title= Log in with Single Sign-on | ||
| + | |media1=SFLloginSSO.png | ||
| + | |text= | ||
| + | In the Gplus Adapter login window, enter your Genesys username and click '''Next'''. In the Gplus Adapter login window, enter your Genesys username and click '''Next'''. If your contact center uses tenants, click '''Tenant''' to reveal the Tenant field. You will be told by your administrator what to enter in the Tenant field. Leave this field blank unless instructed otherwise by your administrator. | ||
| + | |||
| + | If Adapter is configured for SSO, you will be prompted to enter the Adapter credentials in the identity provider's (for example, Okta) login screen. Once you log in with the identity provider, you're redirected back to Adapter and automatically logged in. Alternatively, if you are already logged in with the identity provider, when you click '''Next''', you will have immediate access to Adapter. | ||
| + | |||
| + | The identity provider differs for different organizations, hence the login page of the identity provider might vary depending on the identity provider your organization has configured. | ||
| + | }} | ||
| + | --> | ||
| + | <!-- | ||
| + | {{CloudStep_Stack | ||
| + | |title=Secondary login page | ||
| + | |text= Depending on how your administrator has configured the Gplus Adapter, you might also see a secondary login page where you're asked to enter the name of a place. | ||
| + | |||
| + | If you do not know what to enter, ask your supervisor. | ||
| + | |||
| + | After clicking '''Continue''', you will see the Adapter main view. | ||
| + | |media1=SFLLoginPlace.png | ||
| + | }}--> | ||
| + | |||
| + | {{AnchorDiv|ADPMainview}} | ||
| + | {{CloudStep_Stack | ||
| + | |title=Gplus Adapter main view | ||
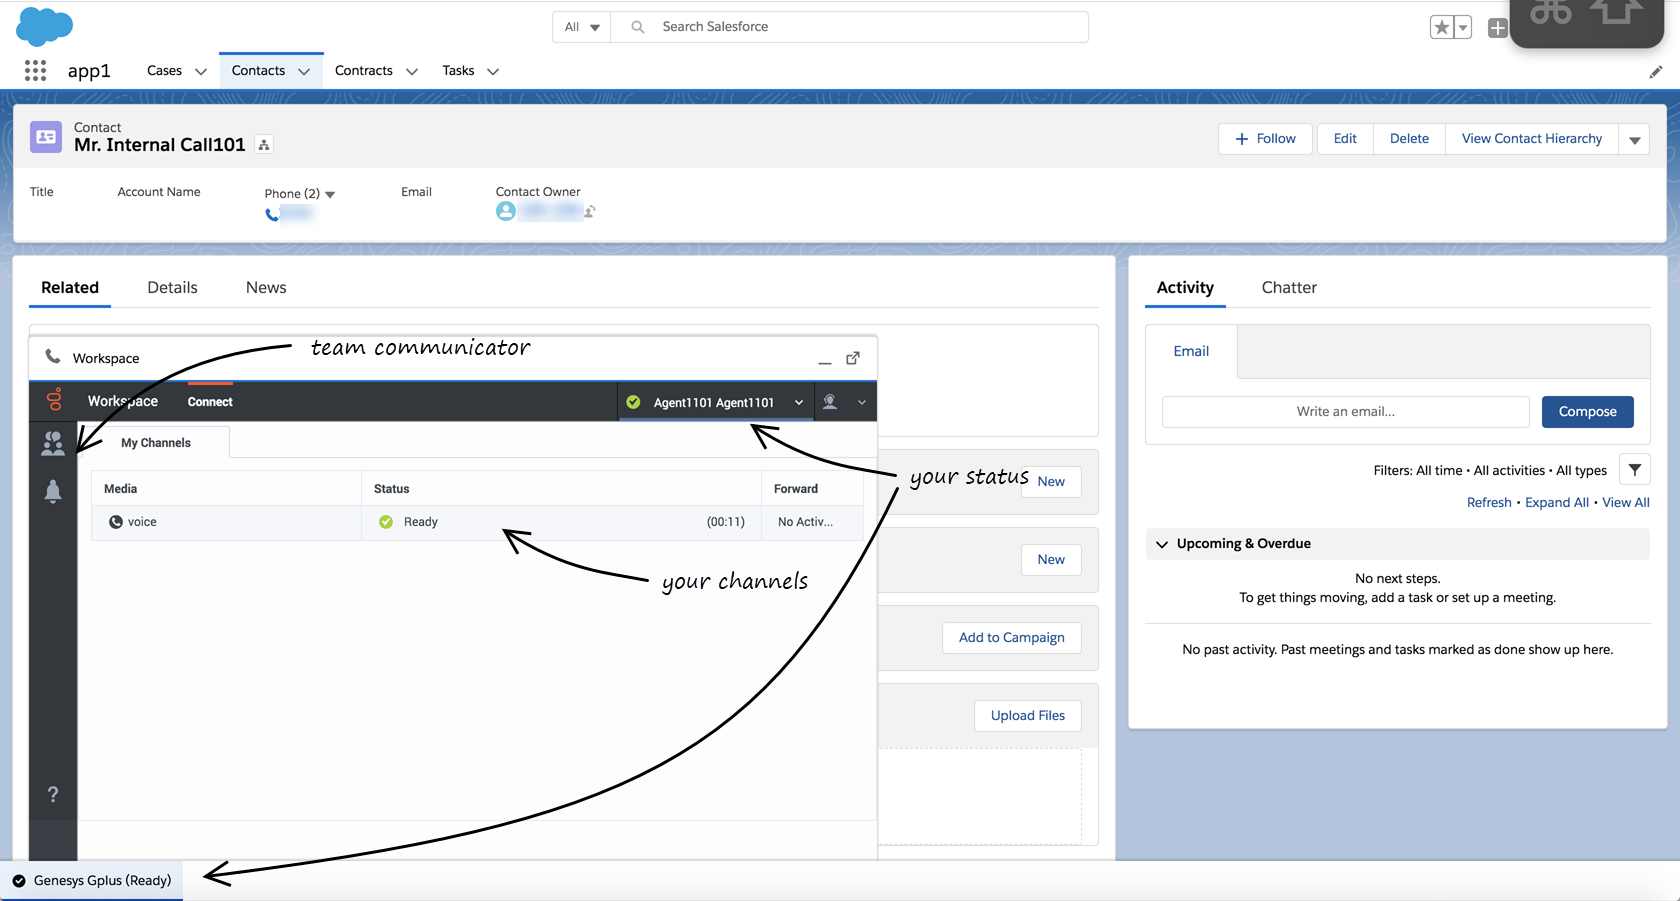
| + | |text= After you log in, the Gplus Adapter's main view is displayed. From this view, you can change your status, navigate among your channels, and make a call by using Team Communicator. | ||
| + | |||
| + | When you first log in, notice that your agent status is set for you — for instance, it could be Not Ready. The default state is determined by your system administrator. However, you must ensure that your status is set to Ready to receive interactions from the queue. | ||
| + | See the [[Documentation:PSAAS:Agent:AD|Genesys Agent Desktop help]] for more details on how to use these functionalities. | ||
| + | |media1=SFLAdaptermainview.png | ||
| + | }} | ||
| + | |||
| + | {{CloudStep_Stack | ||
| + | |title=How do I log out? | ||
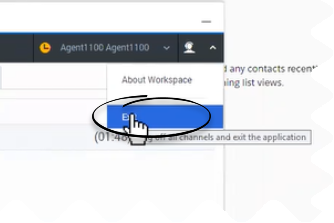
| + | |text= To log off all channels and sign out of Gplus Adapter, click the agent icon and then select '''Exit'''. A modal pop-up window will open asking your confirmation to log out of the application. Click '''Exit'''. Adapter returns you to the login page, where you can enter your credentials again, if needed. | ||
| + | |||
| + | Ensure that you close all the interactions before logging out, otherwise you will see an error message. | ||
| + | |media1=SFLlogout.png | ||
| + | }} | ||
| + | |||
| + | [[Category:V:PSAAS:Public]] | ||
Revision as of 18:33, September 26, 2019
Getting started
Now that you know what Gplus Adapter for Salesforce Lightning is, you’re probably wondering how to use it. Let’s get started.
{{CloudStep_Stack |title=How do I log in? |textwide=You can log into Gplus Adapter from within Salesforce Lightning doing the following:
- Click the soft phone icon at the bottom-left corner of the Utility Bar.
- Follow the log in procedure. For more information about logging in, see Getting Started in the Genesys Agent Desktop help.
- After you successfully log in, you can start working in the Adapter main view.
Gplus Adapter main view
After you log in, the Gplus Adapter's main view is displayed. From this view, you can change your status, navigate among your channels, and make a call by using Team Communicator.
When you first log in, notice that your agent status is set for you — for instance, it could be Not Ready. The default state is determined by your system administrator. However, you must ensure that your status is set to Ready to receive interactions from the queue. See the Genesys Agent Desktop help for more details on how to use these functionalities.
How do I log out?
To log off all channels and sign out of Gplus Adapter, click the agent icon and then select Exit. A modal pop-up window will open asking your confirmation to log out of the application. Click Exit. Adapter returns you to the login page, where you can enter your credentials again, if needed.
Ensure that you close all the interactions before logging out, otherwise you will see an error message.


