|
|
| Line 13: |
Line 13: |
| | To create a new job, click the '''Add new job''' button: | | To create a new job, click the '''Add new job''' button: |
| | | | |
| − | [[File:CDDS_create_manual_job_button.png|alt="Add new job"]] | + | [[File:CDDS_create_manual_job_button.png|alt="Add new job"]] |
| | | | |
| | This opens the job editor page, where you can specify the settings for the new job. Mandatory fields are marked with an asterisk (*). | | This opens the job editor page, where you can specify the settings for the new job. Mandatory fields are marked with an asterisk (*). |
| | | | |
| − | You must give the job a '''Title'''. You can also add a '''Description''', but this is optional. You must also specify the data '''Source'''. You can choose either '''Contact History''' to export data related to contacts and interaction data, or '''Info Mart''' to export historical reporting data.
| + | {{NoteFormat|Info Mart exports are not supported. Do not select Info Mart as the data source for your job.}} |
| | | | |
| − | Depending on the type of source selected, there are different job settings available:
| + | You must give the job a '''Title'''. You can also add a '''Description''', but this is optional. |
| | | | |
| − | * [[CDDSAdmin#ch|Setting up a Contact History export job]]
| + | After you select '''Contact History''' as the data '''Source''', you can select either '''Interaction''' or '''Contact''' as the data '''Type'''. |
| − | * [[CDDSAdmin#im|Setting up an Info Mart export job]]
| |
| − | | |
| − | {{AnchorDiv|ch}}
| |
| − | === Setting up a Contact History export job ===
| |
| − | If you select '''Contact History''' as the source, you must also specify the data '''Type'''. You can select either '''Interaction''' or '''Contact'''.
| |
| | | | |
| | [[File:cdds_admin_create_new_job_02.png]] | | [[File:cdds_admin_create_new_job_02.png]] |
| Line 41: |
Line 36: |
| | | | |
| | When you are finished setting up the job, click '''Save'''. | | When you are finished setting up the job, click '''Save'''. |
| − | {{AnchorDiv|im}}
| |
| − | === Setting up an Info Mart export job ===
| |
| − | If you select '''Info Mart''', the settings for '''Type''' and '''Media Types''' are not available.
| |
| − |
| |
| − | [[File:cdds_admin_create_new_job_03.png]]
| |
| − |
| |
| − | Use the '''Run''' setting to specify how often to run the job. You can then choose to run the job immediately or schedule it to start at a specific date and time.
| |
| − |
| |
| − | {{NoteFormat|If you select '''Hourly''', the start time is calculated based on 00:00 UTC (Coordinated Universal Time) and not the local timezone. For example, let's say you want the job to run every 4 hours. The first run of the job will be at 00:00 UTC, the next at 04:00 UTC, then 08:00 UTC, and so on.}}
| |
| − |
| |
| − | The '''Export Timeframe''' setting lets you select either '''All data''' to export all of the available data, or '''Delta''' to export only the data that was not exported by any previous job.
| |
| − |
| |
| − | If you select '''Delta''' and are running the job '''Once''', you can also specify the '''Audit Key From''' and '''Audit Key To''' details to indicate the range of data you want to export. For example, you could enter the audit keys of two previously-downloaded Info Mart export files to capture any data for the audit keys within that range (see the example, above). Otherwise, for recurring jobs, '''Delta''' captures only the data that was not exported during the previous execution of the job.
| |
| − |
| |
| − | By default, the data is exported as a single file. If you want to break the exported data into a set of smaller files, use the '''File Split Size''' setting to specify the size of each file.
| |
| − |
| |
| − | When you are finished setting up the job, click '''Save'''.
| |
| − | <!--
| |
| − | {{CloudStep_Stack
| |
| − | |title=Adding a new job
| |
| − | |text=To create a new job, click the '''Add new job''' button ([[File:CDDS_create_manual_job_button_sm.png|alt="Add new job"]]).
| |
| − | * You must give the job a '''Title''' and specify the data '''Source'''. If you select '''Contact History''' as the source, you must also specify a data '''Type'''.
| |
| − | * If you select '''Info Mart''' as the data '''Source''', the additional settings for '''Type''' and '''Media Types''' are not available.
| |
| − | * By default, '''Media Types''' is enabled for '''all'''. If you turn the slider off, you must select at least one media type (for example, '''Chat'''). You can add multiple media types.
| |
| − | * Use the '''Run''' setting to specify how often to run the job. You can then choose to run the job immediately or schedule it to start at a specific date and time.
| |
| − | *:{{NoteFormat|If you select '''Hourly''', the start time is calculated based on 00:00 UTC (Coordinated Universal Time) and not the local timezone. For example, let's say you want the job to run every 4 hours. The first run of the job will be at 00:00 UTC, the next at 04:00 UTC, then 08:00 UTC, and so on.}}
| |
| − | * The '''Export Timeframe''' setting lets you export all data or just the data from a specific time period. If you select '''Fixed interval''', you can then specify the '''Start''' and '''End''' dates for the export.
| |
| − | * By default, the data is exported as a single file. If you want to break the exported data into a set of smaller files, use the '''File Split Size''' setting to specify the size of each file. (This option is not available for '''Info Mart''' exports.)
| |
| − |
| |
| − | When you are finished setting up the job, click '''Save'''.
| |
| − | |media1=cdds_admin_create_new_job_02.png
| |
| − | }}-->
| |
| | | | |
| | {{AnchorDiv|clone}} | | {{AnchorDiv|clone}} |
Administration
From the CDDS Administration menu, you can access the Jobs page. The Jobs page displays a list of your data export jobs. From here, you can create a new data export job or monitor and manage existing ones.
Tip
You can view full details for all active and completed jobs on the
History page, which you can access from the
Export menu.
The page provides details about each job, such as data source, job type, latest status, and date when each job last ran. If a job is still running, the Latest Status column features a status bar to indicate the progress of the active data export job. If you hover your mouse over the bar, it displays the estimated time remaining until the job completes.

Adding a new job
To create a new job, click the Add new job button:

This opens the job editor page, where you can specify the settings for the new job. Mandatory fields are marked with an asterisk (*).
Important
Info Mart exports are not supported. Do not select Info Mart as the data source for your job.
You must give the job a Title. You can also add a Description, but this is optional.
After you select Contact History as the data Source, you can select either Interaction or Contact as the data Type.

By default, Media Types is enabled for all. If you turn the slider off, you must select at least one media type (for example, Chat). You can add multiple media types.
Use the Run setting to specify how often to run the job. You can then choose to run the job immediately or schedule it to start at a specific date and time.
Important
If you select
Hourly, the start time is calculated based on 00:00 UTC (Coordinated Universal Time) and not the local timezone. For example, let's say you want the job to run every 4 hours. The first run of the job will be at 00:00 UTC, the next at 04:00 UTC, then 08:00 UTC, and so on.
The Export Timeframe setting lets you export all data or just the data for a specific time period. If you select Fixed interval, you can then specify the Start and End dates for the export.
By default, the data is exported as a single file. If you want to break the exported data into a set of smaller files, use the File Split Size setting to specify the size of each file.
When you are finished setting up the job, click Save.
Cloning a job
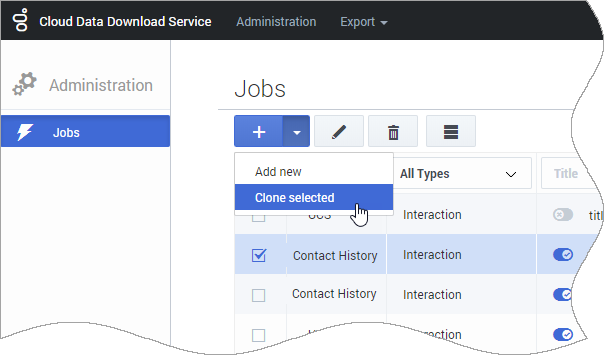
If you want to create a new job that is based on the settings of an existing job, you can clone the job.
Select the job you want to clone and choose Clone selected from the dropdown menu. This opens the job settings editor.
You can keep the existing job settings, or make any desired changes. For example, you might want to give the job a different Title or adjust the range of the Export Start/End dates.
When you are finished, click Save.
Suspending (and resuming) a job
Use the slider to change the state of a job to suspended or active.

Important
If you create a one-time data export job (i.e. a job you intend to only run once) and submit it to run immediately, it is automatically added in a suspended state and can't be resumed. If you create and submit a one-time job with a delayed (i.e. scheduled) start time, it automatically changes to a suspended state when the job starts.
Editing a job
Select the job you want to edit and click the pencil icon:

When you are finished making changes, click Save.
Important
If the data export job is only going to be run once, you won't be able to edit it after it is submitted.
Deleting a job
Select the job you want to delete and click the trash icon:

Important
You can't delete a job that is still in progress.
Viewing the job history
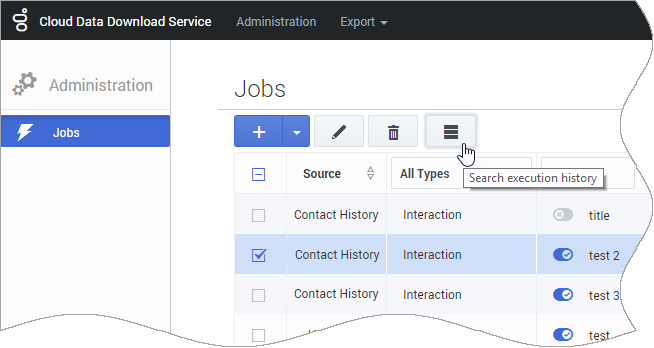
If you select a job and click the collapsed (or "hamburger") button, it takes you to the History page, where the results are filtered to only show the history of the selected job.


