
(Update with the copy of version: draft) |
(Update with the copy of version: draft) |
||
| Line 1: | Line 1: | ||
| − | =Salesforce as SSO and IDP= | + | =Configuring SSO = |
| + | |||
| + | You can configure Gplus Adapter to use either your own IDP or Salesforce as an IDP. You can choose one of these two options: | ||
| + | <ol> | ||
| + | <li>'''Gplus Adapter configured with SSO and your own Identity Provider (IDP)'''. | ||
| + | <ul><li>Ensure that SSO for Agent Desktop release 9 has been enabled in your environment by following the instructions in the [[Documentation:PSAAS:Administrator:SAML|Agent Setup SSO article]] and the [[Documentation:PSAAS:Administrator:SingleSignOn|Single Sign-On article]].</li> | ||
| + | <li>For SSO logout configuration, use the following Agent Setup Desktop [[Documentation:PSAAS:Administrator:umgrGlobalLogin|Global Login]] options: | ||
| + | <ul> | ||
| + | <li>'''Invalidate Auth SSO session on Workspace logout'''</li> | ||
| + | <li>'''Show Change Account Link'''</li> | ||
| + | </ul> | ||
| + | </li> | ||
| + | <li>Adapter is now ready to use with SSO.</li> | ||
| + | </ul> | ||
| + | <br /><br /></li> | ||
| + | <li>'''Gplus Adapter integrated with [[Documentation:PSAAS:Administrator:GPlusSSO90#SFSSO|Salesforce SSO as the IDP]]'''.<br />This option provides an improved experience over the first option.</li> | ||
| + | </ol> | ||
| + | |||
| + | {{AnchorDiv|SFSSO}} | ||
| + | ==Salesforce as SSO and IDP== | ||
You can simplify your agent log in process by integrating Gplus Adapter with Salesforce to use Salesforce as your single sign-on (SSO) identity provider (IDP). This means that your agent only has to provide their Username and Tenant to log in to Gplus Adapter after they have logged into Salesforce using Salesforce as your SSO identity provider. | You can simplify your agent log in process by integrating Gplus Adapter with Salesforce to use Salesforce as your single sign-on (SSO) identity provider (IDP). This means that your agent only has to provide their Username and Tenant to log in to Gplus Adapter after they have logged into Salesforce using Salesforce as your SSO identity provider. | ||
| Line 8: | Line 27: | ||
{{NoteFormat|SSO is applicable to both test and production environments. Genesys recommends that you test SSO in your testing environment before using it in a production environment.|1}}--> | {{NoteFormat|SSO is applicable to both test and production environments. Genesys recommends that you test SSO in your testing environment before using it in a production environment.|1}}--> | ||
| − | ==Enable Salesforce as an Identity Provider== | + | ===Enable Salesforce as an Identity Provider=== |
| − | ===Prerequisites=== | + | ====Prerequisites==== |
* You must have an Admin role in your organization's Salesforce account | * You must have an Admin role in your organization's Salesforce account | ||
* User email address (username) that you use to login to Salesforce. '''Note:''' Username email addresses must be the same in both Salesforce and Gplus Adapter. | * User email address (username) that you use to login to Salesforce. '''Note:''' Username email addresses must be the same in both Salesforce and Gplus Adapter. | ||
{{AnchorDiv|IDP}} | {{AnchorDiv|IDP}} | ||
| − | ===Enable Salesforce as an Identity Provider=== | + | ====Enable Salesforce as an Identity Provider==== |
<ol> | <ol> | ||
<li>Follow the steps in the [https://help.salesforce.com/articleView?id=identity_provider_enable.htm Enable Salesforce as an Identity Provider] article in the '''Salesforce Help'''.</li> | <li>Follow the steps in the [https://help.salesforce.com/articleView?id=identity_provider_enable.htm Enable Salesforce as an Identity Provider] article in the '''Salesforce Help'''.</li> | ||
| Line 20: | Line 39: | ||
</ol> | </ol> | ||
{{AnchorDiv|SSOonTenant}} | {{AnchorDiv|SSOonTenant}} | ||
| − | ==Enable SSO on Genesys tenants== | + | ===Enable SSO on Genesys tenants=== |
<ol> | <ol> | ||
<li>Employing [https://developers.onelogin.com/saml SAML] for SSO requires two parts, a Service Provider (Genesys Auth Service) and an Identity Provider (Salesforce). To complete your Service Provider configuration, you must upload the Salesforce Identity Provider IDP-metadata XML file you created in the previous procedure to Agent Setup (refer to the [[Documentation:PSAAS:Administrator:SAML|Agent Setup SSO article]]).</li> | <li>Employing [https://developers.onelogin.com/saml SAML] for SSO requires two parts, a Service Provider (Genesys Auth Service) and an Identity Provider (Salesforce). To complete your Service Provider configuration, you must upload the Salesforce Identity Provider IDP-metadata XML file you created in the previous procedure to Agent Setup (refer to the [[Documentation:PSAAS:Administrator:SAML|Agent Setup SSO article]]).</li> | ||
| Line 33: | Line 52: | ||
{{AnchorDiv|ConnectedApp}} | {{AnchorDiv|ConnectedApp}} | ||
| − | ==Define Gplus Adapter as a Connected App in Salesforce== | + | ===Define Gplus Adapter as a Connected App in Salesforce=== |
<ol> | <ol> | ||
<li>To configure a new Connected App follow the instructions in the Salesforce Help [https://help.salesforce.com/articleView?id=service_provider_define.htm&type=5 Defining Service Providers as SAML-Enabled Connected Apps] document.</li> | <li>To configure a new Connected App follow the instructions in the Salesforce Help [https://help.salesforce.com/articleView?id=service_provider_define.htm&type=5 Defining Service Providers as SAML-Enabled Connected Apps] document.</li> | ||
| Line 54: | Line 73: | ||
</ol> | </ol> | ||
| − | ==Agent SSO login workflow== | + | ===Agent SSO login workflow=== |
This is the general workflow when Gplus Adapter initiates the login process and uses Salesforce to identify the user: | This is the general workflow when Gplus Adapter initiates the login process and uses Salesforce to identify the user: | ||
# An agent logs in to Salesforce. | # An agent logs in to Salesforce. | ||
| Line 63: | Line 82: | ||
# If the agent is authenticated, they are logged in to Gplus Adapter while logged in to Salesforce. | # If the agent is authenticated, they are logged in to Gplus Adapter while logged in to Salesforce. | ||
| − | ===Useful links=== | + | ====Useful links==== |
* [https://developer.salesforce.com/docs/atlas.en-us.externalidentityImplGuide.meta/externalidentityImplGuide/external_identity_provide_sso.htm Salesforce guide] | * [https://developer.salesforce.com/docs/atlas.en-us.externalidentityImplGuide.meta/externalidentityImplGuide/external_identity_provide_sso.htm Salesforce guide] | ||
* [http://salesforce.vidyard.com/watch/I6j0O6jqr8ZTtoj5Wm_Fjg Video example from Salesforce] | * [http://salesforce.vidyard.com/watch/I6j0O6jqr8ZTtoj5Wm_Fjg Video example from Salesforce] | ||
Revision as of 18:01, May 5, 2020
Configuring SSO
You can configure Gplus Adapter to use either your own IDP or Salesforce as an IDP. You can choose one of these two options:
- Gplus Adapter configured with SSO and your own Identity Provider (IDP).
- Ensure that SSO for Agent Desktop release 9 has been enabled in your environment by following the instructions in the Agent Setup SSO article and the Single Sign-On article.
- For SSO logout configuration, use the following Agent Setup Desktop Global Login options:
- Invalidate Auth SSO session on Workspace logout
- Show Change Account Link
- Adapter is now ready to use with SSO.
- Gplus Adapter integrated with Salesforce SSO as the IDP.
This option provides an improved experience over the first option.
Salesforce as SSO and IDP
You can simplify your agent log in process by integrating Gplus Adapter with Salesforce to use Salesforce as your single sign-on (SSO) identity provider (IDP). This means that your agent only has to provide their Username and Tenant to log in to Gplus Adapter after they have logged into Salesforce using Salesforce as your SSO identity provider.
Follow these steps to set up SSO with Salesforce as the identity provider:
Enable Salesforce as an Identity Provider
Prerequisites
- You must have an Admin role in your organization's Salesforce account
- User email address (username) that you use to login to Salesforce. Note: Username email addresses must be the same in both Salesforce and Gplus Adapter.
Enable Salesforce as an Identity Provider
- Follow the steps in the Enable Salesforce as an Identity Provider article in the Salesforce Help.
- In the Identity Provider view, click Download Metadata to obtain a copy of the IDP metadata XML.
Enable SSO on Genesys tenants
- Employing SAML for SSO requires two parts, a Service Provider (Genesys Auth Service) and an Identity Provider (Salesforce). To complete your Service Provider configuration, you must upload the Salesforce Identity Provider IDP-metadata XML file you created in the previous procedure to Agent Setup (refer to the Agent Setup SSO article).
- Download and open the SP-Metadata XML file in an XML viewer and find the Location parameter. You will need this parameter for the Entity ID and the ACS URL when you define Gplus Adapter as a Connected App in Salesforce. The Location URL looks something like this: https://gws-usw1.genhtcc.com/auth/v3/saml/SSO/alias/<string representing the Entity ID>.
- For SSO logout configuration, use the following Agent Setup Desktop Global Login options:
- Invalidate Auth SSO session on Workspace logout
- Show Change Account Link
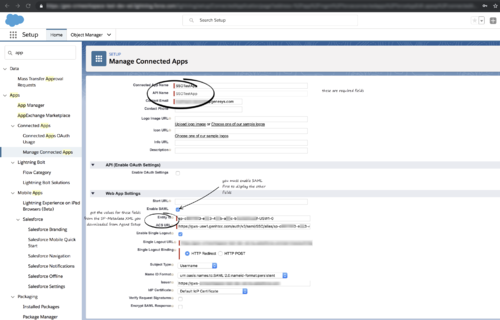
Define Gplus Adapter as a Connected App in Salesforce
- To configure a new Connected App follow the instructions in the Salesforce Help Defining Service Providers as SAML-Enabled Connected Apps document.
- Specify the required fields under Basic Information:
- Connected App Name (for example, Gplus Adapter)
- API Name (for example, GWS)
- Contact email (the email address of the Admin user)
- Under Web App Settings, select Enable SAML
- Use the Location string from the SP-Metadata xml file of the Enable Salesforce as an Identity Provider procedure to provide Entity ID and ACS URL:
- Entity ID: The long string of numbers and letters at the end of the Location parameter URL after the last "/".
- ACS URL: The URL from the Location parameter that you obtained from the SP-Metadata in step 2 of the Enable SSO on Genesys tenants procedure.
- Use the identity provider event log to troubleshoot errors when trying to log in to Gplus Adapter.

Agent SSO login workflow
This is the general workflow when Gplus Adapter initiates the login process and uses Salesforce to identify the user:
- An agent logs in to Salesforce.
- The agent provides their Username and Tenant name in Gplus Adapter and clicks Next.
- GPlus Adapter sends a request to Salesforce to authenticate the user.
- Salesforce identifies the agent specified in the request and sends an authentication response.
- Gplus Adapter authenticates the response sent by Salesforce.
- If the agent is authenticated, they are logged in to Gplus Adapter while logged in to Salesforce.
Useful links
Comments or questions about this documentation? Contact us for support!