(Automated save: adding PEC_Migrated template.) |
(Update with the copy of version: draft) |
||
| Line 39: | Line 39: | ||
== Bot Registry == | == Bot Registry == | ||
| − | + | Use the '''Bot Registry''' to add and define the bot resources you want to use in your applications. | |
| − | + | Designer supports several bot services providers, such as Google Dialogflow, Amazon Lex, and Genesys DialogFlow. If you have a bot resource set up with one of the supported providers, you can add it to the registry and use it in your applications. See the [[BotBlock|Bot block]] page to learn more about how to use bot resources in your applications. | |
| − | |||
| − | + | ===Adding a new bot resource=== | |
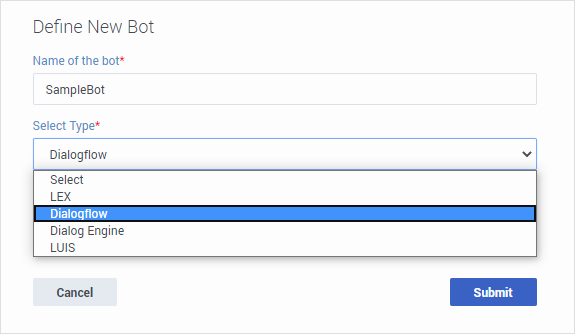
| − | + | Click '''Add Bot Definition'''. Enter a '''Name''' for the bot resource and select the '''Type''' from the list of supported bot services providers. | |
| − | + | [[File:des_define_bot.png]] | |
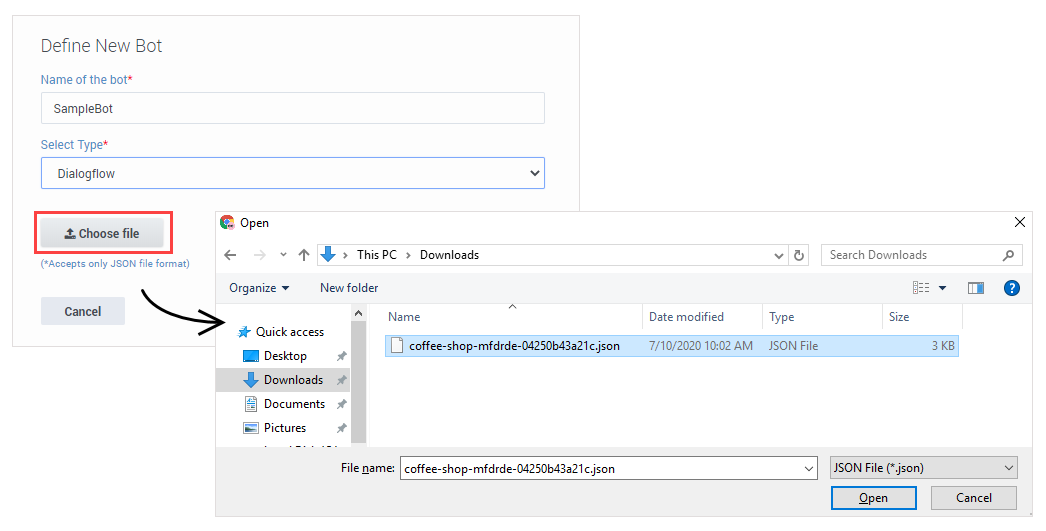
| − | [[File: | + | For Dialogflow bots, you can import a JSON file that contains all of the required settings for your bot resource. (You can export this file from your Dialogflow account page — if you need help, see the documentation provided for your bot service.) |
| + | |||
| + | [[File:des_add_dialogflow_bot.png]] | ||
| + | |||
| + | For other bot services providers, you can click '''Submit''' and enter the details manually: | ||
| + | |||
| + | [[File:des_bot_registry_properties.png]] | ||
| + | |||
| + | Use the '''Test Connection''' button to check if Designer can communicate with your bot. When you are finished setting up the properties, click '''Save''' to add it to the registry. | ||
| + | |||
| + | After a bot resource is added to the registry, you can start using it in your applications by selecting the resource in a [[BotBlock|Bot block]]. | ||
[[Category:V:PSAAS:Public]] | [[Category:V:PSAAS:Public]] | ||
Revision as of 19:46, July 10, 2020
Grammars & Bots
From the Grammars & Bots menu you can manage your Speech Grammars and the Bot Registry.
Speech Grammars
Click Speech Grammars to upload and manage speech grammars for use in your applications. Genesys Designer supports voice and dtmf speech grammars in either SRGS (GRXML) or SLM format.
A speech grammar defines the list of phrases or options that the caller can input when they use your application. You might use a voice speech grammar to tell your application which words or phrases might be used by the caller, to help the application determine how the call should be routed.
For example, an automotive company might upload a speech grammar that contains phrases that a caller might use when they contact the company, such as "I want the parts department" or "I am interested in buying a new car." Your application can use these phrases to determine the best routing target for this customer.
Creating a Speech Grammar
Click Add Grammar to create a speech grammar. In the pop-up window, enter a name for the speech grammar and click OK.
You can now upload your speech grammar file. In the Grammar detail area, click the Language drop-down to select the language of the speech grammar. Next, click the Choose file to upload button that appears when you hover over the No file text. Choose a file to upload.
After the speech grammar file has uploaded, you can click ![]() to view the contents of the grammar file in a read-only window.
to view the contents of the grammar file in a read-only window.
Next, you can tag the speech grammar or enter a description. You can also specify the format and mode of the speech grammar.
When you are done, click Save to save your changes.
Using Speech Grammars
You can use the User Input block to reference your speech grammars in applications.
In the Input tab, you can select External Grammars and click Add Grammar to add your speech grammar to the block. You can use multiple speech grammars at once.
In the ASR Settings tab, you can enable the Use application-wide ASR settings check box to use the default ASR (Automatic Speech Recognition) settings. You can define these settings by clicking Settings in the Toolbar.
Alternatively, you can disable the Use application-wide ASR settings check box to fine-tune the ASR settings for this User Input block.
Refer to the User Input block page for more information.
Bot Registry
Use the Bot Registry to add and define the bot resources you want to use in your applications.
Designer supports several bot services providers, such as Google Dialogflow, Amazon Lex, and Genesys DialogFlow. If you have a bot resource set up with one of the supported providers, you can add it to the registry and use it in your applications. See the Bot block page to learn more about how to use bot resources in your applications.
Adding a new bot resource
Click Add Bot Definition. Enter a Name for the bot resource and select the Type from the list of supported bot services providers.
For Dialogflow bots, you can import a JSON file that contains all of the required settings for your bot resource. (You can export this file from your Dialogflow account page — if you need help, see the documentation provided for your bot service.)
For other bot services providers, you can click Submit and enter the details manually:
Use the Test Connection button to check if Designer can communicate with your bot. When you are finished setting up the properties, click Save to add it to the registry.
After a bot resource is added to the registry, you can start using it in your applications by selecting the resource in a Bot block.


