(Automated save: adding PEC_Migrated template.) |
|||
| Line 15: | Line 15: | ||
|text=This video describes how to customize historical reports in Genesys CX Insights. | |text=This video describes how to customize historical reports in Genesys CX Insights. | ||
| − | |video= | + | |video=431594319 |
}} | }} | ||
Revision as of 13:13, June 26, 2020
Contents
Can I customize CX Insights reports?
The out-of-box historical reports are flexible enough for most business needs. However, Genesys CX Insights is highly customizable, allowing you to create customized reports, or modify copies of the out-of-box reports (you can save your reports in the Custom or My Reports folders). Genesys does not support customization of the underlying metadata.
Modifying reports can be an involved process, and is recommended for advanced users only. For help, contact Genesys.
Video: How do I customize historical reports in Genesys PureEngage Cloud?
This video describes how to customize historical reports in Genesys CX Insights.
Creating or editing reports
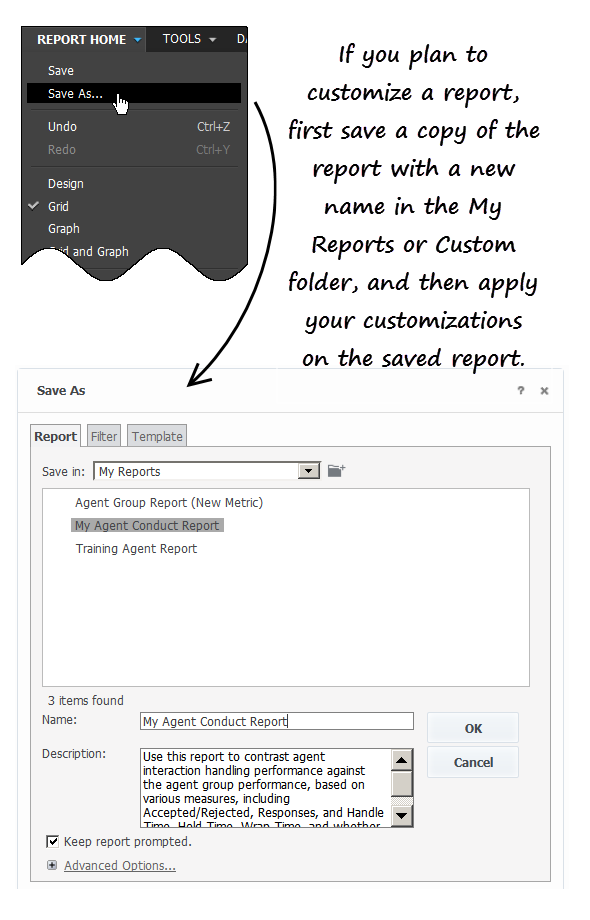
The easiest way to create a new report is to save a copy of an existing report to edit. Begin by browsing through the reports that are provided out-of-box, and select the one that most closely resembles what you'd like to create.
- Log in with an account having Administrator privileges.
- Open and run the report you want to modify.
- In the Save As editor:
- Click Report Home > Save As.
- In the Save in field, choose either: Shared Reports > Custom — to make the new report accessible to other users, or My Reports — to make the new report accessible only to you.
- Enter a Name for the report, and optionally modify the Description, or Advanced Options.
- Click OK.
- In the Report Saved editor, click Run newly saved report.
- The prompts page opens; make appropriate selections and click Run Report. You can now modify the report.
- In the menu, click Grid > Design to view the Report Objects Editor (if it's not already visible).
- Once you have finished editing the report, click Save.
Can I blend data from other sources?
Genesys CX Insights supports data blending from uploaded files. Using MicroStrategy Web, you can import data from Excel or CSV files, and use it to create reports or dashboards. Note that data blending requires advanced knowledge, specific account privileges, and an environment configured to support data import. Talk to your administrator about enabling this functionality for your use.
Where can I learn more?
Advanced users can learn more about creating and customizing reports by accessing MicroStrategy documentation (MicroStrategy is the underlying engine that drives Genesys CX Insights). Log in to Genesys CX Insights, click the menu next to your user name, and click Help to access the latest online MicroStrategy user guides and manuals.
Related Topics:
- See a complete list of available reports.
- Learn how to generate historical reports.
- Learn how to read and understand reports.

