
(→Single sign-on (SSO) integration to connect Gplus Adapter with Salesforce identity provider) |
|||
| Line 1: | Line 1: | ||
= Single sign-on (SSO) integration to connect Gplus Adapter with Salesforce identity provider= | = Single sign-on (SSO) integration to connect Gplus Adapter with Salesforce identity provider= | ||
| − | You can | + | You can simplify your agent log in process by integrating Gplus Adapter with Salesforce to use Salesforce as your single sign-on (SSO) identity provider (IDP). This means that your agent only has to provide their Username and Tenant to log in to Gplus Adapter after they have logged into Salesforce using Salesforce as your SSO identity provider. This is the general workflow when Gplus Adapter initiates the login process and uses Salesforce to identify the user: |
| − | # | + | # An agent logs in to Salesforce. |
| − | # | + | # The agent provides their Username and Tenant name in Gplus Adapter and clicks '''Next'''. |
| − | # | + | # GPlus Adapter sends a request to Salesforce to authenticate the user. |
| − | # Salesforce identifies the | + | # Salesforce identifies the agent specified in the request and sends an authentication response. |
| − | # Gplus Adapter authenticates the response sent by Salesforce | + | # Gplus Adapter authenticates the response sent by Salesforce. |
| − | # | + | # If the agent is authenticated, they are logged in to Gplus Adapter while logged in to Salesforce. |
| − | + | Follow these steps to set up SSO with Salesforce as the identity provider: | |
| − | |||
| − | Follow these steps: | ||
# [[GPSSO#IDP|Enable Salesforce as an Identity Provider]] | # [[GPSSO#IDP|Enable Salesforce as an Identity Provider]] | ||
# [[GPSSO#ConnectedApp|Define Gplus Adapter as Connected App in Salesforce]] | # [[GPSSO#ConnectedApp|Define Gplus Adapter as Connected App in Salesforce]] | ||
Revision as of 17:51, July 31, 2019
Contents
Single sign-on (SSO) integration to connect Gplus Adapter with Salesforce identity provider
You can simplify your agent log in process by integrating Gplus Adapter with Salesforce to use Salesforce as your single sign-on (SSO) identity provider (IDP). This means that your agent only has to provide their Username and Tenant to log in to Gplus Adapter after they have logged into Salesforce using Salesforce as your SSO identity provider. This is the general workflow when Gplus Adapter initiates the login process and uses Salesforce to identify the user:
- An agent logs in to Salesforce.
- The agent provides their Username and Tenant name in Gplus Adapter and clicks Next.
- GPlus Adapter sends a request to Salesforce to authenticate the user.
- Salesforce identifies the agent specified in the request and sends an authentication response.
- Gplus Adapter authenticates the response sent by Salesforce.
- If the agent is authenticated, they are logged in to Gplus Adapter while logged in to Salesforce.
Follow these steps to set up SSO with Salesforce as the identity provider:
Enable Salesforce as an Identity Provider
Requirements
- You must have an Admin role in your organization's Salesforce account
- User email addresses must be the same in both Salesforce and Workspace Web Edition
Procedure: Enable Salesforce as an Identity Provider
- In Salesforce, open the Setup tab from the Setup menu.
- Use the Search field in the Setup Home view to search for Identity Provider. Click Identity Provider in the search results to open the Identity Provider view.
- Follow the steps in the Enable Salesforce as an Identity Provider article in the Salesforce Help. Ensure that you fill in all the required fields, then activate and test your Identity Provider when it is set up.
- Employing SAML for SSO requires two parts, a Service Provider and an Identity Provider. Your Service Provider is already configured by the Genesys Auth team for you. To complete your Salesforce Identity Provider configuration, you must send the IDP metadata XML file to the Genesys Auth team. In the Identity Provider view, click Download Metadata to obtain a copy of the IDP metadata XML and send this to the Genesys Auth team.
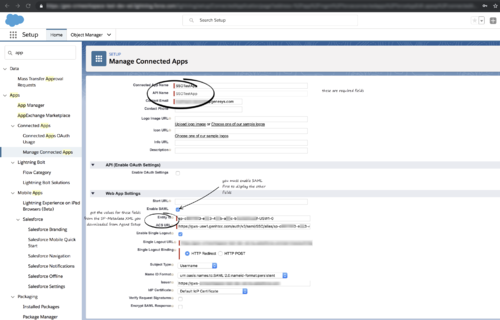
Procedure: Define Gplus Adapter as Connected App in Salesforce
- In Salesforce, open the Setup tab from the Setup menu.
- Use the Search field in the Setup Home view to search for App Manager. Click App Manager in the search results to open the App Manager view.
- Complete the following fields and options:
- Basic Information
- Connected App Name (for example, Workspace)
- API Name (for example, GWS)
- Contact email (the email address of the Admin user)
- Web App Settings
- Enable SAML (check this box)
- Entity ID (Genesys Auth or your Serviced Provider provided this to you)
- ACS URL (Genesys Auth or your Serviced Provider provided this to you)
- Basic Information
- If you encounter any errors, you can troubleshoot them using the Identity Provider Event Log. In Salesforce, open the Setup tab, use the Search field in the Setup Home view to search for Identity Provider Event Log. Click Identity Provider Event Log in the search results to open the Identity Provider Event Log view. Review the log for errors.

Useful links
Comments or questions about this documentation? Contact us for support!