(Created target blank page For Version: PSAAS:Public) |
(Update with the copy of version: draft) |
||
| Line 1: | Line 1: | ||
| − | <!-- | + | = Working with Gplus Adapter for Salesforce Lightning= |
| + | |||
| + | __NOTOC__ | ||
| + | {{BEC_Head | ||
| + | |context= | ||
| + | Gplus Adapter deployed in Salesforce Lightning enables you to handle Genesys contact center functions from Salesforce along with Salesforce-specific features such as updating activity history, screen pop, and click-to-dial. | ||
| + | |dimension= | ||
| + | }} | ||
| + | ==How do I access Gplus Adapter?== | ||
| + | If Gplus Adapter is configured in Salesforce Lightning, you will see a phone icon in the bottom-left corner of your screen. Click the phone icon and you will see a pop-up window where you can login with your Adapter credentials. | ||
| + | |||
| + | <!--===Single Sign-On=== | ||
| + | If your Service console is configured for single sign-on, after you entered your username and clicked Next in the Adapter login screen, you will be additionally prompted with an identity provider's login screen (for example, Okta). Enter your Adapter credentials (username and password) in the identity provider's login screen and you will be redirected to Adapter on successful validation of the credentials. | ||
| + | |||
| + | Instead, if you are already logged in through the identity provider, you can immediately gain access to Adapter and you don't need to log in again in the identity provider's login screen until your authentication expires. | ||
| + | |video=148969698--> | ||
| + | {{AnchorDiv|HandlingInteractions}} | ||
| + | ===Handling Interactions=== | ||
| + | Gplus Adapter uses Genesys Workspace Agent Desktop to handle the following interaction types: | ||
| + | * [[Documentation:PSAAS:Agent:ADVoice|Voice]] | ||
| + | * [[Documentation:PSAAS:Agent:ADemail|Email]] | ||
| + | * [[Documentation:PSAAS:Agent:ADChat|Chat]] | ||
| + | * Open Media [[GPASFLOpenMedia|Workitems]] | ||
| + | For information about how to handle specific interaction types, refer to the [[Documentation:PSAAS:Agent:AD|Agent Desktop Help]]. | ||
| + | |||
| + | ===Pop out, moving and resizing Adapter=== | ||
| + | By default, the Adapter window launches in the bottom-left corner in the Salesforce environment. | ||
| + | |||
| + | If you want to move the Adapter window to a different location, undock (pop out) the window by clicking [[File:icon_pop_out.png|link=]] in the top-right corner of the Adapter window and drag it where you want to place it. Once you undock the window, you can move or resize the window as needed. | ||
| + | |||
| + | You can dock (restore) the window back to its original position by clicking [[File:icon_pop_in.png|link=]]. | ||
| + | |||
| + | [[File:Gplus_900_WWE_Dock_Undock_Button.png|500px]] | ||
| + | |||
| + | The Adapter window can be manually maximized and minimized by clicking [[File:Gplus_900_Minimize_Button.png|link=]]. | ||
| + | |||
| + | If you have minimized Adapter to handle other tasks in Salesforce, the Adapter window is automatically maximized by the following events: | ||
| + | * Receiving voice, chat, email, or workitem interactions | ||
| + | * Releasing interactions | ||
| + | * Marking Done interactions | ||
| + | * Receiving connections error notifications | ||
| + | * Receiving confirmation that an interaction has been added to the Genesys Universal Contact Server (UCS) database | ||
| + | |||
| + | == Supported features== | ||
| + | Gplus Adapter includes some features that integrate with Salesforce Lightning environment. This means that actions that you take in Salesforce or Gplus Adapter can be seamlessly passed to each other. | ||
| + | |||
| + | The integrated features are: | ||
| + | |||
| + | * [[GPASFLWWE#ClicktoDial|Click-to-dial]] | ||
| + | * [[GPASFLWWE#ScreenPops|Screen pops]] | ||
| + | * [[GPASFLWWE#ActivityHistory|Activity history]] | ||
| + | |||
| + | {{AnchorDiv|ClicktoDial}} | ||
| + | {{CloudStep_Stack | ||
| + | |title=Using click-to-dial | ||
| + | |text=With click-to-dial, when you click a phone number in Salesforce, Adapter automatically dials it and starts the call. For example, you might search for a contact and then click the related phone number. | ||
| + | |||
| + | |media1=SFLClicktoDial.png}} | ||
| + | |||
| + | {{AnchorDiv|ScreenPops}} | ||
| + | |||
| + | ==Screen pops== | ||
| + | {{CloudStep_Stack | ||
| + | |title= | ||
| + | |text=Screen pops are contact records that are displayed when an agent receives a call, chat, email, or other media channel interactions in Adapter. Your console can display one or more related records, depending on what information it has about the customer. For example, if a customer enters their case number before they talk to the agent, your console displays the case automatically when the agent receives or makes the call in Adapter. If there is no contact information available, the '''New Contact''' page is displayed. | ||
| + | |media1=SFLscreenpop1.png | ||
| + | }} | ||
| + | |||
| + | {{CloudStep_Stack | ||
| + | |title= | ||
| + | |text=If you are working with [[Documentation:PSAAS:Agent:ADOutbound|Outbound Campaign]] calling records, clicking '''Get Record''' on the '''Outbound Campaign''' notification will screen pop the contact information in Salesforce. You can proceed with dialing the record after the contact information is displayed in the screen pop. | ||
| + | {{NoteFormat|The Outbound Campaign calling list is correctly updated only if you dial from Agent Desktop. Dialing using a click-to-dial phone number field in Salesforce is not an Outbound Campaign call and the calling list will not be updated in such dialing scenarios.}} | ||
| + | |||
| + | |media1=OutboundGetRecord.png | ||
| + | }} | ||
| + | {{CloudStep_Stack | ||
| + | |title= | ||
| + | |text=If you are working with [[Documentation:PSAAS:Agent:ADChat|Genesys Digital Channels chat]] you have two tabs in Gplus Adapter, '''Conversation''' and '''Communication''', where you can select and handle chat interactions live or asynchronously (reading and responding as your schedule permits). Asynchronous chat enables you to continue and existing conversation with a customer without receiving a new pop-up. | ||
| + | |textwide= | ||
| + | |media1=Gplus_900_Chat_Nexus_In_Salesforce.png | ||
| + | |video= | ||
| + | }} | ||
| + | |||
| + | {{AnchorDiv|ActivityHistory}} | ||
| + | {{CloudStep_Stack | ||
| + | |title=Activity history | ||
| + | |text=When you mark a voice, chat, email, or any other media channel interaction as done ('''Mark Done'''), the details about the interaction are added to the contact's activity history in Salesforce, if the corresponding contact record is opened in Salesforce. | ||
| + | |||
| + | The types of information that are saved in the activity history include: | ||
| + | |||
| + | *call duration | ||
| + | *call type | ||
| + | *case data | ||
| + | *call UUID | ||
| + | *disposition | ||
| + | *notes | ||
| + | *time stamp | ||
| + | *chat transcript | ||
| + | *email subject | ||
| + | *email body | ||
| + | |||
| + | |textwide=<br> | ||
| + | {{NoteFormat|For chat interactions, the '''Call type''' field shows all chats as '''Inbound'''. <br> | ||
| + | For emails, the '''Call type''' field shows '''Inbound''' for received emails and '''Outbound''' for sent emails and replies.|2}} | ||
| + | |||
| + | You can view the activity history of a contact by opening the contact record from '''Contacts''' tab and navigating to the '''Activity''' tab. The '''Activity''' tab shows all the activities performed against the contact. If you do not see the latest activity, click '''Refresh'''. | ||
| + | |||
| + | Clicking on an activity will open the '''Task''' tab for that item where you can see the complete details of an activity. | ||
| + | |||
| + | Voice calls or chats that could not be established are not saved in the history. When a voice call or chat involves multiple parties, such as consultations and conferences, the activity is saved as only one interaction. | ||
| + | |||
| + | If you mark '''Done''' an interaction without a contact record open in Salesforce, information about the interaction is saved as a Salesforce Task in the common task pool, not in the contact record. If you need to link the task to a contact record, you can do this manually. | ||
| + | |||
| + | [[File:GAPI_900_SFL_Task_Creation_Without_Contact.png|700px]] | ||
| + | |||
| + | |media1=SFLActivityHistory.png | ||
| + | }} | ||
| + | |||
| + | ==Genesys Softphone in Connector Mode== | ||
| + | Sometimes you might handle a voice interaction using the [[ADVoice#VolumeAndMute|Genesys Softphone in Connector Mode]]. If you are using Softphone in Connector mode, accept the voice interaction invitation as you normally do, you will see a matching screen pop record in Salesforce. Once you are done with the call ('''Mark Done'''), you can view the details of the call from the corresponding activity history record like any other voice interaction. | ||
| + | |||
| + | ==Handling multiple calls== | ||
| + | If you are on a call with an internal target as a second call while you are already handling a customer's call, then Adapter will create the Salesforce activity history only when the customer's call is active. | ||
| + | |||
| + | {{NoteFormat|If you are using the Mozilla Firefox browser and making a consultation call, you might not be able to enter an agent's number occasionally. The workaround is to minimize and maximize the Adapter window or click anywhere in the Salesforce window. This is a Salesforce known limitation and it occurs intermittently. }} | ||
| + | {{CloudStep_Stack | ||
| + | |title=Reconnecting Genesys Server | ||
| + | |textwide=When working with Adapter, if you are disconnected from Genesys server due to some reason, you will receive appropriate notifications. Follow the instructions in the notifications to have you connected back to the server. | ||
| + | |||
| + | For more information about these notifications, see [[Documentation:PSAAS:Agent:ADQuickStart|Handling a system disconnection]] in the Genesys Agent Desktop help. | ||
| + | }} | ||
| + | ==Related documentation== | ||
| + | *To learn how to use Gplus Adapter, see the [[Documentation:PSAAS:Agent:AD|Genesys Agent Desktop help]]. | ||
| + | |||
| + | [[Category:V:PSAAS:Public]] | ||
Revision as of 18:34, September 26, 2019
Working with Gplus Adapter for Salesforce Lightning
Gplus Adapter deployed in Salesforce Lightning enables you to handle Genesys contact center functions from Salesforce along with Salesforce-specific features such as updating activity history, screen pop, and click-to-dial.
How do I access Gplus Adapter?
If Gplus Adapter is configured in Salesforce Lightning, you will see a phone icon in the bottom-left corner of your screen. Click the phone icon and you will see a pop-up window where you can login with your Adapter credentials.
Handling Interactions
Gplus Adapter uses Genesys Workspace Agent Desktop to handle the following interaction types:
For information about how to handle specific interaction types, refer to the Agent Desktop Help.
Pop out, moving and resizing Adapter
By default, the Adapter window launches in the bottom-left corner in the Salesforce environment.
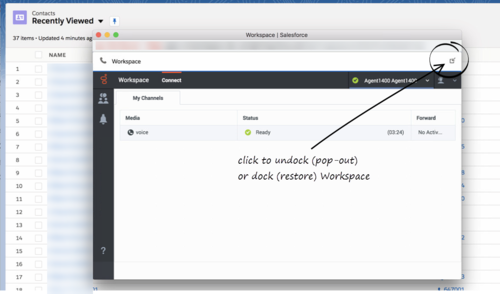
If you want to move the Adapter window to a different location, undock (pop out) the window by clicking ![]() in the top-right corner of the Adapter window and drag it where you want to place it. Once you undock the window, you can move or resize the window as needed.
in the top-right corner of the Adapter window and drag it where you want to place it. Once you undock the window, you can move or resize the window as needed.
You can dock (restore) the window back to its original position by clicking ![]() .
.
The Adapter window can be manually maximized and minimized by clicking ![]() .
.
If you have minimized Adapter to handle other tasks in Salesforce, the Adapter window is automatically maximized by the following events:
- Receiving voice, chat, email, or workitem interactions
- Releasing interactions
- Marking Done interactions
- Receiving connections error notifications
- Receiving confirmation that an interaction has been added to the Genesys Universal Contact Server (UCS) database
Supported features
Gplus Adapter includes some features that integrate with Salesforce Lightning environment. This means that actions that you take in Salesforce or Gplus Adapter can be seamlessly passed to each other.
The integrated features are:
Using click-to-dial
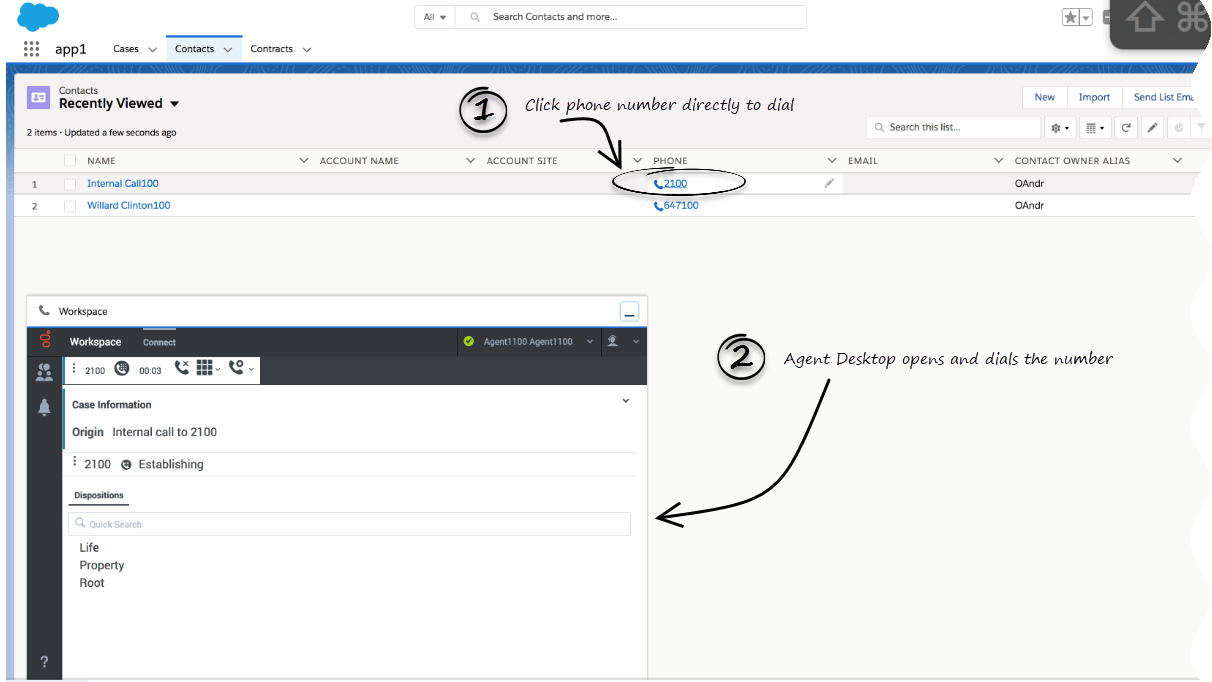
With click-to-dial, when you click a phone number in Salesforce, Adapter automatically dials it and starts the call. For example, you might search for a contact and then click the related phone number.
Screen pops
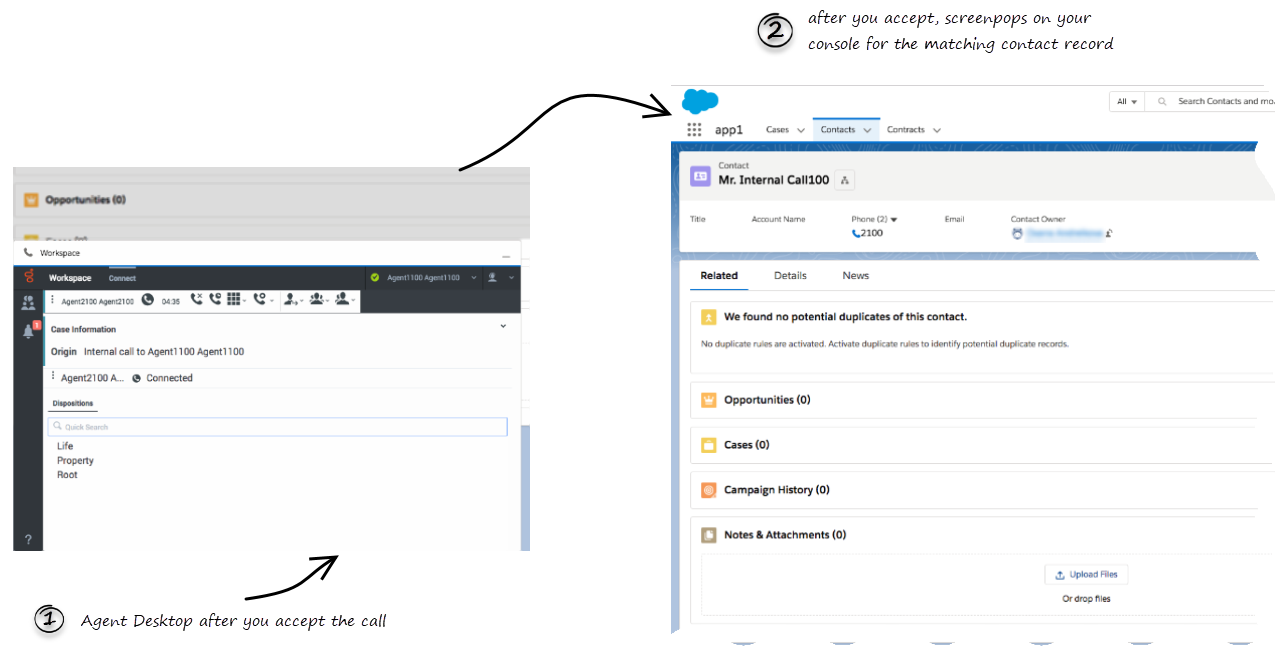
Screen pops are contact records that are displayed when an agent receives a call, chat, email, or other media channel interactions in Adapter. Your console can display one or more related records, depending on what information it has about the customer. For example, if a customer enters their case number before they talk to the agent, your console displays the case automatically when the agent receives or makes the call in Adapter. If there is no contact information available, the New Contact page is displayed.
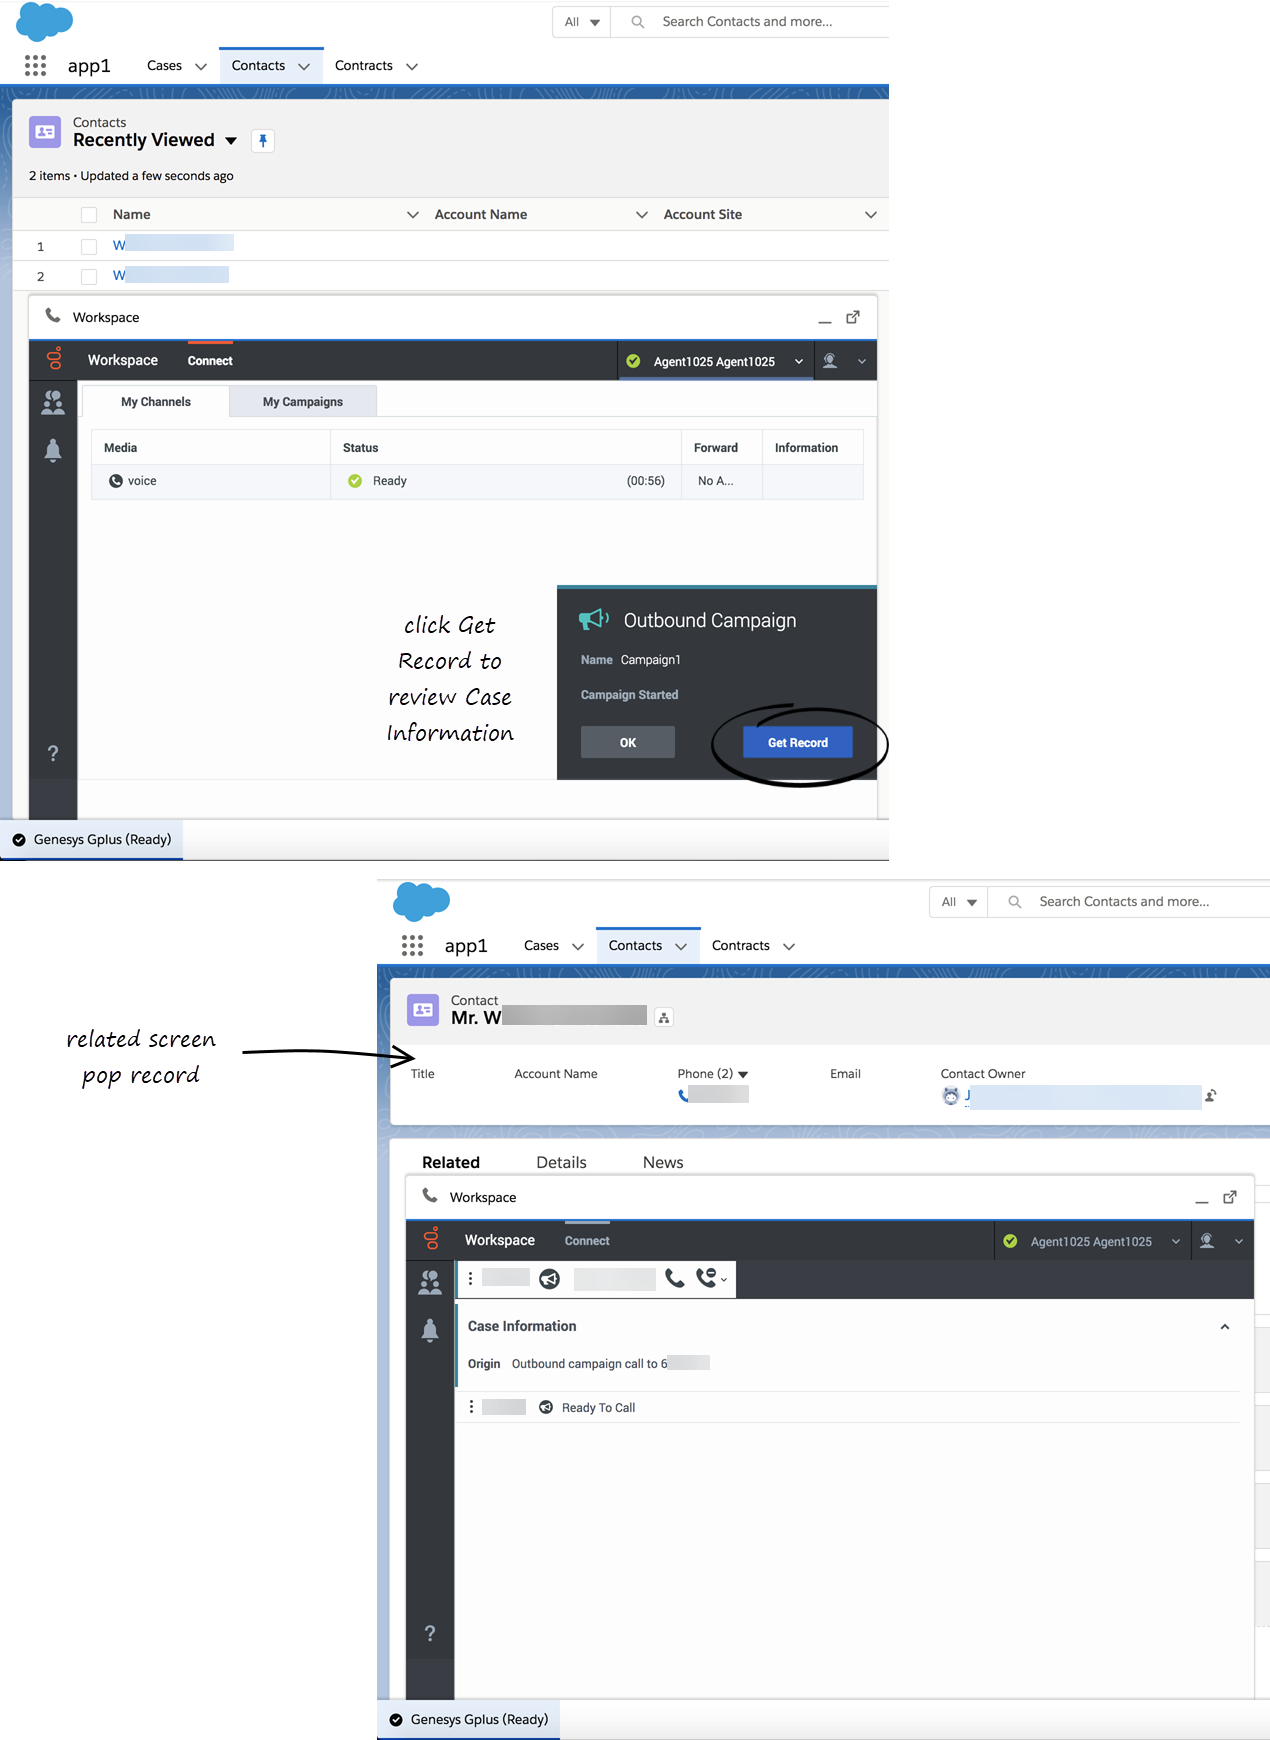
If you are working with Outbound Campaign calling records, clicking Get Record on the Outbound Campaign notification will screen pop the contact information in Salesforce. You can proceed with dialing the record after the contact information is displayed in the screen pop.
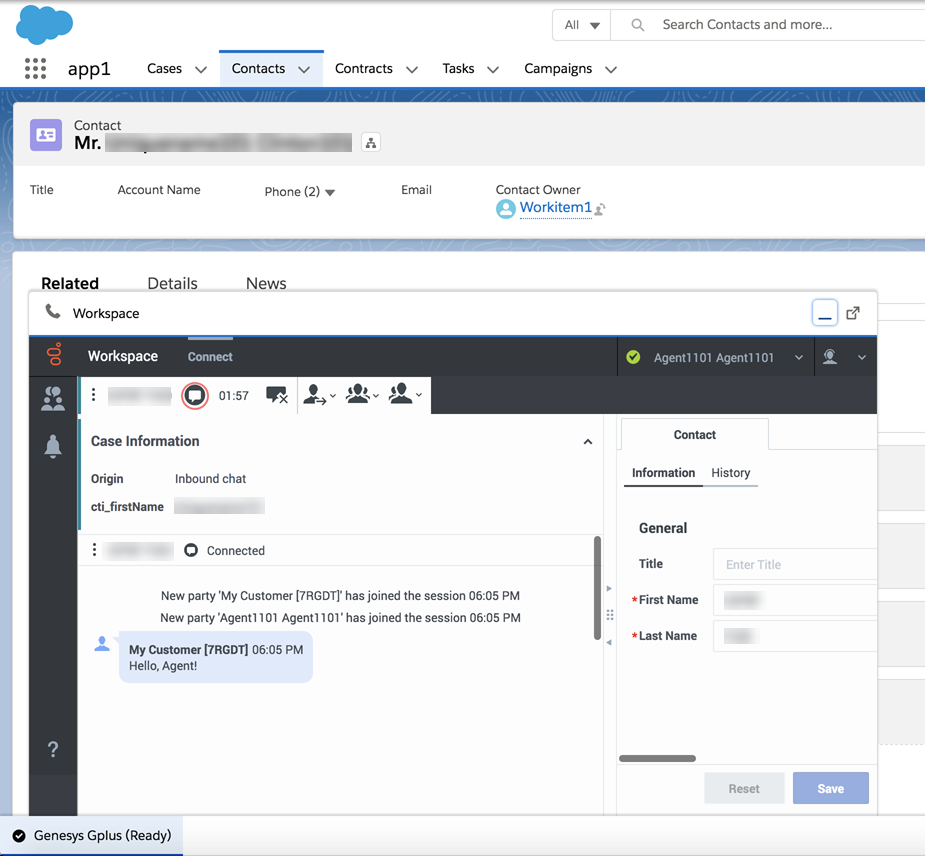
If you are working with Genesys Digital Channels chat you have two tabs in Gplus Adapter, Conversation and Communication, where you can select and handle chat interactions live or asynchronously (reading and responding as your schedule permits). Asynchronous chat enables you to continue and existing conversation with a customer without receiving a new pop-up.
Activity history
When you mark a voice, chat, email, or any other media channel interaction as done (Mark Done), the details about the interaction are added to the contact's activity history in Salesforce, if the corresponding contact record is opened in Salesforce.
The types of information that are saved in the activity history include:
- call duration
- call type
- case data
- call UUID
- disposition
- notes
- time stamp
- chat transcript
- email subject
- email body
For emails, the Call type field shows Inbound for received emails and Outbound for sent emails and replies.
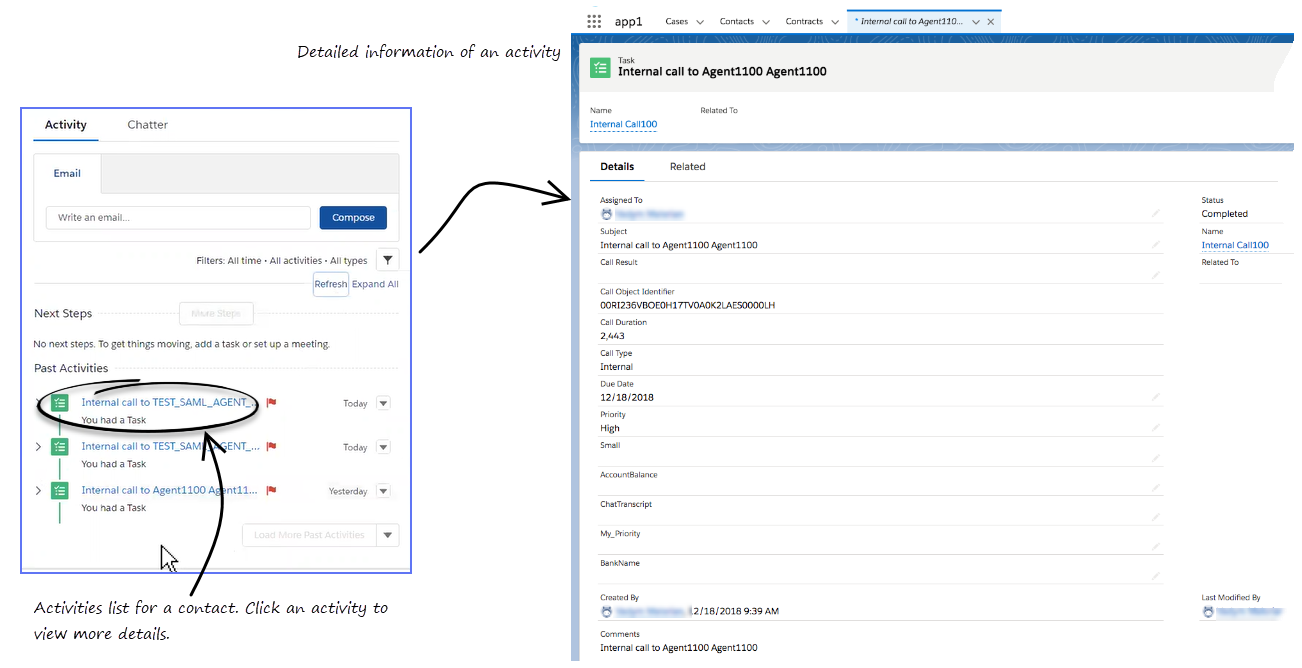
You can view the activity history of a contact by opening the contact record from Contacts tab and navigating to the Activity tab. The Activity tab shows all the activities performed against the contact. If you do not see the latest activity, click Refresh.
Clicking on an activity will open the Task tab for that item where you can see the complete details of an activity.
Voice calls or chats that could not be established are not saved in the history. When a voice call or chat involves multiple parties, such as consultations and conferences, the activity is saved as only one interaction.
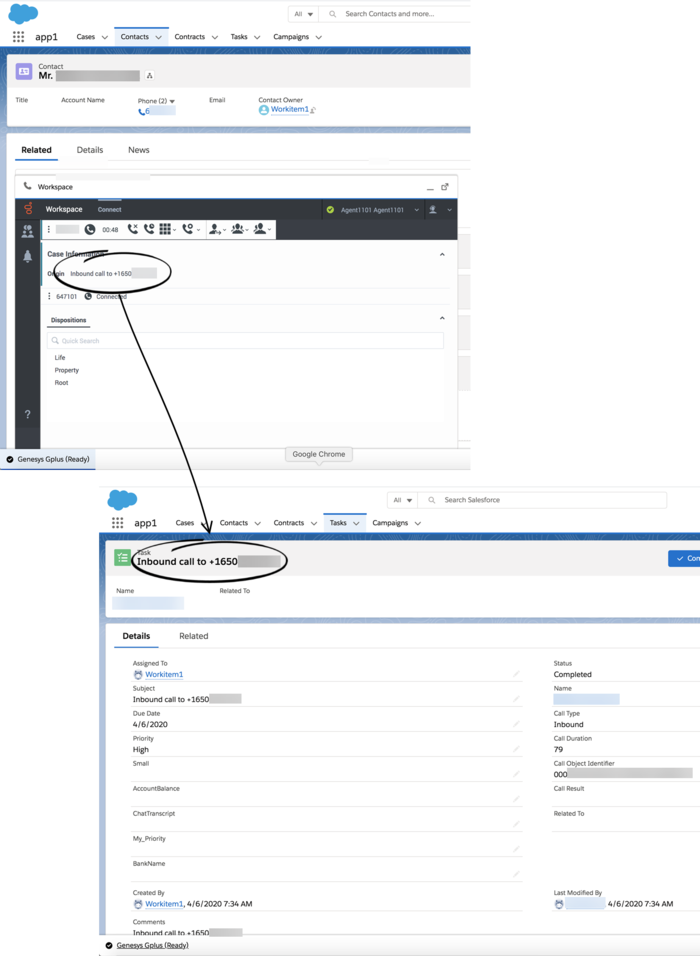
If you mark Done an interaction without a contact record open in Salesforce, information about the interaction is saved as a Salesforce Task in the common task pool, not in the contact record. If you need to link the task to a contact record, you can do this manually.
Genesys Softphone in Connector Mode
Sometimes you might handle a voice interaction using the Genesys Softphone in Connector Mode. If you are using Softphone in Connector mode, accept the voice interaction invitation as you normally do, you will see a matching screen pop record in Salesforce. Once you are done with the call (Mark Done), you can view the details of the call from the corresponding activity history record like any other voice interaction.
Handling multiple calls
If you are on a call with an internal target as a second call while you are already handling a customer's call, then Adapter will create the Salesforce activity history only when the customer's call is active.
Reconnecting Genesys Server
Related documentation
- To learn how to use Gplus Adapter, see the Genesys Agent Desktop help.

