salesforce.block-adapter-multitab
Section: crm-adapter
Default Value: false
Valid Values: true, false
Changes Take Effect: When the session is started or restarted
Specifies that Gplus Adapter cannot work in more than one browser tab.
salesforce.run-apex.class
Section: crm-adapter
Default Value: No default value
Valid Values: Apex Class Name
Changes Take Effect:
Dependencies: salesforce.run-apex.events
Introduced: 9.0.000.51
Specifies the name of the Saleforce Apex Class that is to be executed based on the events specified by the salesforce.run-apex.events option.
salesforce.run-apex.events
Section: crm-adapter
Default Value: No default value
Valid Values: RINGING, DIALING, ESTABLISHED, RELEASED, INVITED, ACCEPTED, CREATED, REMOVED
Changes Take Effect:
Dependencies: salesforce.run-apex.class
Introduced: 9.0.000.51
Modified: 9.0.000.94
Specifies the list of one or more Genesys interaction events that trigger Salesforce Apex Code specified by the salesforce.run-apex.class option to run.
salesforce.keep-session-alive
Section: crm-adapter
Default Value: false
Valid Values: true, false
Changes Take Effect: When the session is started or restarted.
Introduced: 9.0.0
Specifies whether to prevent Adapter from logging out of Salesforce when there is no activity in Salesforce beyond a configurable time period. If set to true, Adapter refreshes the Salesforce session at short intervals and keeps Adapter-Salesforce session alive.
Configuring and Using General Features
Gplus Adapter integrates Genesys interaction handling capabilities into Salesforce. The Adapter window is accessed through the Adapter button in the Salesforce Utility Bar. The Adapter window displays agent status at all times. The Adapter window can be docked, undocked, moved, resized, minimized, and maximized. Some Genesys interactions events cause the Adapter window to be maximized automatically.
Agent Status Display in Gplus Adapter
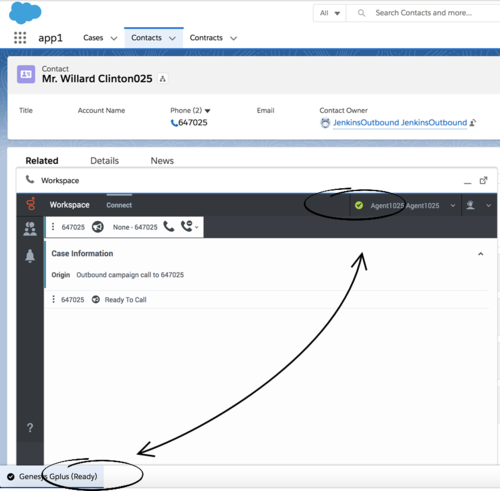
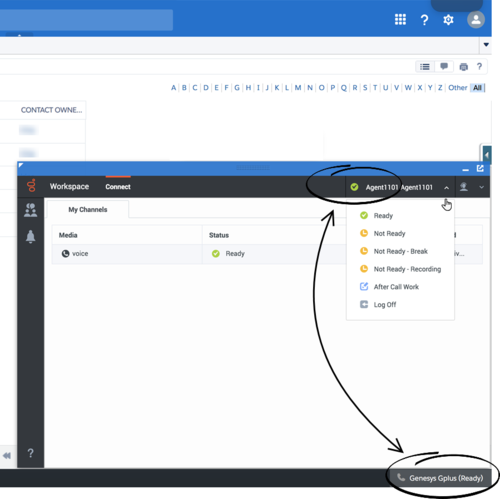
Gplus Adapter displays agent status in the Utility Bar whether the Adapter window is minimized or maximized. Agent status is obtained from Workspace Agent Desktop. This feature enables agents to monitor their status even when the Adapter window is minimized.
Agent status in Lightning:
Agent status in Classic:
Dock, undock, move, and resize Adapter
By default, the Adapter window launches in the bottom-left corner in the Salesforce Utility Bar (bottom-right corner in Classic).
Agents can undock the Adapter window then move it to a different location. To undock (pop out) the window, they click the ![]() icon in the top-right corner of the Adapter window and drag it where they want to place it. Once the window is undocked, agents can move or resize the window as needed.
icon in the top-right corner of the Adapter window and drag it where they want to place it. Once the window is undocked, agents can move or resize the window as needed.
Agents can dock (restore) the window back to its original position by clicking the ![]() icon.
icon.
Interaction Events causing the Adapter window to Maximize
If an agent has minimized Adapter to handle other tasks in Salesforce, the Adapter window is automatically maximized by the following events:
- Receiving voice, chat, email, or workitem interactions
- Releasing interactions
- Marking Done interactions
- Receiving connections error notifications
- Receiving confirmation that an interaction has been added to the Genesys Universal Contact Server (UCS) database
Activity timeout
Gplus Adapter logs an agent out if there has been a period of inactivity. Use the salesforce.keep-session-alive option to prevent the agent from being logged out of Salesforce when there is no activity in Salesforce beyond the configured time period. If enabled, Adapter refreshes the Salesforce session at short intervals and keeps the Adapter-Salesforce session alive.
Configuring Gplus to run Salesforce Apex
If you want to customize Salesforce by running Salesforce Apex on Genesys interaction events, you can configure Gplus Adapter to create and execute Salesforce Apex. See the Salesforce Apex Developer Guide. Apex can be initiated by the following Genesys interaction events: DIALING, RINGING, ESTABLISHED, and RELEASED.
Your Apex class should have one method and accept the following two string parameters: eventName and eventUserDataContent.
For example:
public class TestApex {public void eventCollector (

string eventName, string eventData) { …

…… }
Examples of how to use the Run Salesforce Apex on interaction events functionality include:
- Create Salesforce Case with user data from an interaction.
- Provide Salesforce Alert to Agent for reminders on how to handle a workflow in Salesforce.
Configure which events you want to trigger runApex code by using the salesforce.run-apex.events option.
Configure the name of the custom Apex Class to execute by using the salesforce.run-apex.class option.
Support for Genesys Interaction Recording
The Gplus Adapter console supports Genesys Interaction Recording (GIR). For an overview of Genesys Interaction Recording, see About Genesys Interaction Recording.
Genesys Interaction Recording is only supported for Voice channel and is not supported when Gplus Adapter is popped out of the Salesforce window.
To configure Genesys Interaction Recording for the Gplus Adapter, see Enable Screen Recording in the Genesys Interaction Recording Solution Guide. In this procedure, refer to the Integrating with Workspace Web Edition section.
To manage the call recording features of an agent, see Recording setup.
Lightning support for Service Client API
Gplus Adapter supports the Service Client API, which you can use for custom features such as invoking click-to-email, starting or stopping a recording when a sensitive field is on the screen, and attaching data from Salesforce to Genesys key/value pairs. Complete the following steps in Salesforce Lightning:
- Deploy your Salesforce domain.
-
Create and deploy a message channel using Salesforce CLI or a third-party tool such as
Workbench. For example, here's a breakdown of the steps you must complete using Workbench:
- Create a folder called messagedeploy and add a new file called package.xml with the following contents:
<?xml version="1.0" encoding="UTF-8"?> <Package xmlns="http://soap.sforce.com/2006/04/metadata"> <types> <members>*</members> <name>LightningMessageChannel</name> </types> <version>47.0</version> </Package> - In your messagedeploy folder, create a new folder called messageChannels and add a new file called GplusChanel.messageChannel with the following contents:
<?xml version="1.0" encoding="UTF-8"?> <LightningMessageChannel xmlns="http://soap.sforce.com/2006/04/metadata"> <masterLabel>GplusChanel</masterLabel> <isExposed>true</isExposed> <description>This Lightning Message Channel sends information from VF to LWC and back.</description> </LightningMessageChannel> - Zip (compress) the messagedeploy folder.
- Navigate to https://workbench.developerforce.com/login.php and log in to Salesforce with the account you will use for the Service Client API.
- Open the migration menu, click Deploy and attach the zip you previously created.
- Open the info menu, click Metadata Types & Components and choose LightningMessageChannel - you created this in step 2-a.
- Create a folder called messagedeploy and add a new file called package.xml with the following contents:
- Download gplus-service-client-api.js from https://[YOUR_HOST]/ui/crm-workspace/build/service-client-api/gplus-service-client-api.js and add it to your static resources in Salesforce.
- Create a Visualforce page in Salesforce that uses your new message channel (from step 2-b) and the Service Client API to implement your custom functionality.
- Add the Visualforce page to your dashboard.
- Set the salesforce.message-channel.name option to the name of the message channel you created in step 2-b — for example, GplusChanel.
Classic support for Service Client API
Gplus Adapter supports the Service Client API, which you can use for custom features such as invoking click-to-email, starting or stopping a recording when a sensitive field is on the screen, and attaching data from Salesforce to Genesys key/value pairs. Complete the following steps in Salesforce Classic:
-
Download the SCAPI script from https://<HOST>/ui/crm-workspace/build/service-client-api-classic/service-client-api-classic.js
-
Download the SCAPI example from https://<HOST>/ui/crm-workspace/build/service-client-api-classic/sample.html
-
Add service-client-api-classic.js to your static resources in Salesforce.
-
Create a Visualforce page with SCAPI (according to the SCAPI example) or a custom console component.
Prevent loading Gplus Adapter in multiple browser tabs
If the user opens Salesforce in multiple browser tabs, Gplus Adapter automatically loads into each browser tab. Users might experience performance and other issues. To prevent Gplus Adapter from being loaded in multiple browser tabs that are running Salesforce, set the value of the salesforce.block-adapter-multitab option to true.


