Contents
Desktop settings
Configuring your Agent Desktop settings involves customizing the available options to meet the specific needs of your contact center.
To access the Contact Center Settings tab, click Contact Center Settings on the main menu. Then, on the Contact Center Settings tab, select the Desktop Settings option from the navigation menu. You can see only the objects that permissions enable you to view. If you need to edit an object that you don't see on the interface, contact your administrator.
You can customize the following objects:
Dispositions
On the Desktop Settings > Dispositions page, you can create a list of Disposition options to be displayed when an agent makes an outbound call or transfer. Dispositions are descriptions of the final outcome of a call. These codes are used to flag calls for reporting purposes.
Creating a sharable Disposition business attribute
Dispositions can be used as sharable business attributes for agents, agents groups, and the global contact center. To view an article about how to create sharable business attributes, see Sharing Business Attributes in Agent Setup.
- To view an example of Disposition options in Agent Desktop, see What do I do at the end of a call? in Agent Desktop Help.
- In the table of configured Dispositions, in addition to selecting and adding Dispositions, you can also filter items using the Quick Filter field and delete a Disposition.
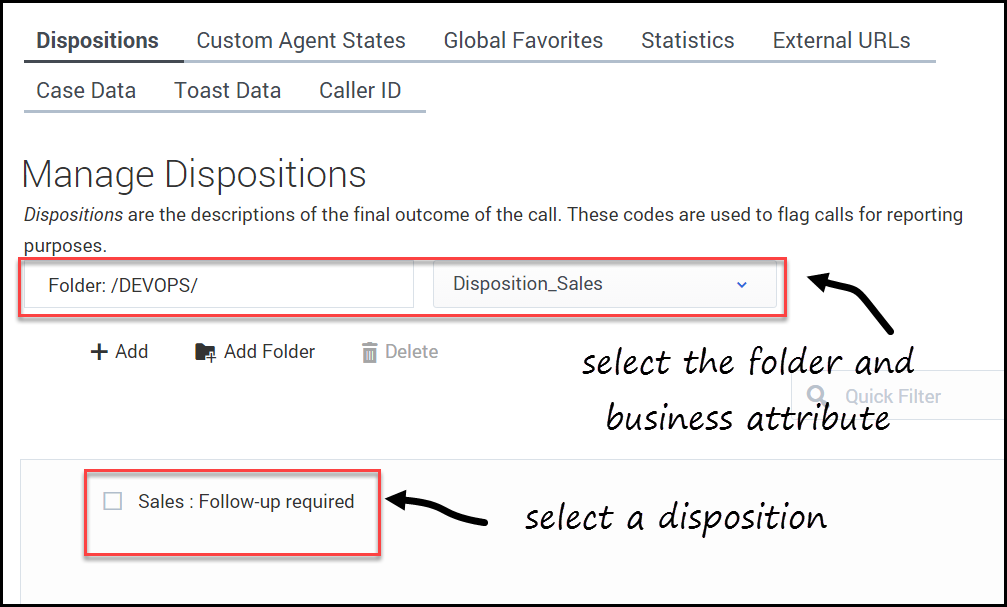
Selecting a disposition
- Select a business attribute:
- Select the folder you want to view from the Folder drop-down list box.
- Click the second drop-down list box and select the business attribute for the Disposition.
You can consider a business attribute to be the container that holds a list of Dispositions that have a common theme.
- Select a Disposition from the list.
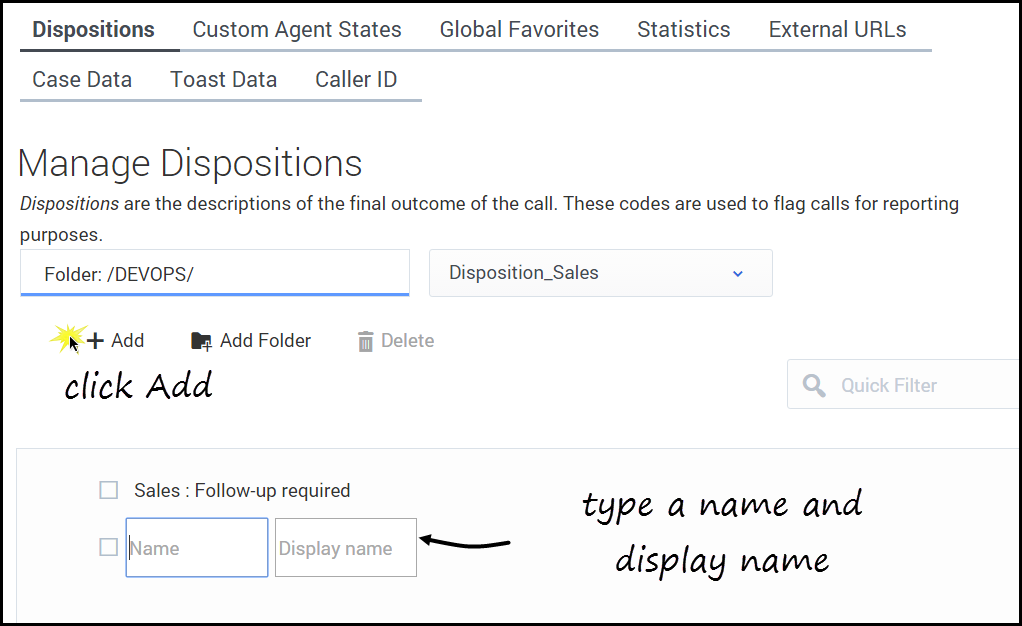
Adding a disposition
- Select the folder you want to view from the Folder drop-down list box.
- Click the second drop-down list box and select the business attribute into which you want to add the Disposition.
- Click Add.
- Type the Name and Display Name for the new Disposition.
- Click Add Folder; or
- To add a subfolder, click the Folder drop-down list box, select a folder, and then click the Add folder icon.
Custom agent states
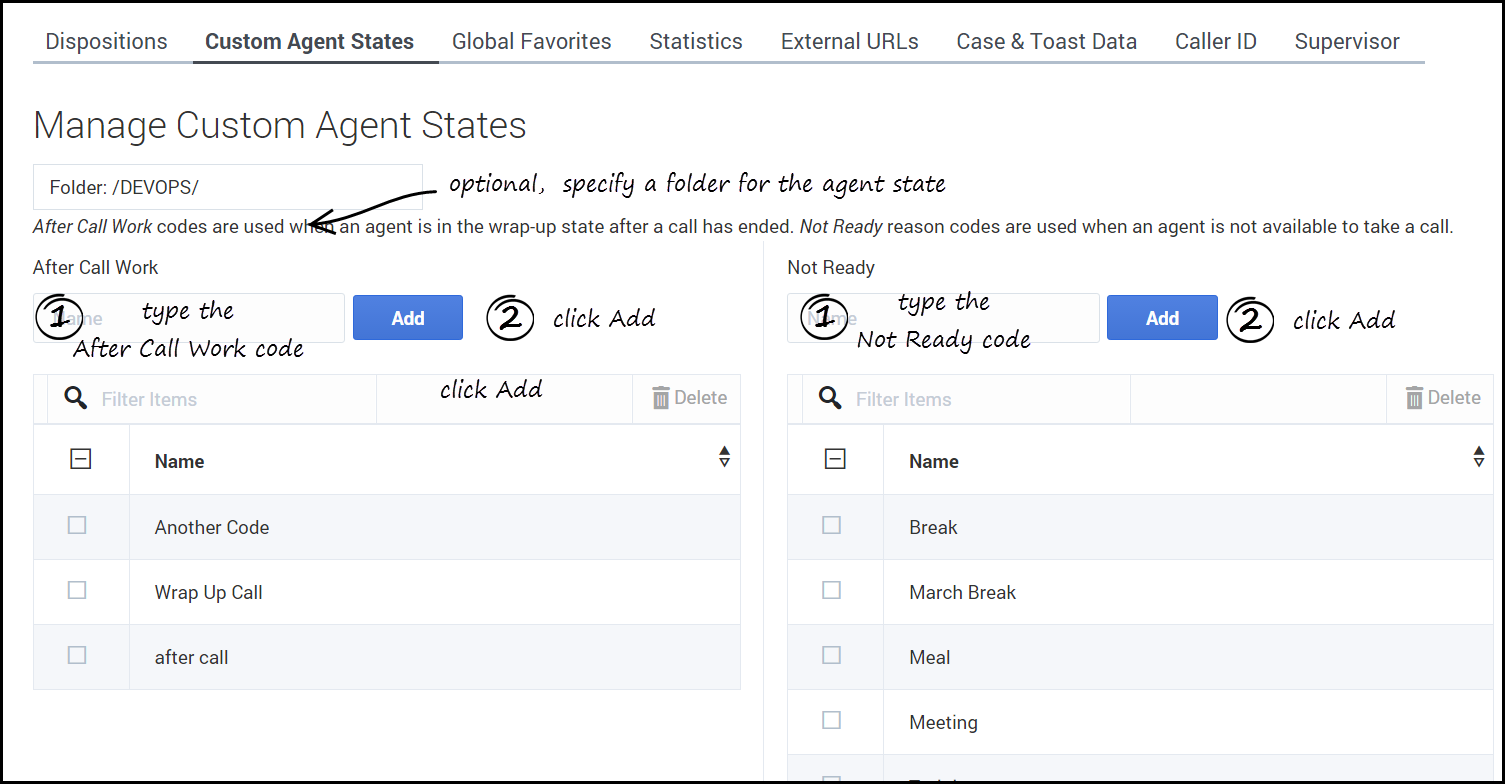
On the Custom Agent States tab, you can add custom agent states that an agent can select for:
- After-call work
- Not ready reasons
You can organize custom agent states into folders. When you select the Folder option, a drop-down list box is displayed where you can select a folder or click the add folder icon ![]() to create a new folder.
to create a new folder.
Global Favorites
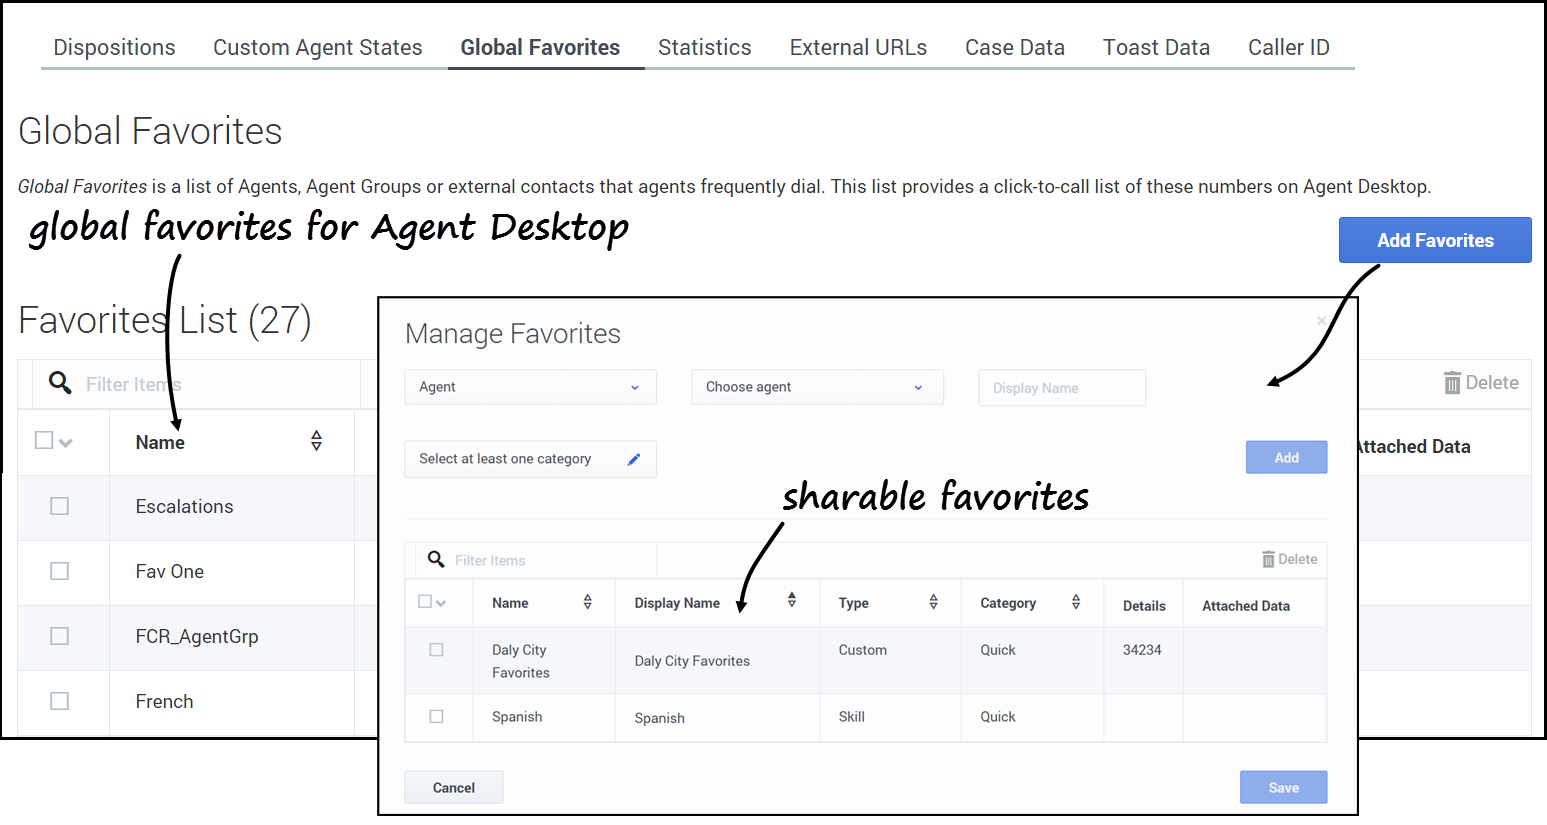
As a contact center administrator, you can create and maintain a list of Favorites, which are contacts and internal targets that your agents can access quickly in the Team Communicator. To see how agents use Global Favorites in Agent Desktop, see Using Favorites in the Agent Dektop Help guide.
In addition to managing favorites from the Desktop Settings page, you can also manage favorites on the Agent Groups page and the Add/Manage User window. No matter from what screen you add a favorite, you can include the favorite in the list of shareable favorites to be reused in all places where Global Favorites (or Personal Favorites for user accounts) are available for configuration in Agent Setup.
To learn more about how to work with Global Favorites, including a scenario-based demonstration, see Working with Global Favorites.
Statistics
On the Statistics tab, you can add, edit, import and export statistics to be displayed under My Reports and Contact Center panes of the Agent Desktop dashboard or the Reports view in Gplus Adapter. The Statistics tab includes three sub-tabs to help you manage your statistics:
Essentially, you add statistics to a global statistics list. Then from that list, you can select the statistics that you want to apply. Statistics can be re-used, meaning that if you create a statistic for a specific agent group, for example, and then apply that favorite to another agent group.
Agent Statistics
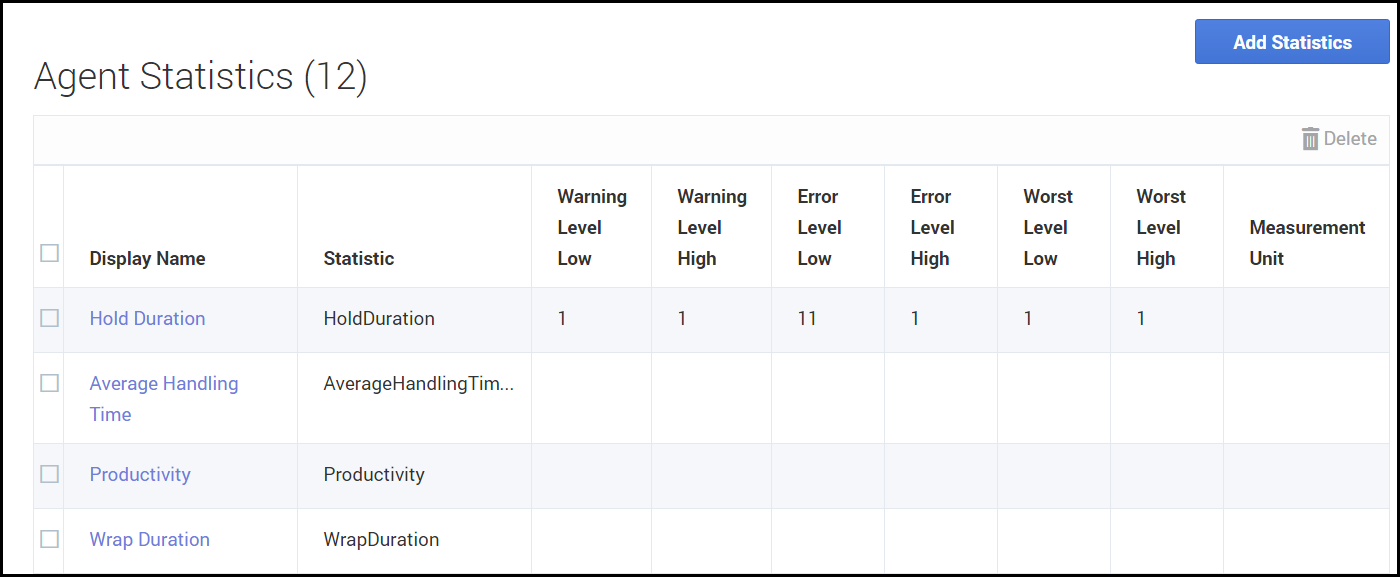
On Agent Statistics tab, manage the statistics that are displayed under My Reports to the agent. The My Reports page gives agents a view of the current state of their own activity.
To access the Agent Statistics tab, click Contact Center > Desktop Settings > Statistics > Agent Statistics. The list on the page includes all agent statistics that are already configured, either by you or another administrator. For a new implementation, the list might be blank.
To add a shared statistic to the list, click Add Statistics to access a list of shared statistics. In the window that opens, select an option from the list of statistics, and then click Add.
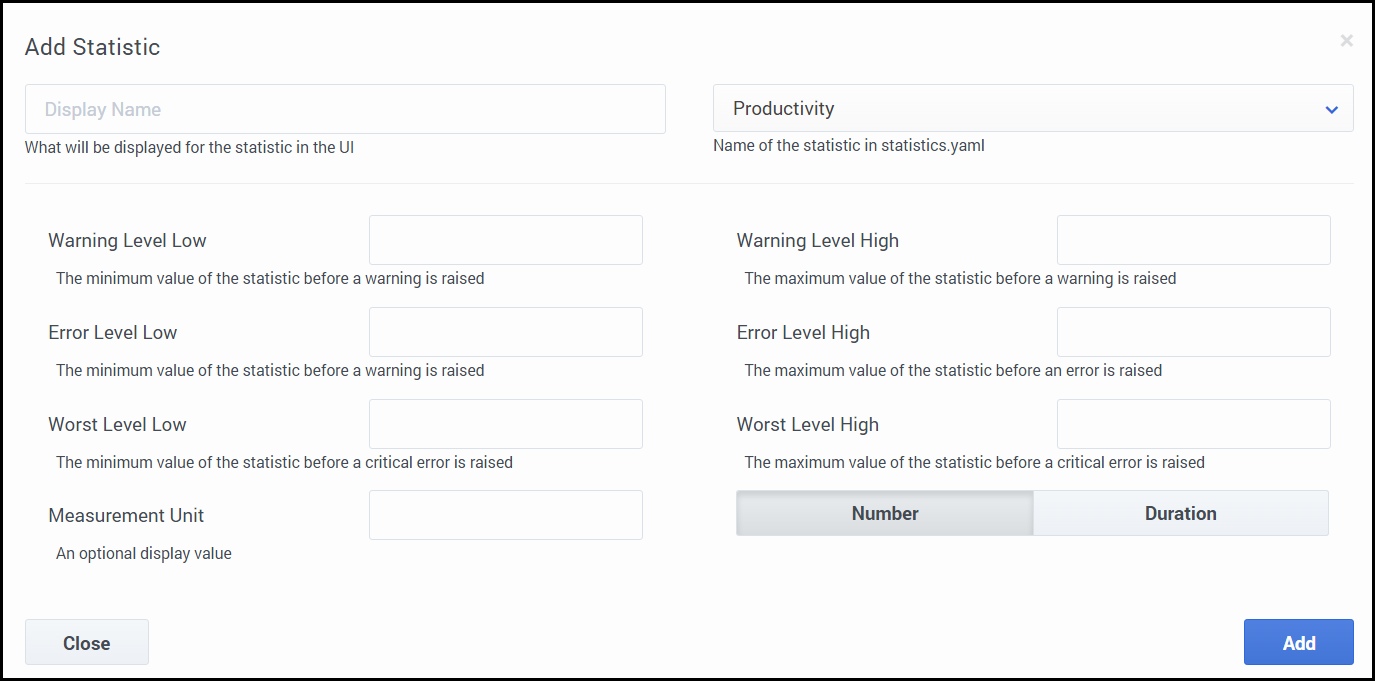
If you don't see the statistic you want, you can create a new statistic for the global list and then add that statistic for the Agent Statistics list.
- Click Add Statistics.
- In the window that opens, click Add to create a new statistic.
- In the Add Statistic window, configure the attributes.
- Click Add.
- The statistic is now listed in the list on the Add Statistic window. This means that the statistic is now available in the global list, but is not yet assigned.
- To assign the new statistic to Agent Statistics list, select the statistic and click Add.
- The window closes and the new statistic is assigned to the Agent Statistics list.
Contact center statistics
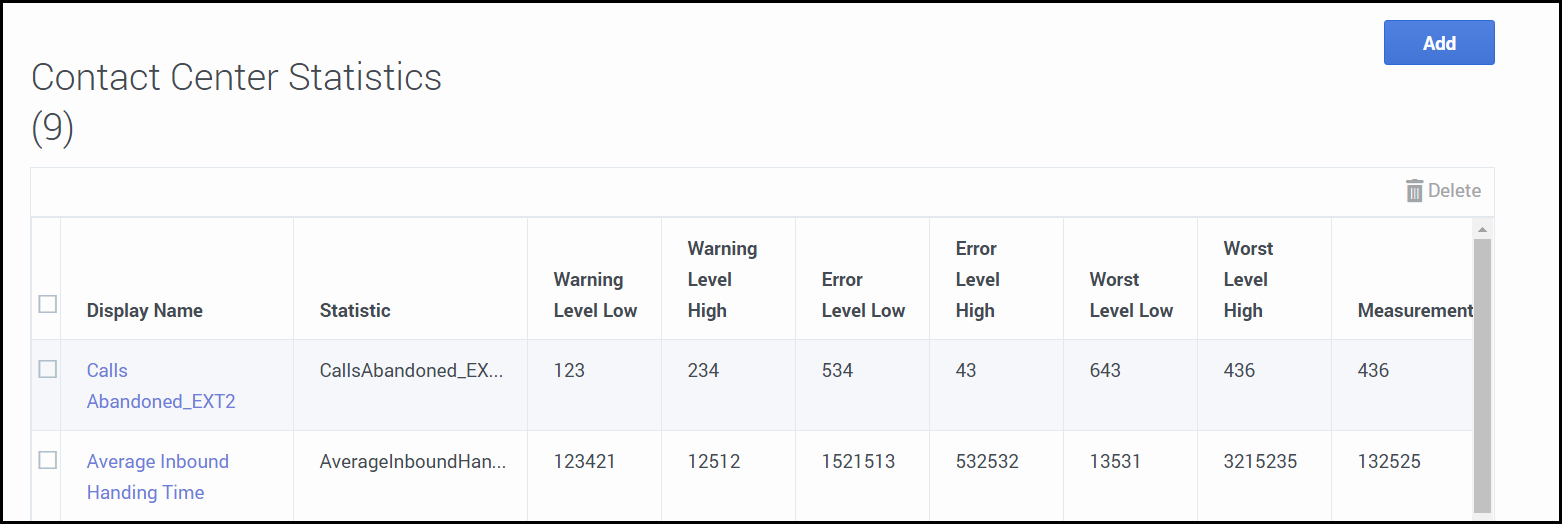
On Contact center statistics tab, manage the statistics that are displayed under Contact Center. The Contact Center tab gives agents a view of the current state of activity for the call center.
To access the Contact Center Statistics tab, click Contact Center > Desktop Settings > Statistics > Contact Center Statistics.
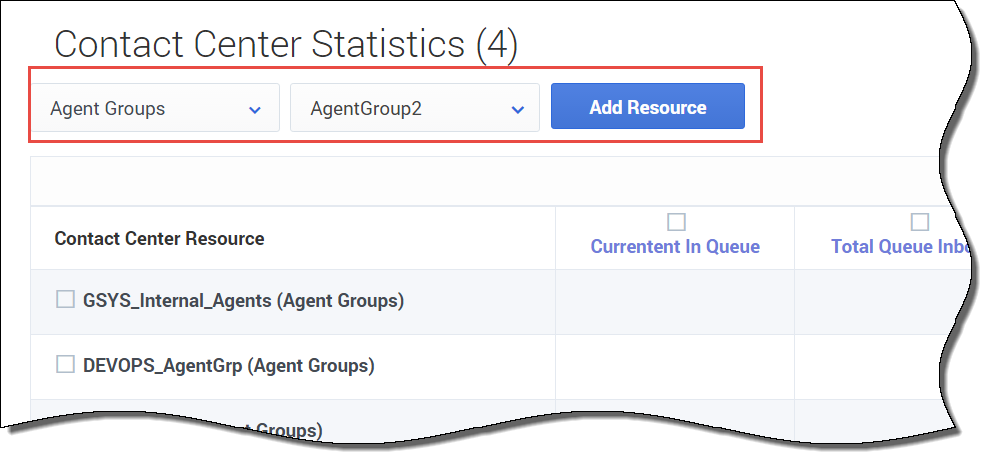
To configure Contact Center Statistics, you must first add a resource. Resources can include agent groups, queues, DN groups, and routing points. In the first drop-down list box, select the type of resource you want to add, and then select the resource from the second drop-down list box. Click Add Resource. This action adds a row for the resource to the Contact Center Statistics table.
Then you can add statistics by clicking Add Statistics. The Add Statistics window opens, where you can either select a preconfigured statistic or create a new one. For details on how to select or add statistics, see Agent Statistics. This action adds a column to the Contact Center Statistics table. Continue adding the statistics that you want to add to the table.
When you are done, notice the black checkmarks in the Contact Center Statistics table. The black checkmarks indicate that which statistics applies to each resource. For example, the current number in queue statistic does not apply to agent groups. Agent desktops shows only statistics with check marks; other desktops show only statistics with hyphens (-).
Statistic definitions
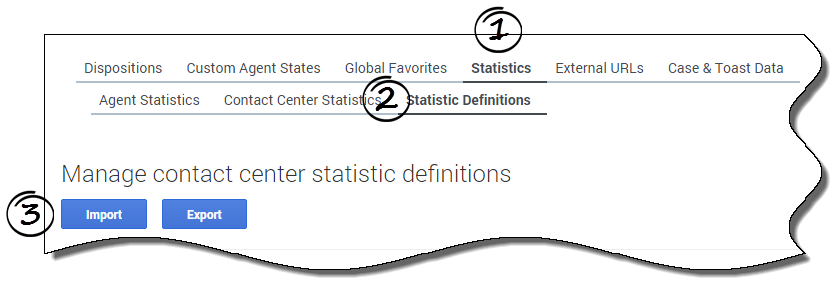
Using the Statistic Definitions tab, you can import, export, and edit statistic definitions. The supported formats for the statistic definition files are: .CSV and .YAML.
About CSV files
The .CSV file must be a text file in a comma-separated format. In the source file each line represents a single statistic.
About YAML files
Use a YAML file to import custom statistics from a valid .YAML file. The following example shows one custom statistic from a sample .YAML file:
How do I import custom statistic definitions?
To import a .CSV or .YAML file that contains your custom statistic definitions, click Import, select your file, and then click Open. User Setup validates the file and indicates which, if any, values need to be corrected. If you receive such a message, make the recommended corrections and then try again.
How do I export statistic definitions?
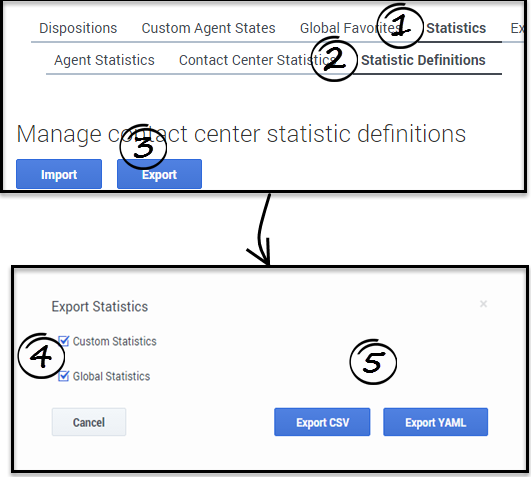
You can export your statistic definitions to an external .CSV or .YAML file. You can select your custom statistics, global statistics, or both. Then you can choose which file type to export. The exported file downloads to your local computer.
External URLs
You can integrate internal and external websites into your agent's main view. At the Agent Desktop level, the external website is displayed in dedicated tabs. These tabs allow you to access the website without leaving Agent Desktop.
At the interaction level, there are two ways to display websites depending the main interaction type.
- For voice, the external Website is displayed in the background when an interaction is selected. When the interaction is unselected or closed, the external website is replaced with the previous panel displayed in the background.
- For multimedia, the external website is displayed in a dedicated view in the case data.
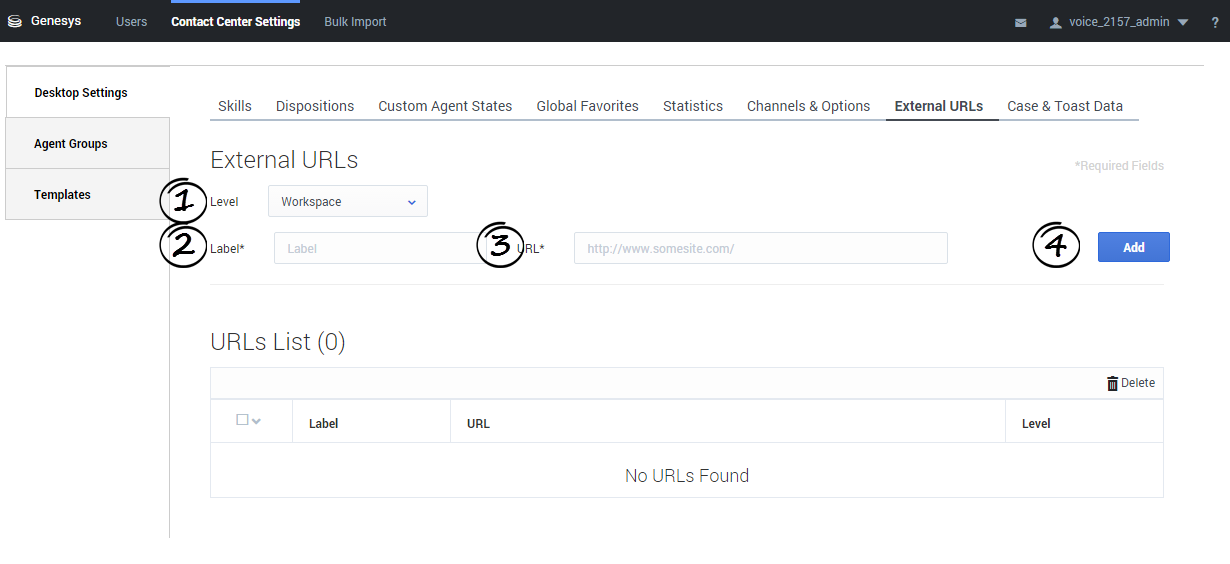
To add a URL to the list, select Workspace or Interaction from the Level menu, type a label for the URL, type or paste the URL in the URL field, and click Add.
Case Data
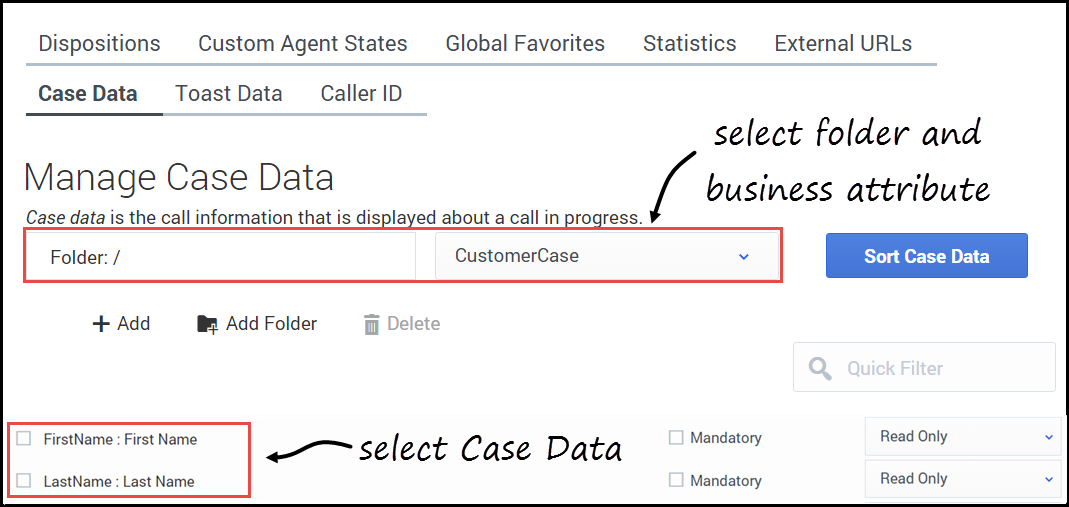
On the Desktop Settings > Case Data page, you can specify the information to be displayed to the agent when a call, chat, or other interaction when an interaction is transferred to them.
Creating a sharable Case Data business attribute
Case data can be used as sharable business attributes for agents, agents groups, and the global contact center. To view an article about how to create sharable business attributes, see Sharing Business Attributes in Agent Setup.
- To view an example of Case Data in Agent Desktop, see Contact and interaction history in Agent Desktop Help.
- In the table of configured Case Data, in addition to selecting and adding Case Data, you can also filter items using the Quick Filter field and delete a Case Data.
Selecting Case Data
- Select a business attribute:
- Select the folder you want to view from the Folder drop-down list box.
- Click the second drop-down list box and select the business attribute for the Disposition.
You can consider a business attribute to be the container that holds a list of Dispositions that have a common theme.
- Select a Case Data from the list.
Adding Case Data
Select the folder you want to view from the Folder drop-down list box.
- Click the second drop-down list box and select the business attribute into which you want to add the Case Data.
- Click Add.
- Specify a name and display name.
- Select Mandatory to specify that the case data is mandatory.
- Enable the Read Only option if you do not want the agent to be able to update the data. Or, select a data validation type, such as Boolean, String, or Integer, which allows the agent to edit the data. Note that if the case data is mandatory, the Read Only option is disabled.
- Click Add Folder; or
- To add a subfolder, click the Folder drop-down list box, select a folder, and then click the Add folder icon.
To configure the order in which the case is displayed in the UI, click Sort Case Data and follow the instructions in the dialog box.
Toast Data
On the Desktop Settings > Toast Data page, you can specify the information to be displayed to the agent when they receive a call, chat, or other interaction.
Creating a sharable Toast business attribute
Toast Data can be used as sharable business attributes for agents, agents groups, and the global contact center. To view an article about how to create sharable business attributes, see Sharing Business Attributes in Agent Setup.
- To view an example of Toast Data in Agent Desktop, see Contact and interaction history in Agent Desktop Help.
- In the table of configured Toast Data, in addition to selecting and adding Toast Data, you can also filter items using the Quick Filter field and delete a Toast Data.
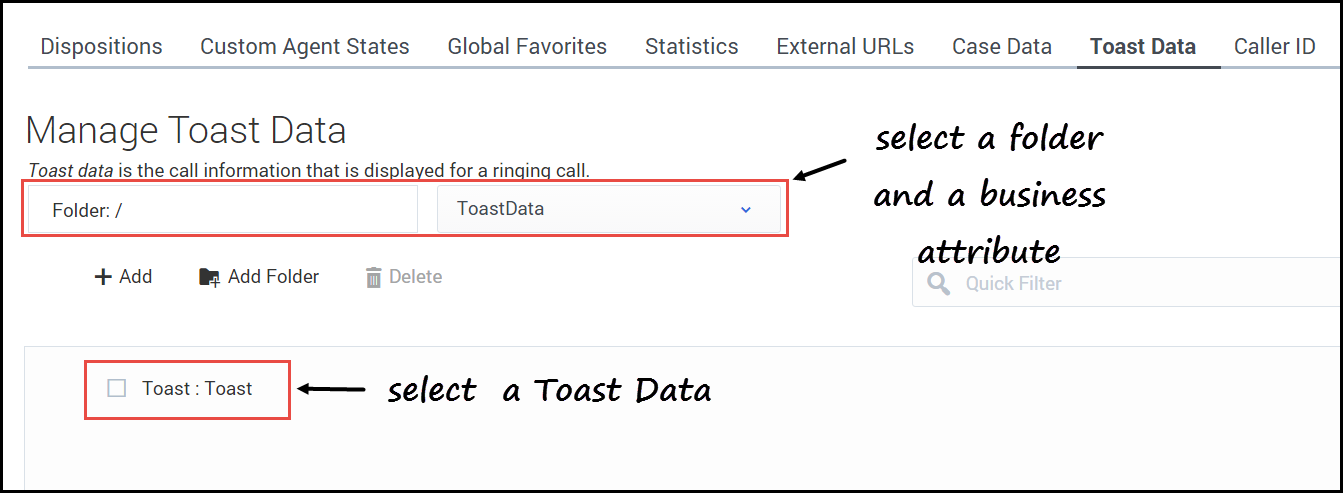
Selecting Toast Data
- Select a business attribute:
- Select the folder you want to view from the Folder drop-down list box.
- Click the second drop-down list box and select the business attribute for the Disposition.
You can consider a business attribute to be the container that holds a list of Dispositions that have a common theme.
- Select a Toast Data from the list.
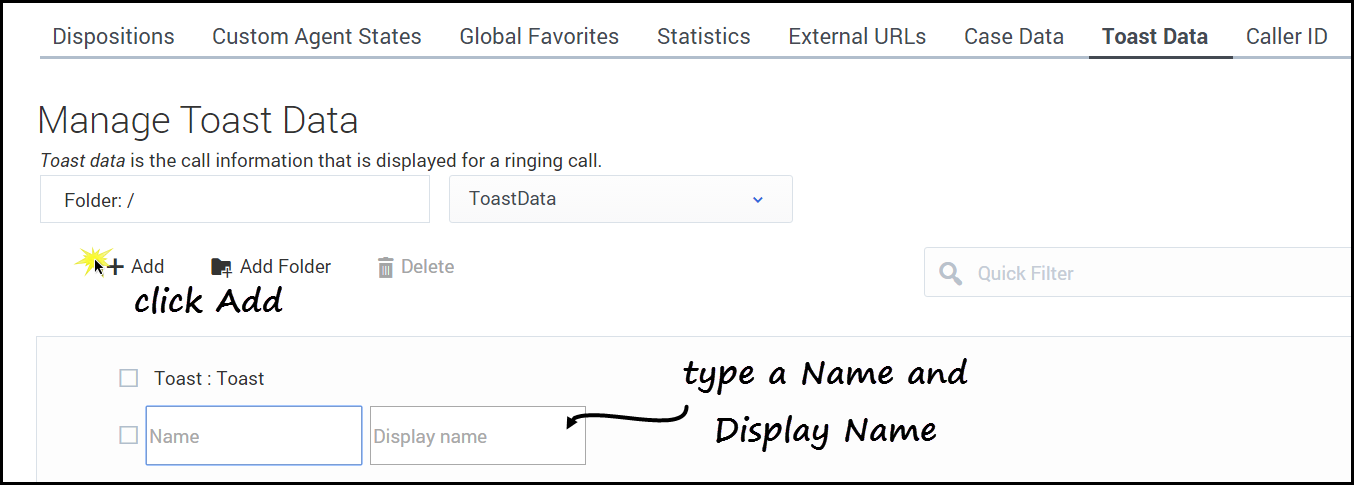
Adding Toast Data
Select the folder you want to view from the Folder drop-down list box.
- Click the second drop-down list box and select the business attribute into which you want to add the Toast Data.
- Click Add.
- Specify a name and display name.
- Click Add Folder; or
- To add a subfolder, click the Folder drop-down list box, select a folder, and then click the Add folder icon.
Caller ID
On the Desktop Settings > Caller ID page, you can create a list of Caller Identification (ID) options to be displayed when an agent makes an outbound call or transfer. A Caller ID is typically the phone number that you want displayed on the phone of the person who receives the call when the agent consults, conferences, or transfers a call.
You can also specify a display name, such as your company name, to be included with the Caller ID. For example, SalesForMore 1-555-555-5555. In this case, Agent Desktop shows SalesForMore on the list of Caller IDs that an agent can select.
Creating a sharable Caller ID business attribute
Caller IDs can be used as sharable business attributes for agents, agents groups, and the global contact center. To view an article about how to create sharable business attributes, see Sharing Business Attributes in Agent Setup.
- To view an example of Caller ID options in Agent Desktop, see How do I manually select a Caller Identification? in Agent Desktop Help.
- In the table of configured Caller IDs, in addition to selecting and adding Caller IDs, you can also filter items using the Quick Filter field and delete a Caller ID.
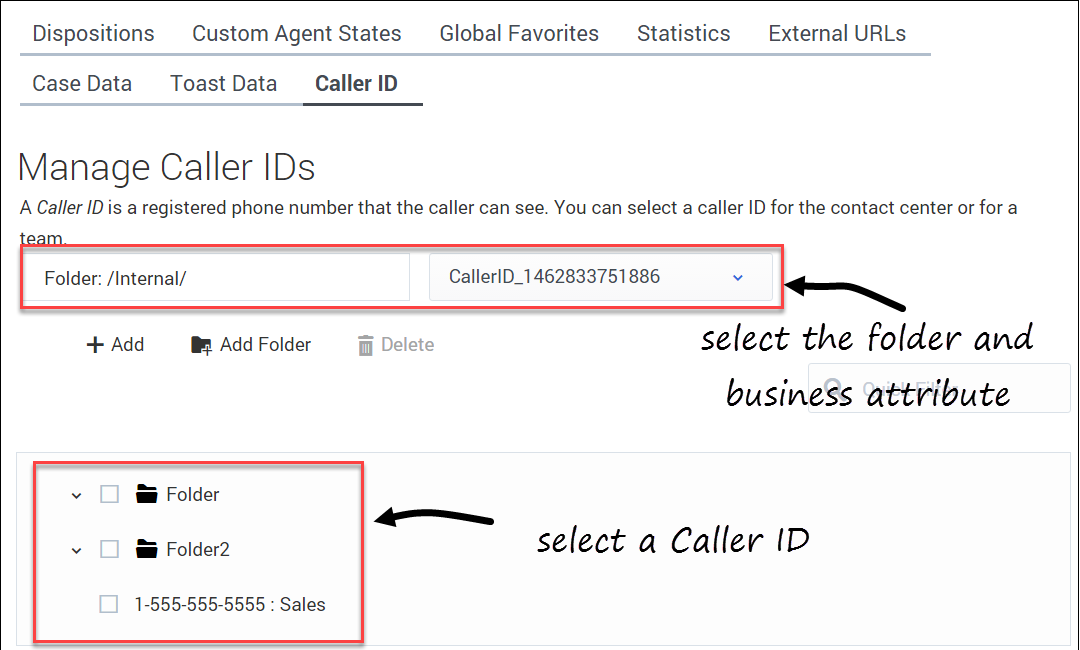
Selecting a Caller ID
- Select a business attribute:
- Select the folder you want to view from the Folder drop-down list box.
- Click the second drop-down list box and select the business attribute for the Caller ID.
You can consider a business attribute to be the container that holds a list of Caller IDs that have a common theme.
- Select a Caller ID from the list.
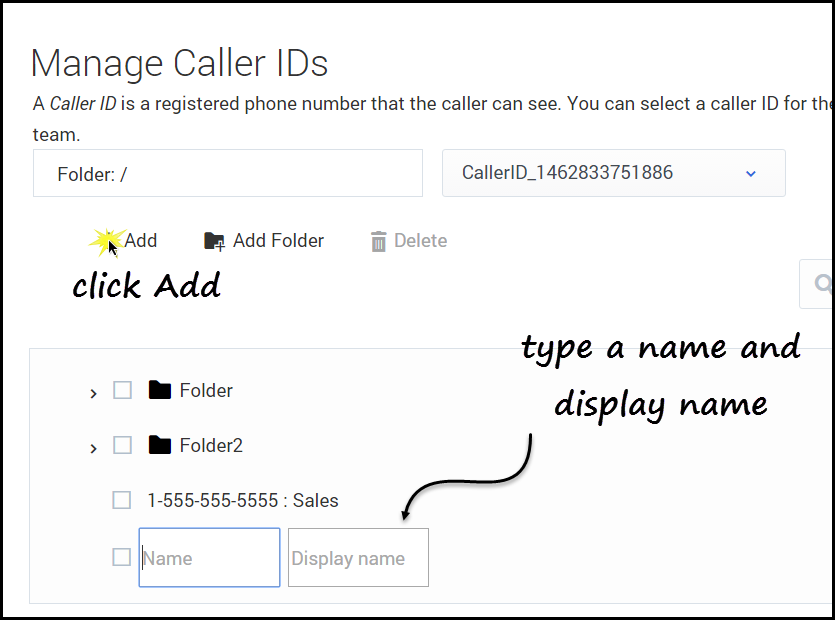
Adding a new Caller ID
- Select the folder you want to view from the Folder drop-down list box.
- Click the second drop-down list box and select the business attribute into which you want to add the Caller ID.
- Click Add.
- Type the Name and Display Name for the new Caller ID.
- Click Add Folder; or
- To add a subfolder, click the Folder drop-down list box, select a folder, and then click the Add folder icon.
Next Steps
Now that you have configured your Desktop Settings, you can proceed to configure Skills for your contact center. See Skills.

