login.show-change-account-link
Section: interaction-workspace
Default Value: true
Valid Values: true, false.
Changes Take Effect: After the next platform configuration refresh interval.
Introduced: 9.0.000.49
Show or Hide the change login account link on login error page and second step login page.
auth.session.invalidate-on-logout
Section: interaction-workspace
Default Value: true
Valid Values: true, false.
Changes Take Effect: After the next platform configuration refresh interval.
Introduced: 9.0.000.61
Specifies whether the Auth SSO session persists when an agent logs out.
If true, when an agent exits Workspace, both Workspace and the Auth session are removed and the gent is redirected to the Auth login view.
If false, when an agent exits Workspace, only the Workspace session is removed and agent is redirected to a Workspace session ended view.
Gplus Adapter with Salesforce Single sign-on (SSO) identity provider
You can simplify your agent log in process by integrating Gplus Adapter with Salesforce to use Salesforce as your single sign-on (SSO) identity provider (IDP). This means that your agent only has to provide their Username and Tenant to log in to Gplus Adapter after they have logged into Salesforce using Salesforce as your SSO identity provider.
Follow these steps to set up SSO with Salesforce as the identity provider:
Enable Salesforce as an Identity Provider
Prerequisites
- You must have an Admin role in your organization's Salesforce account
- User email address (username) that you use to login to Salesforce. Note: Username email addresses must be the same in both Salesforce and Gplus Adapter.
Enable Salesforce as an Identity Provider
- Follow the steps in the Enable Salesforce as an Identity Provider article in the Salesforce Help.
- In the Identity Provider view, click Download Metadata to obtain a copy of the IDP metadata XML.
Enable SSO on Genesys tenants
- Employing SAML for SSO requires two parts, a Service Provider (Genesys Auth Service) and an Identity Provider (Salesforce). To complete your Service Provider configuration, you must upload the Salesforce Identity Provider IDP-metadata XML file you created in the previous procedure to Agent Setup (refer to the Agent Setup SSO article).
- Download and open the SP-Metadata XML file in an XML viewer and find the Location parameter. You will need this parameter for the Entity ID and the ACS URL when you define Gplus Adapter as a Connected App in Salesforce. The Location URL looks something like this: https://gws-usw1.genhtcc.com/auth/v3/saml/SSO/alias/<string representing the Entity ID>.
- In the interaction-workspace section of the Workspace application object, set the value of the auth.session.invalidate-on-logout option to false. This ensures that when an agent exits Gplus Adapter, only the Gplus Adapter session is removed and the agent is redirected to a Gplus Adapter session ended page.
- In the interaction-workspace section of the Workspace application object, set the value of the login.show-change-account-link to false to hide the Change login account link on the login error page and the second step login page.
Define Gplus Adapter as a Connected App in Salesforce
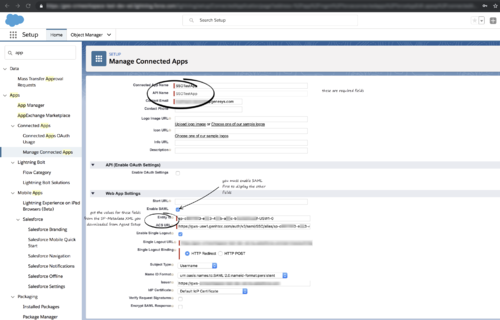
- To configure a new Connected App follow the instructions in the Salesforce Help Defining Service Providers as SAML-Enabled Connected Apps document.
- Specify the required fields under Basic Information:
- Connected App Name (for example, Gplus Adapter)
- API Name (for example, GWS)
- Contact email (the email address of the Admin user)
- Under Web App Settings, select Enable SAML
- Use the Location string from the SP-Metadata xml file of the Enable Salesforce as an Identity Provider procedure to provide Entity ID and ACS URL:
- Entity ID: The long string of numbers and letters at the end of the Location parameter URL after the last "/".
- ACS URL: The URL from the Location parameter that you obtained from the SP-Metadata in step 2 of the Enable SSO on Genesys tenants procedure.
- Use the identity provider event log to troubleshoot errors when trying to log in to Gplus Adapter.
Agent SSO login workflow
This is the general workflow when Gplus Adapter initiates the login process and uses Salesforce to identify the user:
- An agent logs in to Salesforce.
- The agent provides their Username and Tenant name in Gplus Adapter and clicks Next.
- GPlus Adapter sends a request to Salesforce to authenticate the user.
- Salesforce identifies the agent specified in the request and sends an authentication response.
- Gplus Adapter authenticates the response sent by Salesforce.
- If the agent is authenticated, they are logged in to Gplus Adapter while logged in to Salesforce.

