Contents
- 1 Applications
- 1.1 Creating a new application
- 1.2 Viewing application properties
- 1.3 Edit the application name, description, or tags
- 1.4 Change the status of an application stream
- 1.5 View the application history
- 1.6 Clone an application
- 1.7 Manage Builds
- 1.8 Manage Phone Numbers
- 1.9 Manage Chat Endpoints
- 1.10 Manage Digital Endpoints
- 1.11 Manage OpenMedia Endpoints
- 1.12 Disconnect Phone Numbers and Chat Endpoint
- 1.13 Managing Application Settings
- 1.14 Enabling Your Application
- 1.15 Viewing the application summary
Applications
Go to the Applications page to manage your applications. From here, you can create new applications and make changes to existing ones.
Creating a new application
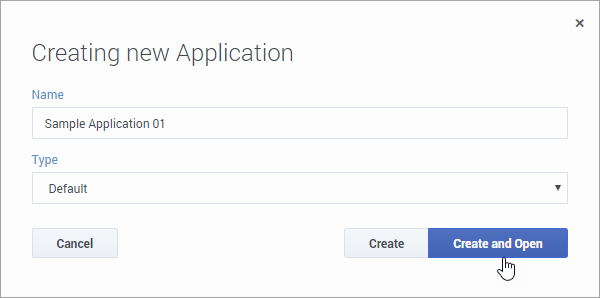
To create a new application, click Add Application. This opens the Creating new application window:
Enter a Name and select the Type of application that you want to build. You can select one of the following:
Default
Select this type to create an application that supports Interactive Voice Response (IVR) and voice call routing. After you create a default type application, you can enable it for digital interactions (i.e. chat) by enabling omnichannel support in the Application settings.
Digital
Select this type if the application is only going to handle digital interactions, such as chat and/or email (no voice calls).
Callback
Select this type if the application is only going to be used for outbound callbacks.
Click Create to save it and go back to the Applications page. Or, click Create and Open to save the application and open it for editing.
Viewing application properties
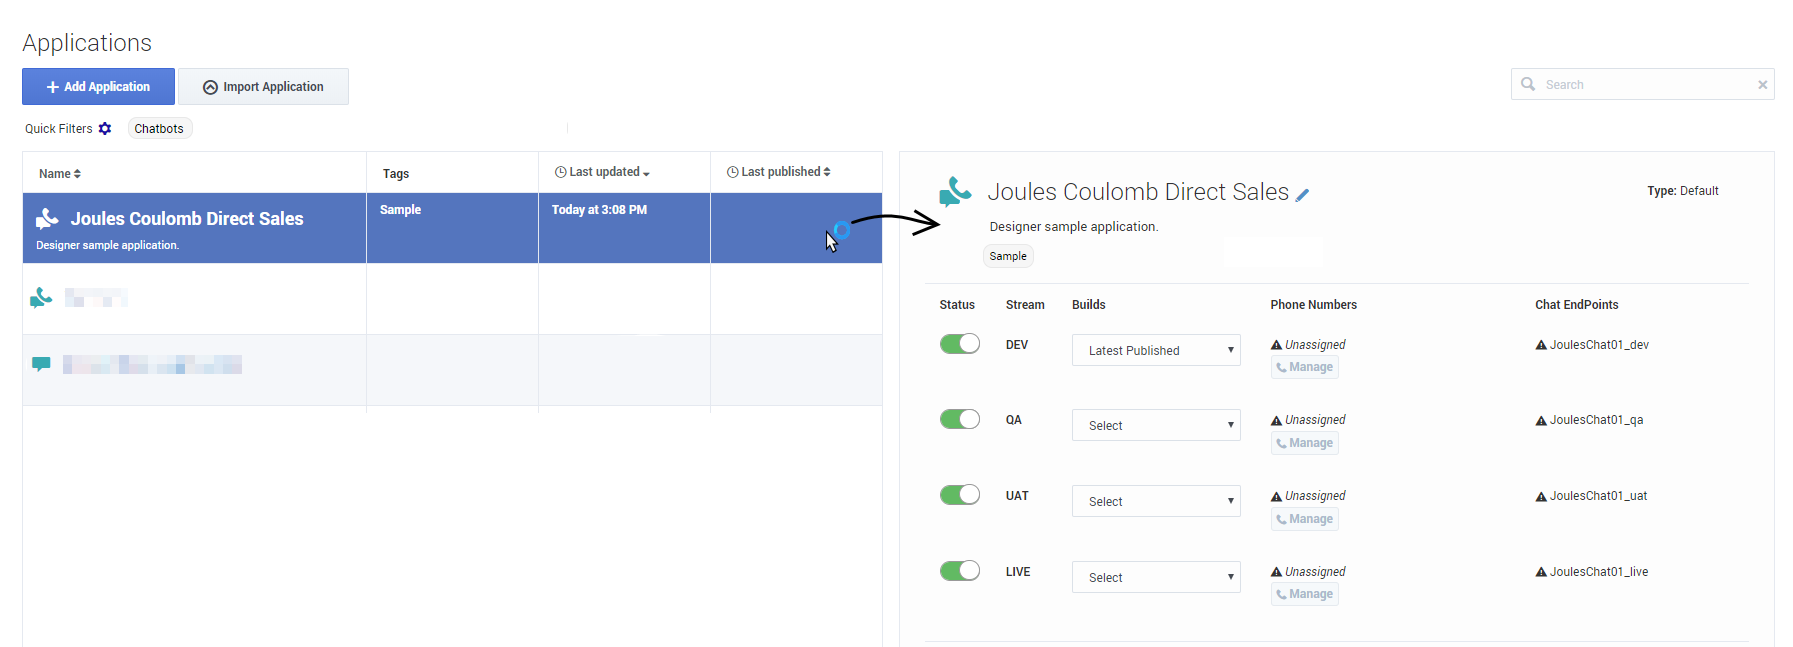
From the Applications list, click an empty spot in an application's row to display its properties on the right-hand side (if you click the application name, it will open for viewing or editing):
Application ID
Each Designer application has a unique application ID associated with it. You can view the application ID by mousing over the application link and checking the target URL that appears in the browser window:
Edit the application name, description, or tags
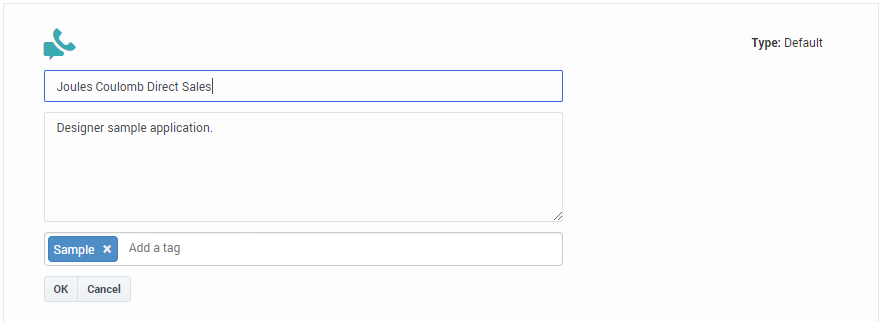
Click the pencil icon to open the editing view.
From the editing view, you can change the application name, description, or manage the tags associated with the application.
Change the status of an application stream
Use the sliders to change the status of an application stream to enabled or disabled.
To enable:
To disable:
View the application history
Click ![]() Application History to see a list of historical events for the application, such as each time it was viewed, edited, or published:
Application History to see a list of historical events for the application, such as each time it was viewed, edited, or published:
The history view shows you the date of each event, the action that was taken (for example, READ, EDIT, PUBLISH, CLONE, or DELETE), the user who made the change, and the new and previous value of any properties that were changed.
You can use the toolbar buttons to view the history for the last day, week, month, or three-month period. You can also specify a custom start and end date and click Search to generate the results. To download the results in a CSV file, click Export.
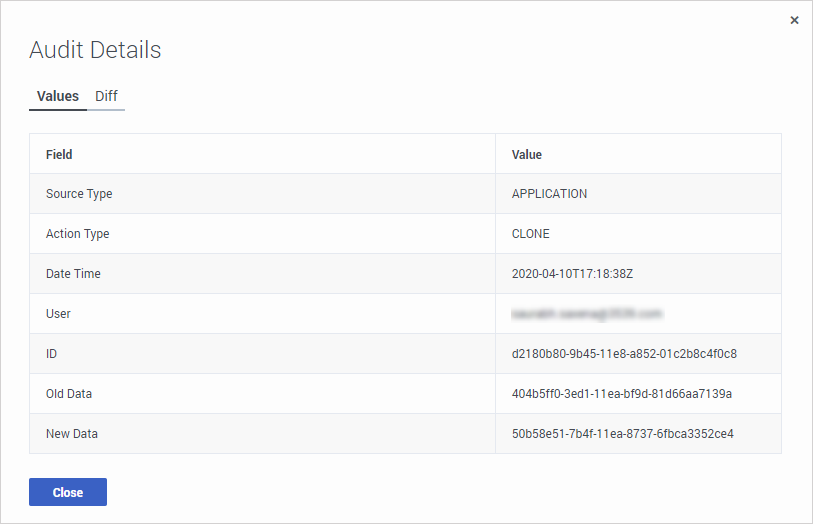
Double-clicking on an event opens an audit window that displays more details for that particular item:
Clone an application
Click ![]() Clone application to create a new application that is an exact copy of the selected application. Save the clone with a unique name and then manage it like any other application. This can be useful when you want to use the same structure as the selected application, but need to specify different settings or resources.
Clone application to create a new application that is an exact copy of the selected application. Save the clone with a unique name and then manage it like any other application. This can be useful when you want to use the same structure as the selected application, but need to specify different settings or resources.
Manage Builds
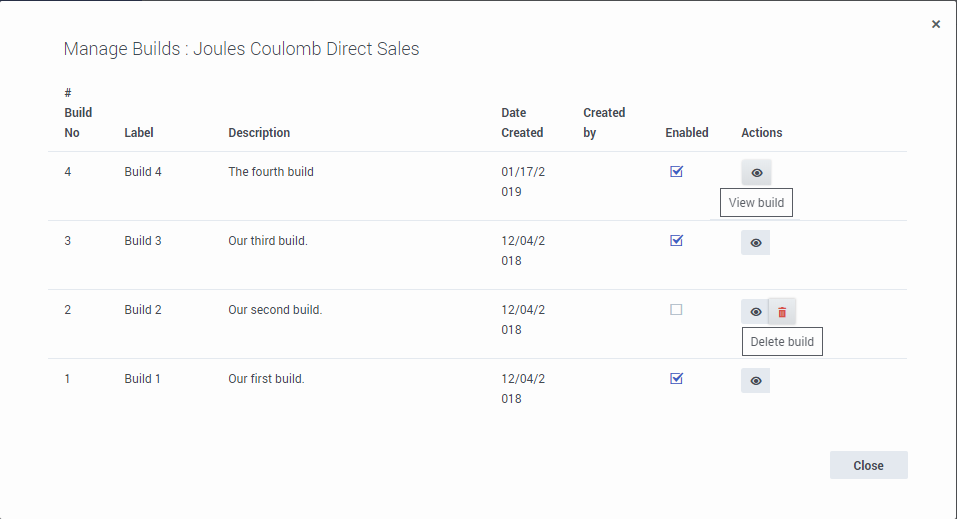
Click ![]() Manage Builds to manage the application builds that are available for the application.
Manage Builds to manage the application builds that are available for the application.
All builds are initially enabled by default.
To disable a build, deselect it. After a build is disabled, you can click the trash icon to delete it.
If your user role has the required permissions, you can click View build to open the build in read-only mode. This can be useful when you want to review or compare the flows of different builds.
For more information about builds, see Application builds.
Manage Phone Numbers
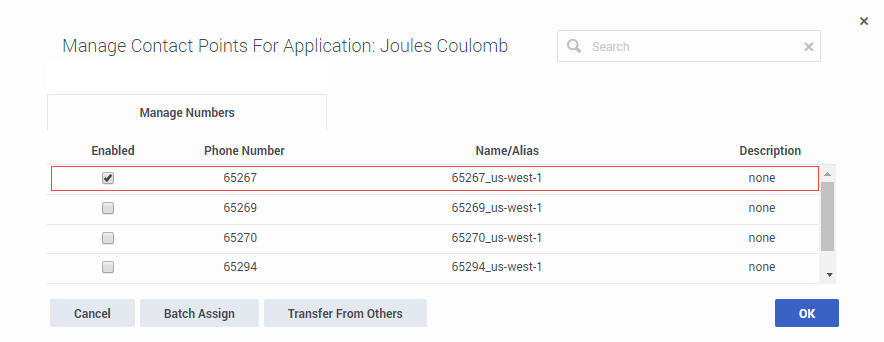
Click Manage in the Phone Number column to select and assign a phone number(s) to the application. When you are finished, click OK.
- You cannot assign a phone number to IVR type applications.
- You cannot assign a phone number to an application that has not been published at least once.
- To assign a large list of phone numbers, you can use the Batch Assign option.
- If you are moving phone numbers from one application to another, you can use the Transfer from Others option.
Batch Assign
Let's say you have a large list of phone numbers that you want to assign to the application. With Batch Assign, you can copy and paste the phone numbers into a form and assign them in a single operation.
Here's how it works:
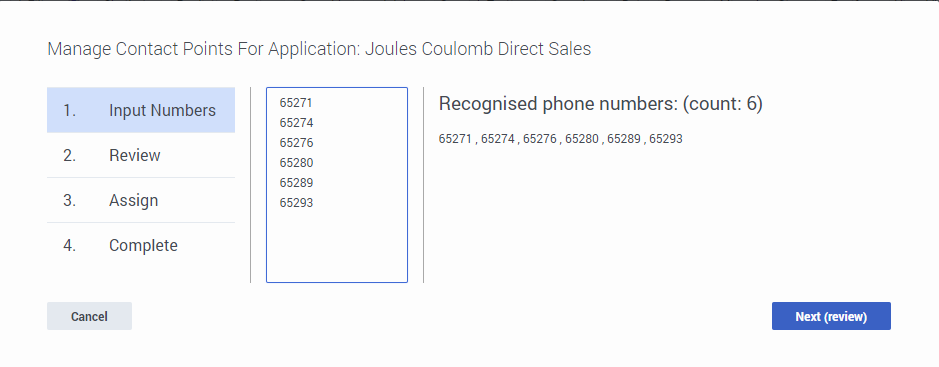
Input Numbers
Click Batch Assign and add the numbers you want to assign to the input column. Note that the numbers must be on separate lines. Designer keeps track of the numbers you've added in the Recognized phone numbers column.
When you are finished adding numbers, click Next (review).
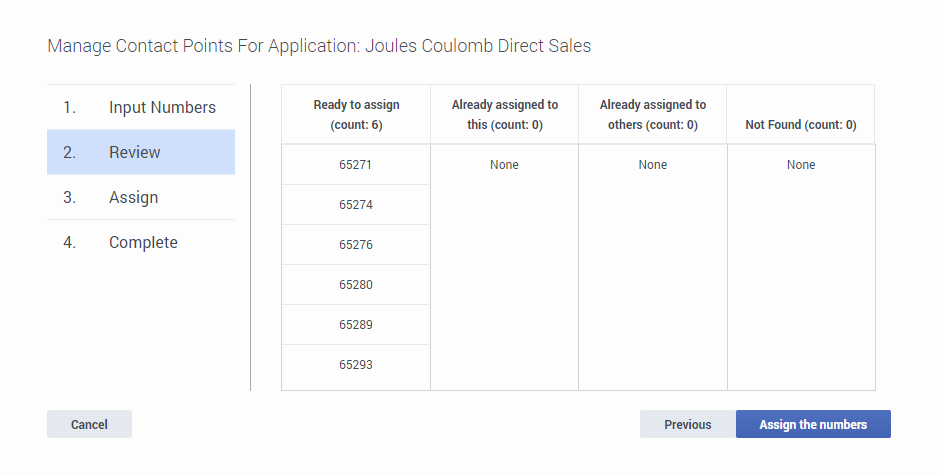
Review
You can review the results to see the phone numbers that are ready to be assigned, are already assigned to this application (or another application), or were not found — maybe these were entered incorrectly or are not available for use.
If you need to make changes, click Previous. Otherwise, click Assign the numbers.
Complete
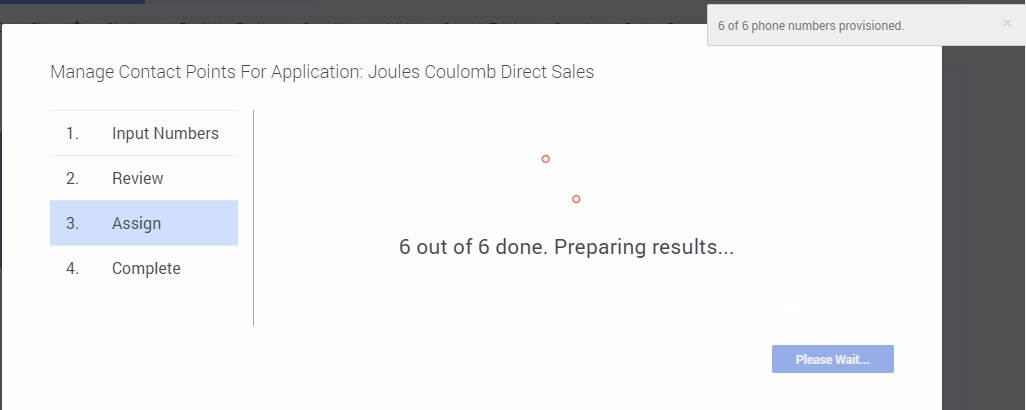
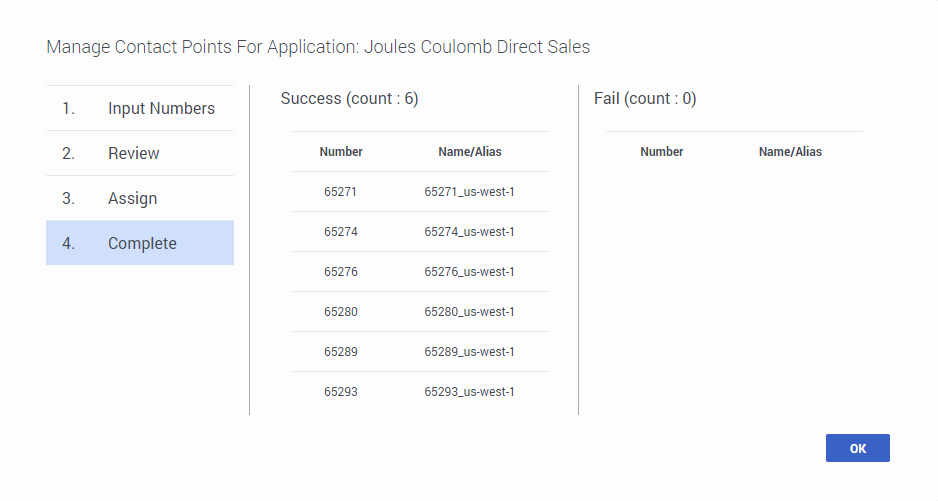
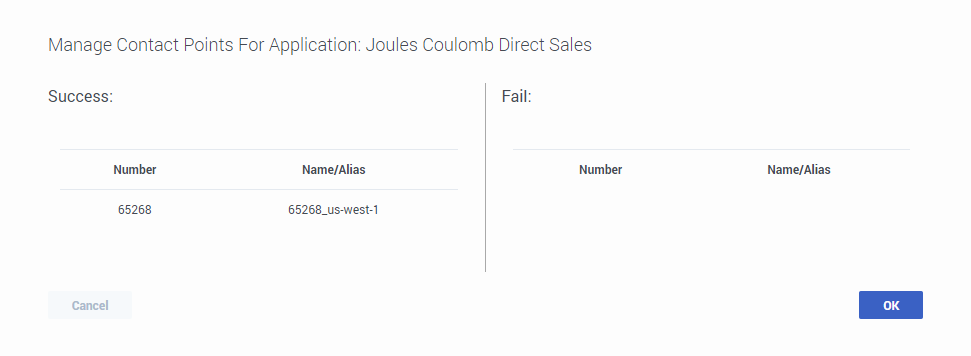
When the operation completes, Designer shows you which numbers were successfully assigned and which (if any) failed.
Click OK to close the window.
Transfer from Others
Use Transfer from Others to transfer multiple phone numbers to another application or to other stream of the current application. To show an example of how this works, let's transfer a phone number to another stream of an application.
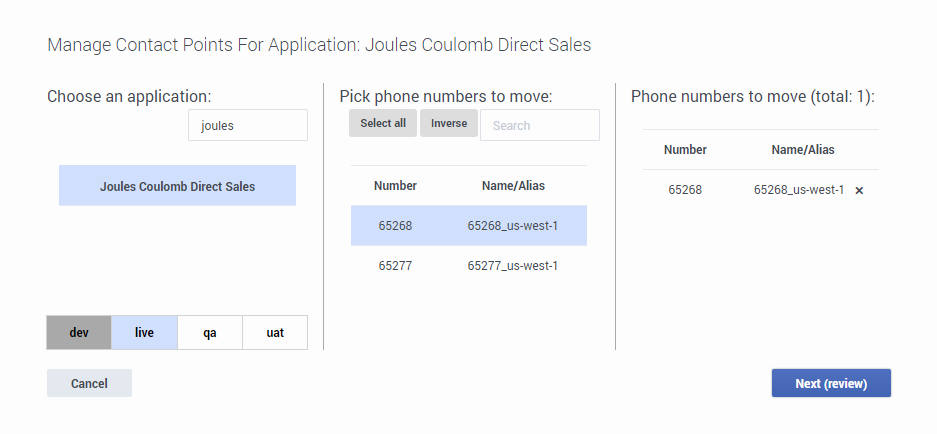
We've clicked Manage Phone Numbers for the Joules Coulomb application and selected Transfer from Others:
We want to transfer a number to a stream of the current application, so we use the search bar to filter the application list for "Joules". We select it, and the stream tabs appear at the bottom.
We want to move a number from LIVE to DEV, so we select the LIVE tab.
There are two numbers assigned to that stream, but we only want to move one of them. We select the number we want to move and click Next (review).
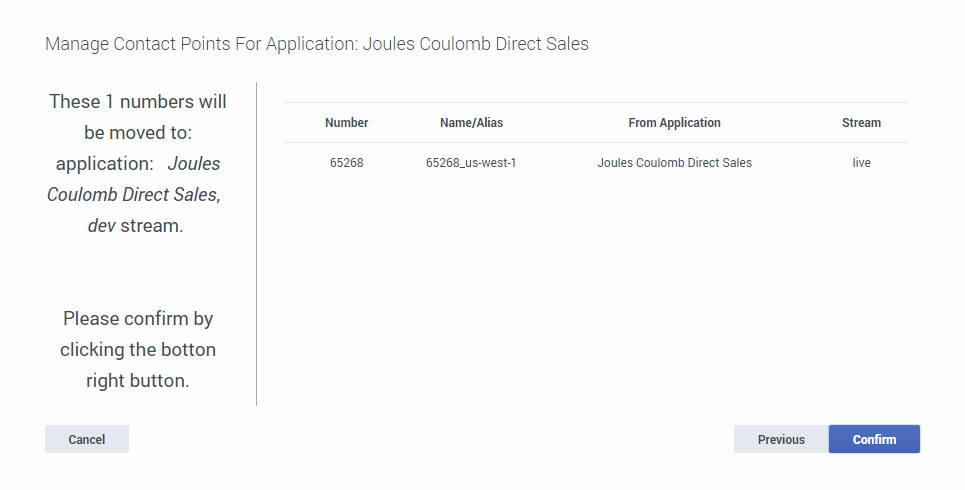
Review the transfer details.
If everything looks ok, click Confirm. If you need to make any changes, click Previous.
Designer shows you the progress of the transfer. When it is complete, the summary lists the numbers that were successfully transferred and also any that failed.
Click OK to close the transfer results window and return to the application properties.
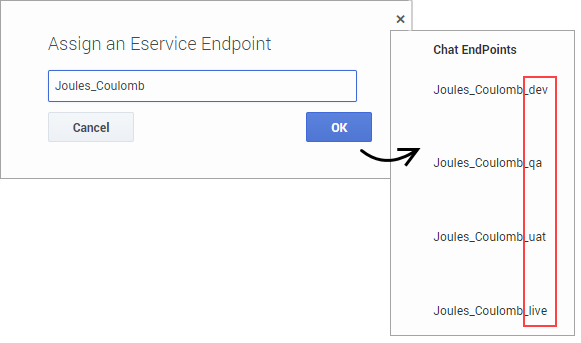
Manage Chat Endpoints
Click ![]() Manage Chat Endpoint to assign a chat endpoint to the application.
Manage Chat Endpoint to assign a chat endpoint to the application.
Note that the endpoint is assigned to each of the application streams, with a naming extension that corresponds to the stream.
Some tips:
- Enter a name that is unique across all applications.
- The name should indicate the origination point of the chat (for example, sales_page or mortgage_division).
- Use alphanumeric characters only. Avoid using spaces or special characters (underscores are okay).
Manage Digital Endpoints
This option is only available for default application types.
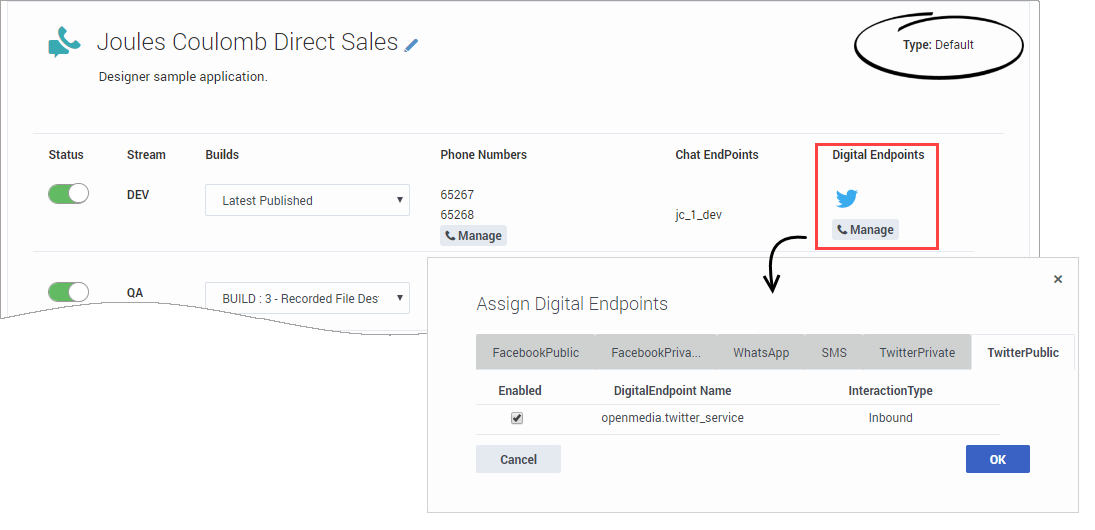
To assign a digital endpoint to a default application stream, click the Manage button under the Digital Endpoints column. (Digital endpoints are configured using Agent Setup. For more information, contact your Genesys representative.)
For example, you might want to add an endpoint for Facebook, WhatsApp, or Twitter, so that if a customer contacts you from one of these social media platforms or services, Designer detects which channel the message is coming from and launches the appropriate application for managing and routing that type of interaction. If applicable, Designer can also send or post messages back to the incoming channel.
Go to the tab for the appropriate service and select the endpoint to assign.
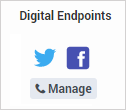
After you've assigned the endpoint, an icon for the respective service appears in the application properties, under the Digital Endpoints column:
You can click the icon to view the details for the endpoint.
Manage OpenMedia Endpoints
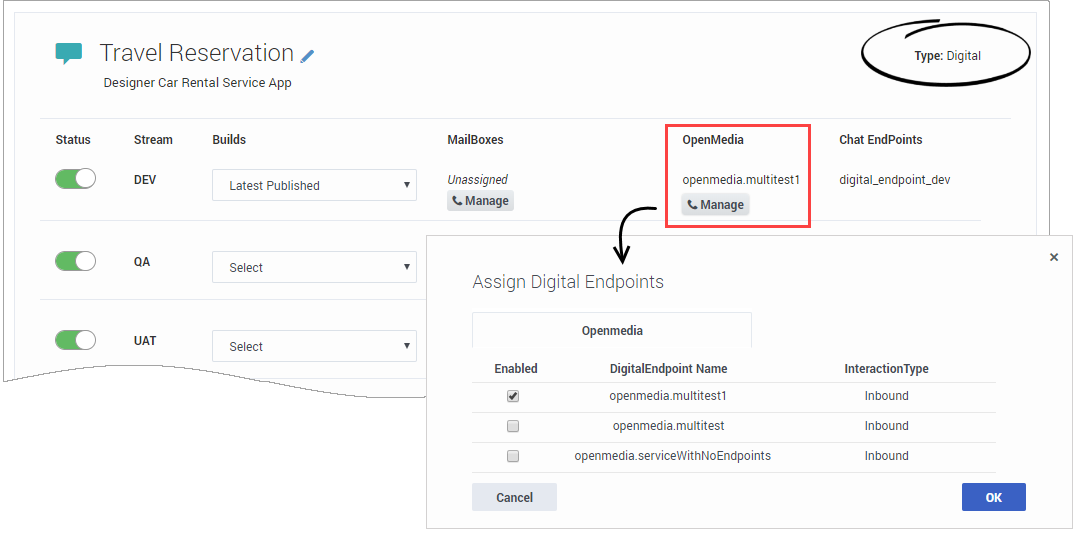
This option is only available for digital application types.
To assign an OpenMedia endpoint to an application stream, click the Manage button under the OpenMedia column. (Digital endpoints are configured using Agent Setup. For more information, contact your Genesys representative.)
For example, you might want to add an endpoint for Facebook, Twitter, or WhatsApp, so that if a customer contacts you from one of these social media platforms or services, Designer detects which channel the message is coming from and launches the appropriate application for managing and routing that type of interaction. If applicable, Designer can also send or post messages back to the incoming channel.
- Designer requires that OpenMedia endpoints contain the openmedia prefix (for example, openmedia.banking). Otherwise, Designer won't recognize the endpoint.
Disconnect Phone Numbers and Chat Endpoint
Click ![]() Disconnect Phone Numbers and Chat Endpoint to disconnect all phone numbers and the chat endpoint from the application (you might need to click More to see this option). Once disconnected, the phone numbers or endpoint can be assigned to other applications.
Disconnect Phone Numbers and Chat Endpoint to disconnect all phone numbers and the chat endpoint from the application (you might need to click More to see this option). Once disconnected, the phone numbers or endpoint can be assigned to other applications.
If you want to disconnect specific numbers from an application stream, click Manage under the Phone Numbers column for that stream to deselect the number(s) you want to disconnect.
Managing Application Settings
When an application is open for editing, click Settings to view and manage the Application Settings.
General tab
- Application Reporting Title — The name of the application to be used for reporting in Designer Analytics.
- Application Version — Specify the version number of this application. For example: 0.1. You can then increase the version after making significant changes to the application.
Media tab
- Media Resource Collection - Select the Media Collection that this application will use. See the Media Resources page for more information.
Persona tab
If Persona functionality is available for your workspace, you can use this tab to enable the use of personas in the application. Personas are not enabled by default, so you'll need to enable this option for each application you want to use them in. For more information, see Personas.
Reporting tab
- Milestone Path Prefix - Specify a prefix to use with this application's milestone paths.
DTMF Options
This tab enables you to set global DTMF commands for your application. These DTMF keys can be used at any time within the application to trigger a specified action.
A common use case for this feature is a global command for the DTMF key 0 that routes the caller directly to an agent. In this example, you can set 0 as a global DTMF command that routes directly to the Assisted Service phase. In your application, you can add a Play Message block to announce that callers can press 0 at any time to speak to an agent.
Selecting Enable Global Commands enables global DTMF commands for the application.
To set a global DTMF command, select the drop-down menu beside the corresponding DTMF key that you want to use. In the drop-down menu, select a target block or phase for the DTMF key. Click OK when you are done setting global DTMF commands.
Global DTMF commands can target the Self Service, Assisted Service, or Finalize phase, or any block within the Self Service phase.
- If the same DTMF key is also used by a block within your application, Designer first processes the command in the block.
- You can also use global DTMF commands with Self Service type shared modules.
Speech Recognition tab
Configure settings for speech recognition (ASR). See the User Input block page for more information.
Global Retry tab
Configure global settings for menu retries. See the Menu block page for more information.
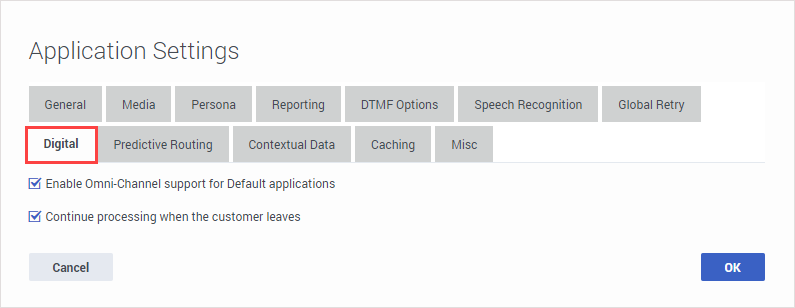
Digital tab
To enable a Default application type for chat interactions, select Enable omni-channel support for Default applications.
Select Continue processing when the customer leaves if you want Designer to continue processing the application after the customer leaves the chat session (this option does not apply to voice interactions). This option is only available for Default application types if omni-channel support is enabled.
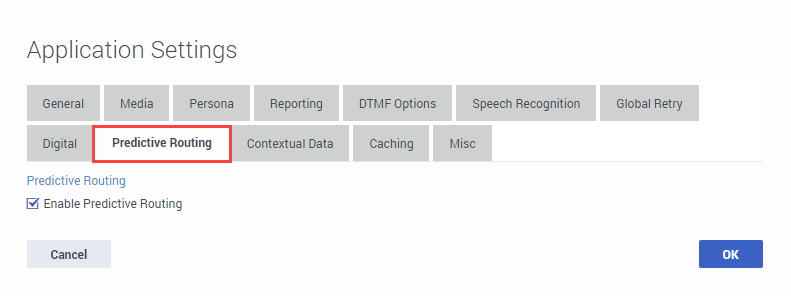
Predictive Routing tab
Select this option to enable support for predictive routing (as required for the Predictive Routing block).
Contextual Data tab
Select Enable Customer Profile to allow Designer to retrieve certain details about the customer, such as their name and contact information. When this option is enabled, you can also choose to select the amount of interaction history data that Designer should collect for the customer.
Caching tab
Resource caching can improve overall system performance, but it can also cause a delay in how long it takes for changes in Designer to take effect (changes to Data Tables and Business Controls take effect immediately).
In most cases, it is best to leave Use workspace cache settings selected (it is already selected by default), as each application stage has optimized settings for how often a resource is checked. But you can disable it if you want the application to regularly check the cached resources for updates, and enter your own values for each resource.
The following resources are cached:
- Media Resources
- Speech Grammars
Misc tab
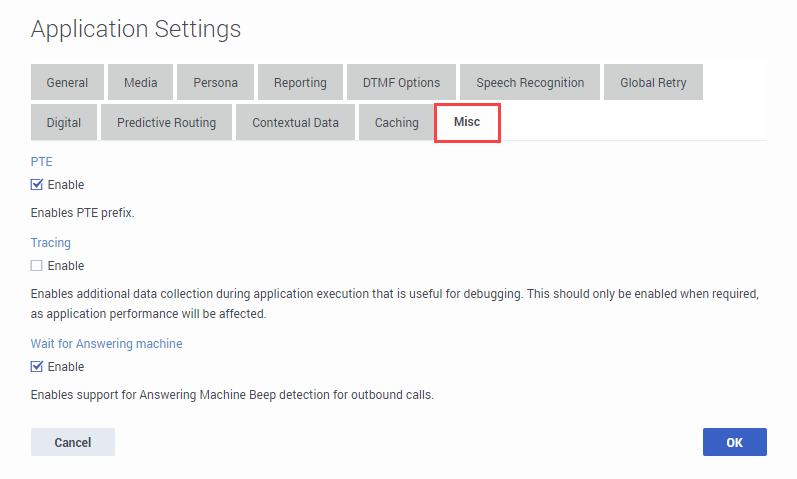
The Misc tab contains options for enabling the Parallel Test Environment, Tracing, and Wait for Answering Machine.
PTE (Parallel Test Environment)
Enable the PTE (Parallel Test Environment) option if you want non-production streams (DEV, QA, UAT) to use test versions of resources instead of the resources being used in the LIVE production environment.
For more information, see Parallel Test Environment (PTE) on the Application Workflow page.
Tracing
Enabling the Tracing option enables additional data to be collected while the application runs, which can later be used for debugging.
Wait for Answering Machine
This option tells Designer to wait for an answering machine beep (i.e. the tone that signals the caller to begin recording their message) during an outbound call. For example, if the customer does not answer the call, the application waits for an answering machine beep before playing a message.
Enabling Your Application
After you have assigned a phone number to your application, you can enable it by clicking the switch icon in the Status column. The switch icon turns green when the application is enabled.
Viewing the application summary
When an application is displayed the flow section, you can use Views > Summary to generate a visualization of the application.
The resulting diagram is similar to a hierarchical flow-chart, with each node representing a block in the application flow:
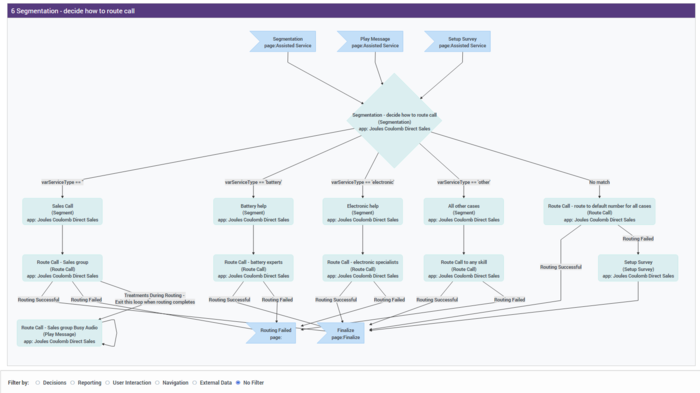
The application summary view shows all the possible paths that an interaction can take through the application. The diagram is divided into sections for each application phase, and for nodes that need to be expanded into their own sections due to their size or complexity.
For example, this section shows a Segmentation node:
Filtering
Use the Filter by options to focus on specific details. You can choose to filter the diagram by Decisions, Reporting, User Interaction, Navigation, or External Data.
Select No Filter to clear any selected filtering options.
Session playback
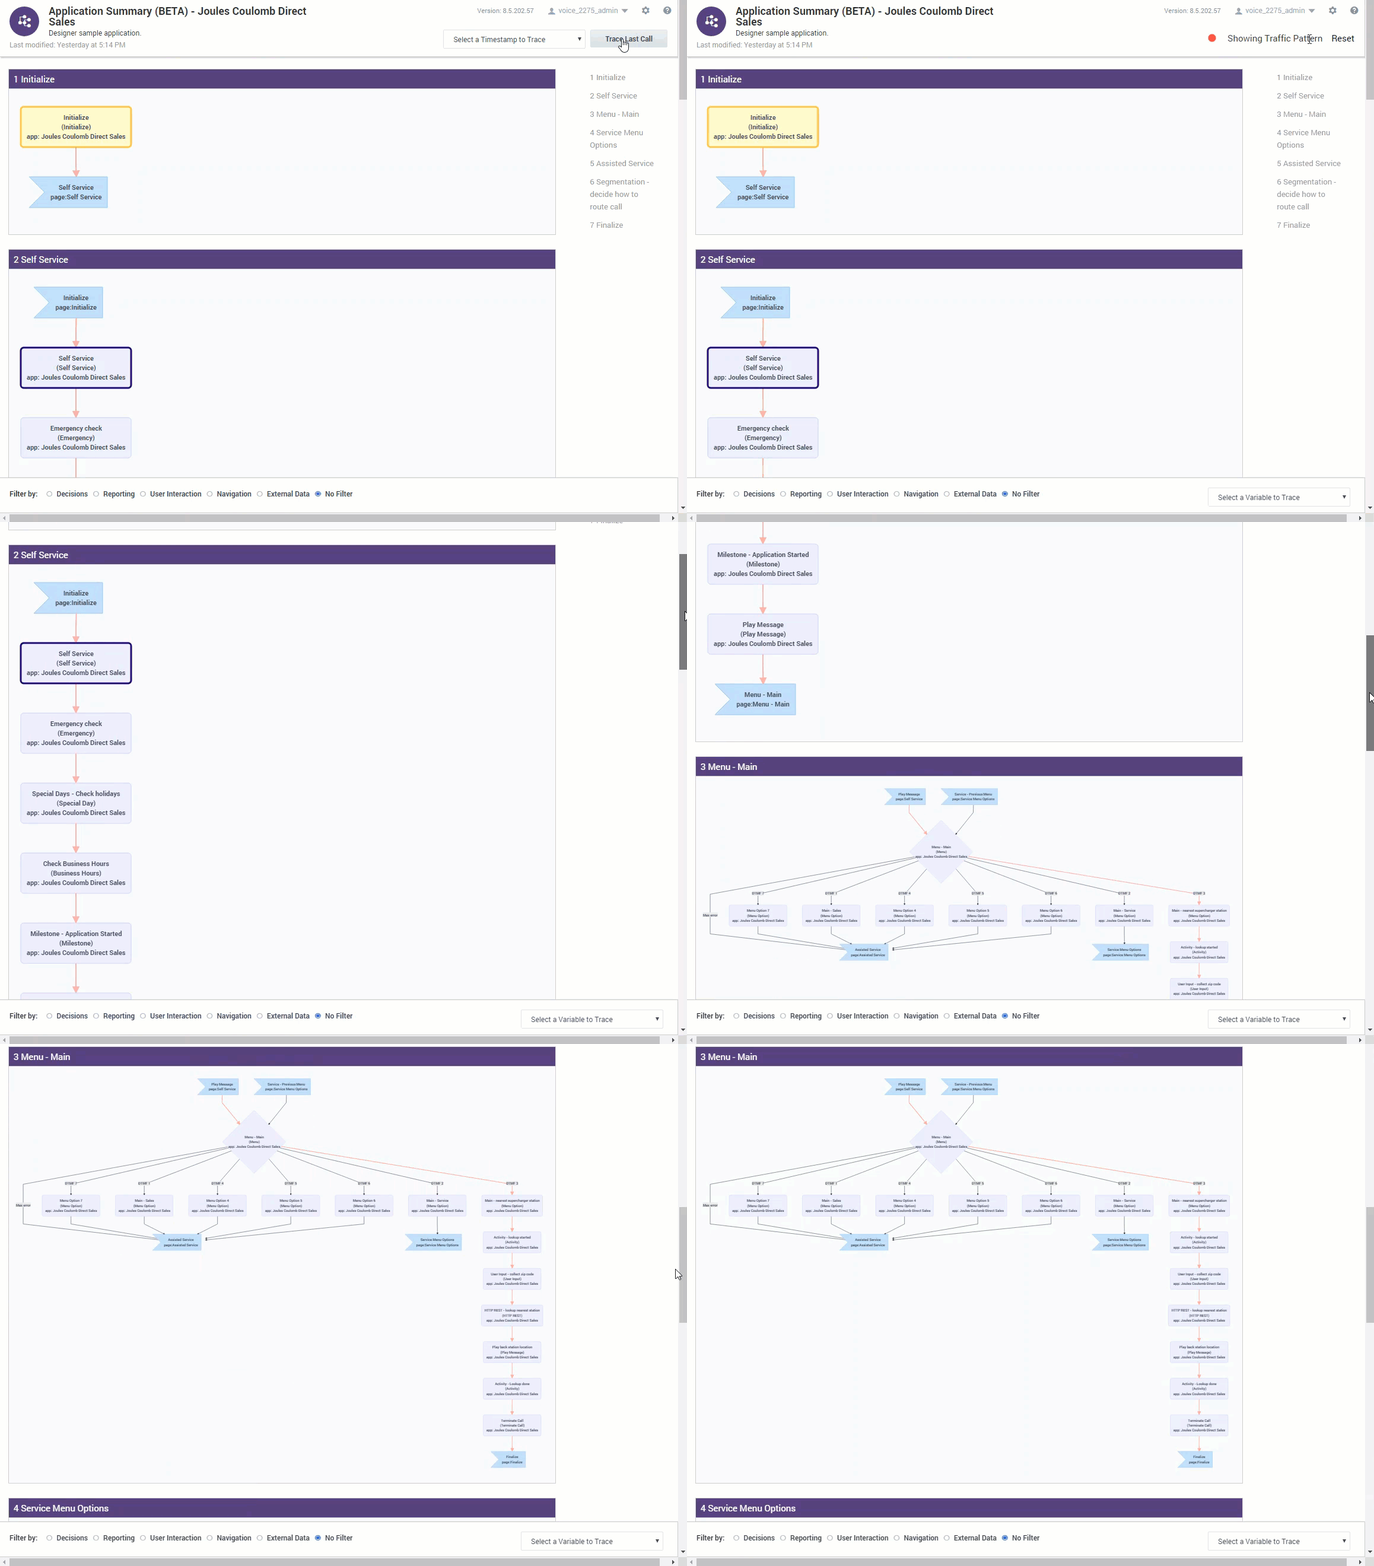
You can use Select a Timestamp to Trace to select and display the path that a specific session took through the application, or click Trace Last Call to load the path of the last session that was processed.
The path that the session took is indicated by red flashing connecting lines and highlighted nodes:
Click Reset to clear the playback details for the selected session.
Variable tracing
Likewise, you can also select a specific variable to trace:
This lets you track a variable as it moves and changes through the various nodes, which can be useful for discovering and resolving potential trouble spots.

