Deploying the Screen Recording Service
Genesys Interaction Recording (GIR) needs a Screen Recording Client installed on each Agent's desktop to enable the Agent to capture what is happening on their screen at the time of an active interaction.
Single Monitor:
- 1024 x 768
- 1280 x 720
- 1600 x 1200
- 1920 x 1080
Dual Monitor:
- Side-by-side 1024 x 768 + 1024 x 768
- Side-by-side 1280 x 720 + 1280 x 720
- Side-by-side 1600 x 1200 + 1600 x 1200
- Side-by-side 1920 x 1080 + 1920 x 1080
The following steps show how to download, install, configure and test the Screen Recording Client. You can also watch this video for a short demonstration.
Before you can install and use the Screen Recording Client on your desktop, you must have some information ready at hand. Your IT department can help you get this information.
- Windows 7 64-bit Operating System with admin privileges
- The Web Services URL—for example, https://mywebservices.com:80
- Access to Workspace Web Edition from your Genesys Hub
- The software (minimum version 8.5.205.00 - build 306)
- Agent Login credentials
Get Your Software
Find the email you received from Genesys with the details about your software (it will look similar to the example on the left), and using your favorite FTP client—for example, Filezilla, connect with the credentials listed in the email.
Download the zipped file to a temporary folder on your computer.
Install Your Software
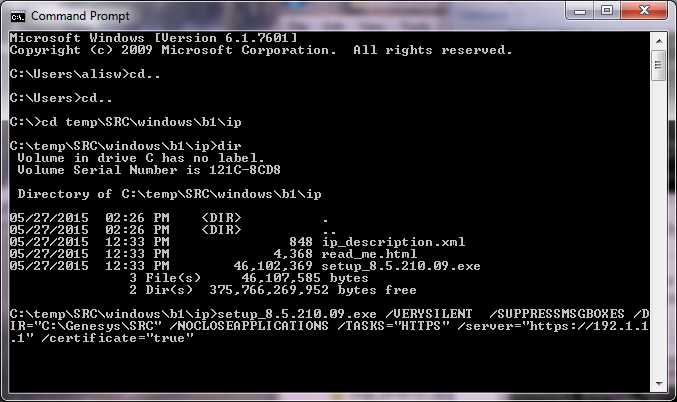
Open a command prompt, and type dir to change directories to the installation folder.
At the prompt, enter the following command:
setup_<version>.exe /VERYSILENT  /SUPPRESSMSGBOXES
/DIR="C:\Genesys\SRC" /NOCLOSEAPPLICATIONS /TASKS="HTTPS"
/server="<URL for your Web Services server>"
And then press Enter.
Remember: If you are using Workspace Web Edition, the desktop requires a secure connection (the URL has https:// as the prefix) to Web Services server. The Screen Recording Client is also required to support a secure connection with Workspace Web Edition, so it can accept credentials to Web Services.
[+] Show more tips and tricks.Verify the Installation
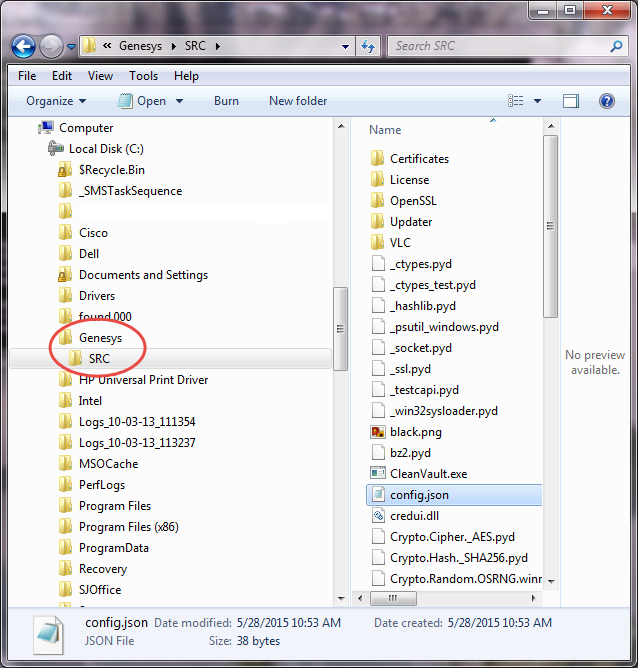
Use Windows Explorer to locate the directory where you installed the software (in this example, it is in the C:/Genesys/SRC folder). Once you see the folder is there, restart your computer. This will ensure that the service starts automatically.
Test the Service
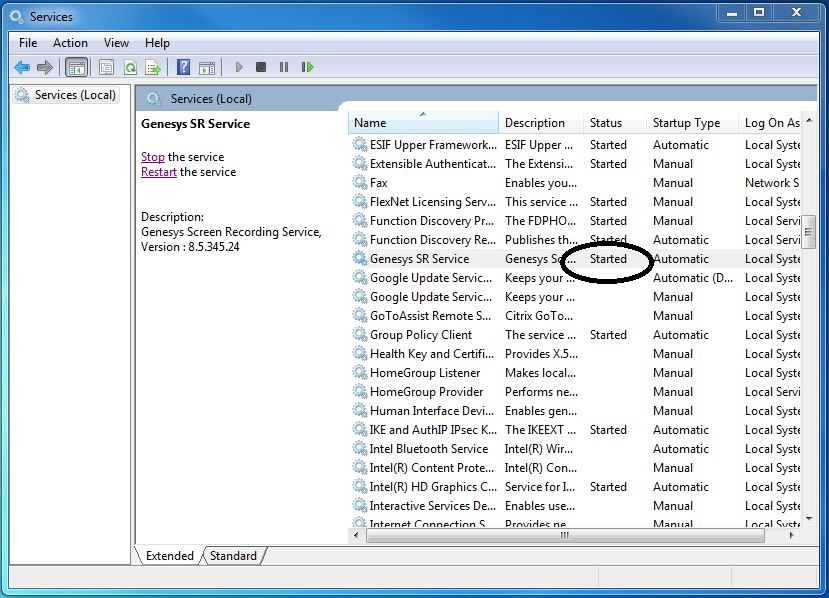
You can test the service to see if the Screen Recording Client is running on the PC. Using Windows Services, on the Services tab, search for Genesys SR Service. If the status is Started, the Screen Recording Client is working. If the status says anything else, contact your Genesys Professional to help troubleshoot the issue.
Use your Agent Desktop to place a test call. For information on how to use the Agent Desktop, see Workspace Desktop Edition Help.
Advanced Installation Procedures
Configuring During the Installation
You can also add more client side parameters to the command line when installing the Screen Recording Client.
For example:
setup.exe /VERYSILENT /server="https://192.1.1.1"
setup.exe /VERYSILENT /CONFIG="C:\path\to\config.json"
For more information about the parameters, see the Advanced Configuration section below.
Creating Self-Signed Certificates
If you did not use the /TASKS="HTTPS" parameter to install the Screen Recording Client, create self-signed certificates as follows:
- Open a command window as an Administrator.
- Navigate to the <install_dir>\Certificates\Self-Signed directory.
- Run the create_certificates.bat file. This creates a set of unique self-signed certificates.
- Run the install_certificates.bat file. This installs the new self-signed certificates to windows trusted certificates store.
Installing Your Own Certificates
Alternatively, you can provided you own certificates without any configuration changes as follows:
- Provide a certificate for the IPv4 host, 127.0.0.1, in the <install_dir>\Certificates\server.pem file.
- Install the .pfx form of this certificate to the local certificates store as a "Trusted Root Certification Authority" file.
- Provide a certificate for the IPv6 host, [::1], in the <install_dir>\Certificates\serverIp6.pem file.
- Install the .pfx form of this certificate to the local certificates store as a "Trusted Root Certification Authority" file.
- The PEM certificate files should include both the private RSA key and the certificate itself. [+] Show an example.
Upgrading the Screen Recording Client
The Screen Recording Client will automatically upgrade any new version on the client machine.
- The following steps must be performed by a System Administrator.
- When you go to upgrade to a newer Screen Recording Service, check with Customer Care about compatibility with your system if not also upgrading your system to the latest versions.
Uploading a New Version to the Web Server
Each new release includes two files:
- setup_<version>.exe—Full version, used for new installations or where a full upgrade is required.
- setup_update_<version>.exe—Lite update version.
Check with Genesys Customer Care to verify the correct version to use.
Depending on the type of update required, upload the setup_<version>.exe file or setup_update_<version>.exe file to the Web Server that does not require HTTP authorization. For example, http://<IP Address>/src/setup_update_<version>.exe.
Configuring Genesys Framework to Push a New Version to the Agent's Desktop
- Update the Web Services Cluster application object in the configuration database. On the Annex tab, edit the [screen-recording-client] section and add the parameters.[+] Show the table that describes the parameters.
- Restart the client machines to push the new version of the Screen Recording Client to the machines.
Advanced Configuration for the Screen Recording Client
The Screen Recording Clients running on all desktops can be configured centrally.
- If your server uses a self-signed certificate, set the certificate parameter to the path on the file system where the pem file is stored.
- Edit the local config.json file on the Screen Recording Client machine, and add the client parameters. [+] Show the table describing the parameters.
- In the most basic configuration, you will not need to add the following parameters since they are all optional. However, if you do intend to use any of the server parameters, use Genesys Administrator Extension, and following the next steps:
- At Environment level, locate the Web Services Cluster application object that was created during the Web Services installation.
- Edit the application object, and create a new section named screen-recording-client. The following figure provides an example of the screen-recording-client section.
file:SRC_config.png
[+] Show the table describing the parameters that can be added to this section.
Enable Screen Recording
ImportantBefore you can start to capture and playback the screen recordings, you must make sure that you have configured the Web Services components, and encryption specifically for screen recording.To set up recording conditions, add the recordingWhen parameter to the [screen-recording-client] section of the Web Services Cluster object.
When this parameter is set in the Web Services Cluster object, the recording condition applies to all agents in the environment. You can create the recordingWhen parameter in a [screen-recording-client] section of each agent object to override the settings at the environment level.
The parameter value is an expression of conditions to enable screen recording for each agent. The format is:
- For Non-voice agents: recordingWhen = condition1,condition2,... where condition1,condition2, etc. are a set of conditions that must all be true in order for the screen recording to be taking place.
- For Voice agents: Screen recording starts when the voice recording starts except in cases where recordingWhen is explicitly set to off.
Integrating with Workspace Web Edition
If your agents use Workspace Web Edition as their desktop, screen recording must be set up as follows to support single sign on:
Using Genesys Administrator Extension, add the following parameters to the interaction-workspace section of the Web Services Cluster object.
ImportantIf you are working with HTTP, the Screen Recording Service default port number is 8080. If you are working with HTTPS, the default port number is 443. In addition, verify that the Workspace Web Edition configuration is set to 8080 or 443.Parameter Name Mandatory Description Default Value privilege.screen-recording.can-use Y Specifies whether agents can use screen recording. If set to true, the integration module is loaded and sends credentials to the client. false screen-recording.client.address N Specified the IP address that the Screen Recording Client listens for credentials on. Valid values: 127.0.0.1, [::1] 127.0.0.1 screen-recording.client.port N Specifies the port that the Screen Recording Client listens for credentials on. 8080 screen-recording.client.ping-interval N Specifies the interval, in milliseconds, between ping requests to the Screen Recording Client. 5 screen-recording.client.max-attempts N Specifies the maximum number of attempts to establish communication with the Screen Recording Client. 5 screen-recording.client.server-url N Defines the GWS server address that the Screen Recording Client will use for communication.
Integrating with Workspace Desktop Edition
If your agents use Workspace Desktop Edition as their desktop, screen recording must be set up as according to the instructions in the Workspace Desktop Edition Deployment Guide.
Enable Screen Recording for a Contact Center
To enable the screen recording feature for given Contact Center:
Using the ops account:
POST http://<Web Services-host-prefix>/api/v2/ops/contact-centers/<ccid>/features
{ "uris": ["/api/api-voice-screenrecording","/api/api-multimedia-screenrecording"] }


