Contents
Installing and Configuring Agent Desktop in Microsoft USD
Before you install the adapter, contact Genesys to obtain the link to the installation package.
Start
- Download the required USD configuration export from your GWS install by navigating to http(s)://<GWS_HOST>:<GWS_PORT>/ui/crm-workspace/artifacts/microsoft.zip.
- Import the configuration into USD using the USD migration tool. See https://technet.microsoft.com/en-us/library/dn646866.aspx for more details.
- Open Microsoft USD.
- Select Settings > Unified Service Desk > Action Calls > Navigate to Genesys Workspace .
- In the Data field, update the <WORKSPACE URL> template with the URL to your workspace, for example: url=http://esx15-ip20-214.gws.genesys.com:8090/ui/crm-workspace/index.html?crm=usd
End
- To prevent usability issues for your users, ensure that the panel that will house the adapter has a minimum recommended size of 500 x 600. Issues occur when the panel is smaller than the adapter. If you have a custom panel layout, change the main panel to meet this specification. If you use the default panel layout on low resolution, you might have to create a custom panel layout. See your Microsoft USD documentation for information on custom panel layout.
- Microsoft USD displays a COM error or silently blocks the adapter if security isn't configured correctly. To avoid this issue, add the adapter to your web browser's trusted sites. For instructions on how you add trusted sites, see your web browser documentation.
- For screen pops to match with phone numbers, the screenpop.include-ani-in-search configuration option must be set to true. To enable screen pops to match with other options, you must manually modify the FetchXML file.
Configuring the FetchXML file
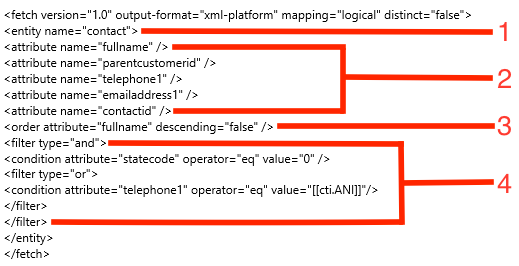
Microsoft USD uses the FetchXML for the screen pop feature in the adapter.
The FetchXML file consists of four main parts:
- Entity type: Set the entity type to contact.
- Attributes: The list of attributes that the query returns. The required attributes for screen pop are listed by default. If your contact entity is customized in your organization, you might need to change the attributes to match the entity names in your organization's metadata.
- Order: This tag specifies in what order USD gets the results for the query. Currently, the order is alphabetical, using the first name as the order key. Note that multiple match screen popping don't use the Order tag.
- Query Conditions and Filters: This section defines what instances of the entity the FetchXML actually matches against. We recommend that you edit this section to allow matches against attributes other than ANI. For more information see, Query conditions and Query filters
Query conditions
A query condition tag has three main attributes:
- Attribute: The Attribute attribute determines what entity attribute to match against for the given entity type. To identify attributes in your Dynamics instance in the following locations:
- Metadata Browser in the Dynamics SDK
- EntityMetadata.xlsx in the Dynamics SDK to to see the default attributes
- Operator: The default operator is '"eq"'. With this operator, the query string must be equal to the value in the Value attribute. For a list of other operators, see the FetchXML schema.
- Value: The value the Operator tag uses to match against. You can hard-code values into this section or use a variable. Use the following syntax when typing a variable: [[cti.<variable name>]+].
Query filters
A filter tag has one attribute, type. There are two filter types: '"and"' and '"or"'. The '"and"' filter matches if all filters or conditions inside the filter match. The "or" filter matches if any of the conditions or filters inside the filter match.
Fetch XML example
In this example, if the user data includes cti_firstname and cti_lastname, the following FetchXML would match a contact if the contact is active, has the same last name as the call's attached data, and either the same phone number or same first name as the call.
<fetch version="1.0" output-format="xml-platform" mapping="logical" distinct="false">
<entity name="contact">
<attribute name="fullname" />
<attribute name="parentcustomerid" />
<attribute name="telephone1" />
<attribute name="emailaddress1" />
<attribute name="contactid" />
<order attribute="fullname" descending="false" />
<filter type="and">
  <condition attribute="statecode" operator="eq" value="0" />
  <filter type="or">
    <condition attribute="firstname" operator="eq" value="[[cti.cti_firstname]+]"/>
    <condition attribute="telephone1" operator="eq" value="[https://en.docs.genesys.com/Documentation/HTCC/8.5.2/Dep/cti.ANI cti.ANI]"/>
  </filter>
  <condition attribute="lastname" operator="eq" value="[[cti.cti_lastname]+]"/>
</filter>
</entity>
</fetch>
